Bold BI Installation and Deployment on Ubuntu
Deployment prerequisites
-
You must have access to a Linux server with a standard user account that has sudo privileges.
-
Install Nginx by running the following commands:
sudo apt-get update sudo apt-get install nginx -
Install zip by running the following command:
sudo apt-get install zip -
Install the
GDIPluspackage using the following command:sudo apt-get install libgdiplus -
Install the
pvtool by running the following command:sudo apt-get install pv -
If you want to install the ETL application with Bold BI, follow these steps. Otherwise, skip this step and proceed with step 7.
-
Install the
python 3.9orlaterby executing the following command:Ubuntu Version:22.04 :
sudo apt-get install -y python3 -
Install pip dependency packages for ETL service by running the following command:
sudo apt-get install python3-pip && sudo pip install duckdb===1.1.2 dlt===0.5.4 pymysql sqlalchemy pyodbc pg8000 poetry pandas===2.2.2 pymongo "dlt[parquet]" "dlt[filesystem]"
-
-
If it does not exist, add an
openssl confpath to the environment by running the following command:export OPENSSL_CONF=/etc/ssl/
Configuring the Bold BI application
-
Please register and download the Bold BI Linux package.
-
Download the Bold BI Linux package by running the following command:
sudo wget {Bold BI Linux package link} -
Extract the zip file by running the following command:
sudo unzip {Bold BI Linux package zip file} -
Change the directory to
BoldBIServer-Linuxby running the following command:cd BoldBIServer-Linux -
Execute the following command to deploy Bold BI on your Linux machine based on the type of host URL you are using for deployment:
If you are using http host URL:
sudo bash install-boldbi.sh -i {new} -u {user} -h {host URL} -n {true or false}If you are using https host URL:
sudo bash install-boldbi.sh -i {new} -u {user} -h {host URL} -n {true or false} --ssl-cert {ssl certificate path} --ssl-key {ssl key path}IMPORTANT: If you are using https host URL, then it is mandatory to give paths for SSL certificate and key in —ssl-cert and —ssl-key. If paths are not given or if the given path does not exist, then the installation will be stopped.
-
i : Installation type - Specify whether it is a new or upgrade installation.
-
u : Specify the user or group that manages the service. Make sure this user exists on your Linux server.
-
h : Domain or IP address of the machine with HTTP protocol.
-
n : Setting this to “true” will automatically configure Bold BI with Nginx front-end server.
IMPORTANT: If there are any existing applications running on the Linux machine using Nginx, set the “-n” value to false and configure Nginx manually.
-
ssl-cert : Specify the path in which the SSL certificate is present.
-
ssl-key : Specify the path in which the SSL key is present.
Example for new installation with http host URL:
sudo bash install-boldbi.sh -i new -u www-data -h http://linux.example.com -n trueExample for new installation with https host URL:
sudo bash install-boldbi.sh -i new -u www-data -h https://linux.example.com -n true --ssl-cert /etc/ssl/domain.crt --ssl-key /etc/ssl/domain.key
NOTE: You can also configure Bold BI with Apache server on Ubuntu.
Once the installation is completed, open the host URL in your browser and proceed with the application startup.
IMPORTANT: If you have deployed Bold BI application using HTTP domain and now want to change the domain as HTTPS, then follow the steps to Manually configure SSL.
Manually Configure Nginx
To configure Nginx as a reverse proxy to forward requests to the Bold BI app, modify the file /etc/nginx/sites-available/default file.
- Open it in a text editor and add the following code.
#server {
#listen 80;
#server_name example.com;
#return 301 https://example.com$request_uri;
#}

server {
		listen       80 default_server;
		listen       [::]:80 default_server;

		#server_name   example.com;

		#listen 443 ssl;
		#ssl_certificate /path/to/certificate/file/domain.crt;
		#ssl_certificate_key /path/to/key/file/domain.key;

		proxy_buffer_size   128k;
		proxy_buffers   4 256k;
		proxy_busy_buffers_size   256k;
		large_client_header_buffers 4 16k;
		proxy_read_timeout 300;
		proxy_connect_timeout 300;
		proxy_send_timeout 300;
		send_timeout 300;
		client_max_body_size 200M;

	location / {
        root               /var/www/bold-services/application/idp/web/wwwroot;
        proxy_pass         http://localhost:6500/;
        proxy_http_version 1.1;
        proxy_set_header   Upgrade $http_upgrade;
        proxy_set_header   Connection keep-alive;
        proxy_set_header   Host $http_host;
        proxy_cache_bypass $http_upgrade;
        proxy_set_header   X-Forwarded-For $proxy_add_x_forwarded_for;
        proxy_set_header   X-Forwarded-Proto $scheme;
		fastcgi_buffers    16 16k;
		fastcgi_buffer_size 32k;
    }
	location /api {
        proxy_pass         http://localhost:6501/api;
        proxy_http_version 1.1;
        proxy_set_header   Upgrade $http_upgrade;
        proxy_set_header   Connection keep-alive;
        proxy_set_header   Host $http_host;
		proxy_cache_bypass $http_upgrade;
        proxy_set_header   X-Forwarded-For $proxy_add_x_forwarded_for;
        proxy_set_header   X-Forwarded-Proto $scheme;
    }
	location /ums {
        root               /var/www/bold-services/application/idp/ums/wwwroot;
        proxy_pass         http://localhost:6502/ums;
        proxy_http_version 1.1;
        proxy_set_header   Upgrade $http_upgrade;
        proxy_set_header   Connection keep-alive;
        proxy_set_header   Host $http_host;
        proxy_cache_bypass $http_upgrade;
        proxy_set_header   X-Forwarded-For $proxy_add_x_forwarded_for;
        proxy_set_header   X-Forwarded-Proto $scheme;
    }
	# Start of bi locations
	location /bi {
		root               /var/www/bold-services/application/bi/web/wwwroot;
        proxy_pass         http://localhost:6504/bi;
        proxy_http_version 1.1;
        proxy_set_header   Upgrade $http_upgrade;
        proxy_set_header   Connection keep-alive;
        proxy_set_header   Host $http_host;
        proxy_cache_bypass $http_upgrade;
        proxy_set_header   X-Forwarded-For $proxy_add_x_forwarded_for;
        proxy_set_header   X-Forwarded-Proto $scheme;
    }
	location /bi/api {
        proxy_pass         http://localhost:6505/bi/api;
        proxy_http_version 1.1;
        proxy_set_header   Upgrade $http_upgrade;
        proxy_set_header   Connection keep-alive;
        proxy_set_header   Host $http_host;
        proxy_cache_bypass $http_upgrade;
        proxy_set_header   X-Forwarded-For $proxy_add_x_forwarded_for;
        proxy_set_header   X-Forwarded-Proto $scheme;
    }
	location /bi/jobs {
        proxy_pass         http://localhost:6506/bi/jobs;
		proxy_http_version 1.1;
        proxy_set_header   Upgrade $http_upgrade;
        proxy_set_header   Connection keep-alive;
        proxy_set_header   Host $http_host;
        proxy_cache_bypass $http_upgrade;
        proxy_set_header   X-Forwarded-For $proxy_add_x_forwarded_for;
        proxy_set_header   X-Forwarded-Proto $scheme;
    }
	location /bi/designer {
        root               /var/www/bold-services/application/bi/designer/wwwroot;
        proxy_pass         http://localhost:6507;
        proxy_http_version 1.1;
        proxy_set_header   Upgrade $http_upgrade;
        proxy_set_header   Connection keep-alive;
        proxy_set_header   Host $http_host;
        proxy_cache_bypass $http_upgrade;
        proxy_set_header   X-Forwarded-For $proxy_add_x_forwarded_for;
        proxy_set_header   X-Forwarded-Proto $scheme;
    }
	location /bi/designer/helper {
        proxy_pass http://localhost:6507/bi/designer/helper;
        proxy_http_version 1.1;
        proxy_set_header Upgrade $http_upgrade;
        proxy_set_header Connection "upgrade";
        proxy_set_header Host $http_host;
        proxy_cache_bypass $http_upgrade;
        proxy_set_header   X-Forwarded-For $proxy_add_x_forwarded_for;
        proxy_set_header   X-Forwarded-Proto $scheme;
    }
    location /aiservice {
        proxy_pass http://localhost:6510/aiservice;
        proxy_http_version 1.1;
        proxy_set_header Upgrade $http_upgrade;
        proxy_set_header Connection "upgrade";
        proxy_set_header Host $http_host;
        proxy_cache_bypass $http_upgrade;
        proxy_set_header   X-Forwarded-For $proxy_add_x_forwarded_for;
        proxy_set_header   X-Forwarded-Proto $scheme;
    }
	# End of bi locations
}- If you need to configure the
Bold Data Hubalong with the Bold BI, you need to add the below syntax to thedefaultfile after aiservice block.
    location /etlservice/ {
	    root               /var/www/bold-services/application/etl/etlservice/wwwroot;
	    proxy_pass http://localhost:6509/;
	    proxy_http_version 1.1;
	    proxy_set_header   Upgrade \$http_upgrade;
	    proxy_set_header   Connection "upgrade";
	    proxy_set_header   Host \$http_host;
	    proxy_cache_bypass \$http_upgrade;
	    proxy_set_header   X-Forwarded-For \$proxy_add_x_forwarded_for;
	    proxy_set_header   X-Forwarded-Proto \$scheme;
    }
    location /etlservice/_framework/blazor.server.js {
	    root               /var/www/bold-services/application/etl/etlservice/wwwroot;
	    proxy_pass http://localhost:6509/_framework/blazor.server.js;
	    proxy_http_version 1.1;
	    proxy_set_header   Upgrade \$http_upgrade;
	    proxy_set_header   Connection "upgrade";
	    proxy_set_header   Host \$http_host;
	    proxy_cache_bypass \$http_upgrade;
	    proxy_set_header   X-Forwarded-For \$proxy_add_x_forwarded_for;
	    proxy_set_header   X-Forwarded-Proto \$scheme;
    }
Once the Nginx configuration is set up, run the command sudo nginx -t to verify the syntax of the configuration files. If the configuration file test is successful, force Nginx to pick up the changes by running sudo nginx -s reload.
Configure SSL
Follow the below steps only in either of the two cases:
- If you have set the “-n” value to false along with HTTPS domain and manually configured Nginx during initial deployment.
- If you have deployed Bold BI application using HTTP domain and now want to change the domain as HTTPS.
Otherwise, you can skip this section.
Steps to follow for SSL configuration:
-
Navigate to the directory
/etc/nginx/sites-available/and open the fileboldbi-nginx-configin a text editor. -
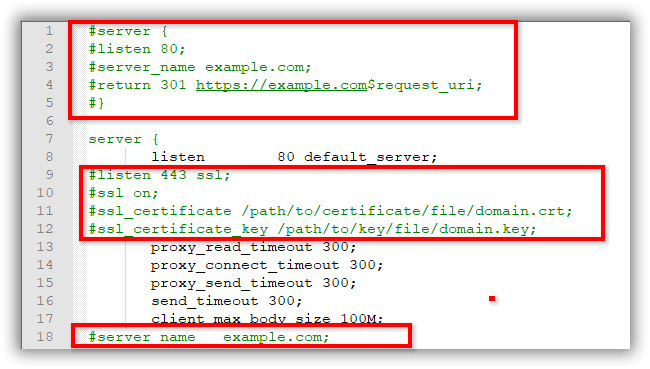
Uncomment the marked lines in the Nginx config file.
-
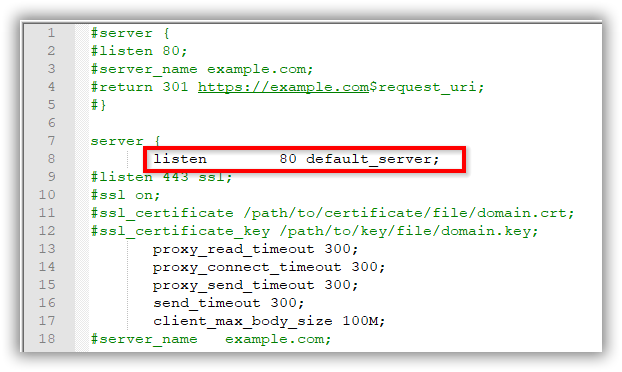
Comment the marked line in the Nginx config file.
-
Replace
example.comwith your domain name. -
Define the path of the SSL certificate:
ssl_certificate /etc/ssl/domain.crt. -
Specify the directory where the SSL certificate key is located:
ssl_certificate_key /etc/ssl/domain.key. -
Save the changes and run
sudo nginx -tto verify the syntax of the configuration file. If the configuration file test is successful, force Nginx to pick up the changes by runningsudo nginx -s reload. -
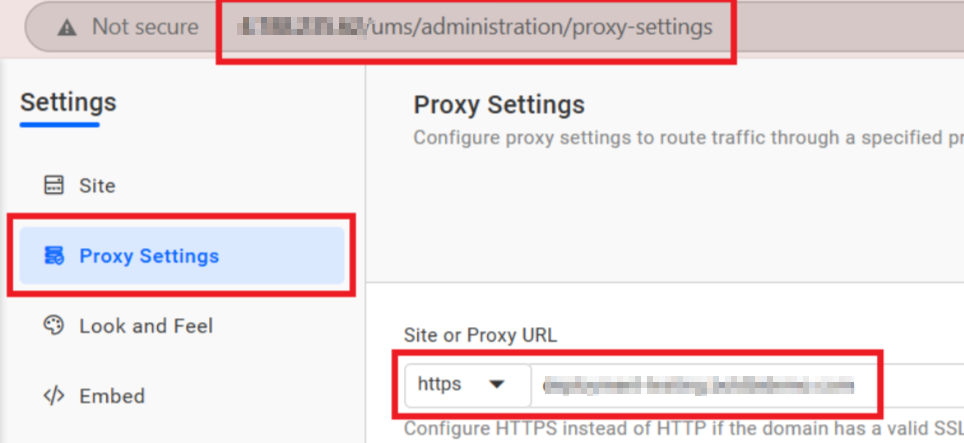
Navigate to the proxy settings page of the UMS application ({domain_name}/ums/administration/proxy-settings) and update the Site URL as shown in the following image with new domain.
-
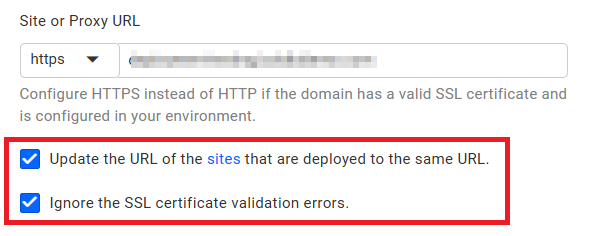
You can ignore SSL certificate errors by checking the checkbox for ignoring the SSL certificate errors.
-
Check the checkbox for update the URL as shown in the below image and save the proxy settings by clicking on Save button.
-
You can now use the new HTTPS domain to access the site in the browsers.