Bold BI Installation and Deployment on CentOS
Deployment prerequisites
-
Install Nginx.
-
Install the
GDIPluspackage using the following command:sudo yum install libgdiplus -
Add an
openssl confpath in the environment, if does not exist:export OPENSSL_CONF=/etc/ssl/
Configuring the Bold BI application
-
Register and download the Bold BI Linux package from this link.
-
Update the highlighted URLs in the
product.jsonfile, located in{extracted location}/boldbi/app_data/configuration/.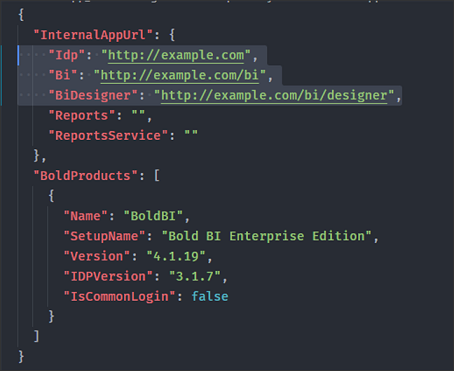
Application Url Idp https://{Domain or IP address of the machine}Bi https://{Domain or IP address of the machine}/biBiDesigner https://{Domain or IP address of the machine}/bi/designer -
Create a
boldbi-embeddedfolder in the Linux Server inside the/var/www/directory and place the extracted files.NOTE: Please create the
/var/wwwfolder, if doesn’t exist. -
Provide executable permission to dotnet file, located in
/var/www/boldbi-embedded/dotnet/:sudo chmod +x /var/www/boldbi-embedded/dotnet/dotnet -
Once the libraries are installed, please make the following changes in all service files.
a. Update the user account that manages the service.
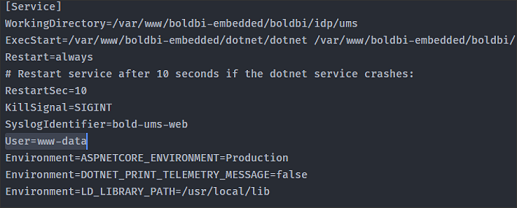
b. Add the following line:
Environment=LD_LIBRARY_PATH=/usr/local/lib.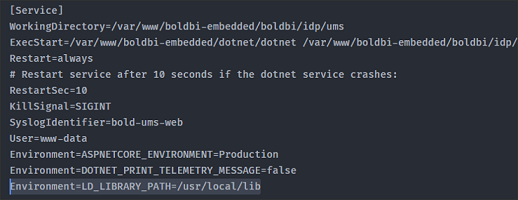
-
Change the ownership of all directories to user or group:
sudo chown -R {{username or group}} /var/www/boldbi-embedded/ -
Copy the service files to the
/etc/systemd/systemfolder. -
Enable all the services by running the following commands:
sudo systemctl enable bold-id-web sudo systemctl enable bold-id-api sudo systemctl enable bold-ums-web sudo systemctl enable bold-bi-web sudo systemctl enable bold-bi-api sudo systemctl enable bold-bi-jobs sudo systemctl enable bold-bi-designer -
Start all the services by running the following commands:
sudo systemctl start bold-id-web sudo systemctl start bold-id-api sudo systemctl start bold-ums-web sudo systemctl start bold-bi-web sudo systemctl start bold-bi-api sudo systemctl start bold-bi-jobs sudo systemctl start bold-bi-designer -
Run the following commands to check the status of the services:
sudo systemctl status bold-id-web
sudo systemctl status bold-id-api
sudo systemctl status bold-ums-web
sudo systemctl status bold-bi-web
sudo systemctl status bold-bi-api
sudo systemctl status bold-bi-jobs
sudo systemctl status bold-bi-designer
Configure Nginx
-
To configure Nginx as a reverse proxy to forward requests to the Bold BI app, copy the Nginx configuration file from the
{extracted location}/boldbi-nginx-config to /etc/nginx/conf.dfolder. -
Rename the Nginx configuration file to
boldbi-nginx-config.conf. -
Once the Nginx configuration is established, run the
sudo nginx -tto verify the syntax of the configuration files. -
If the configuration file test is successful, force the Nginx to pick up the changes by running the
sudo nginx -s reload. -
If this is the first site you are configuring in the server, then please run the following command to allow
httpdto make connections to modules.sudo setsebool -P httpd_can_network_connect 1
Next steps
Having trouble getting help?
Contact SupportHaving trouble getting help?
Contact Support