Secure Dashboard Embedding via Backend Authorization
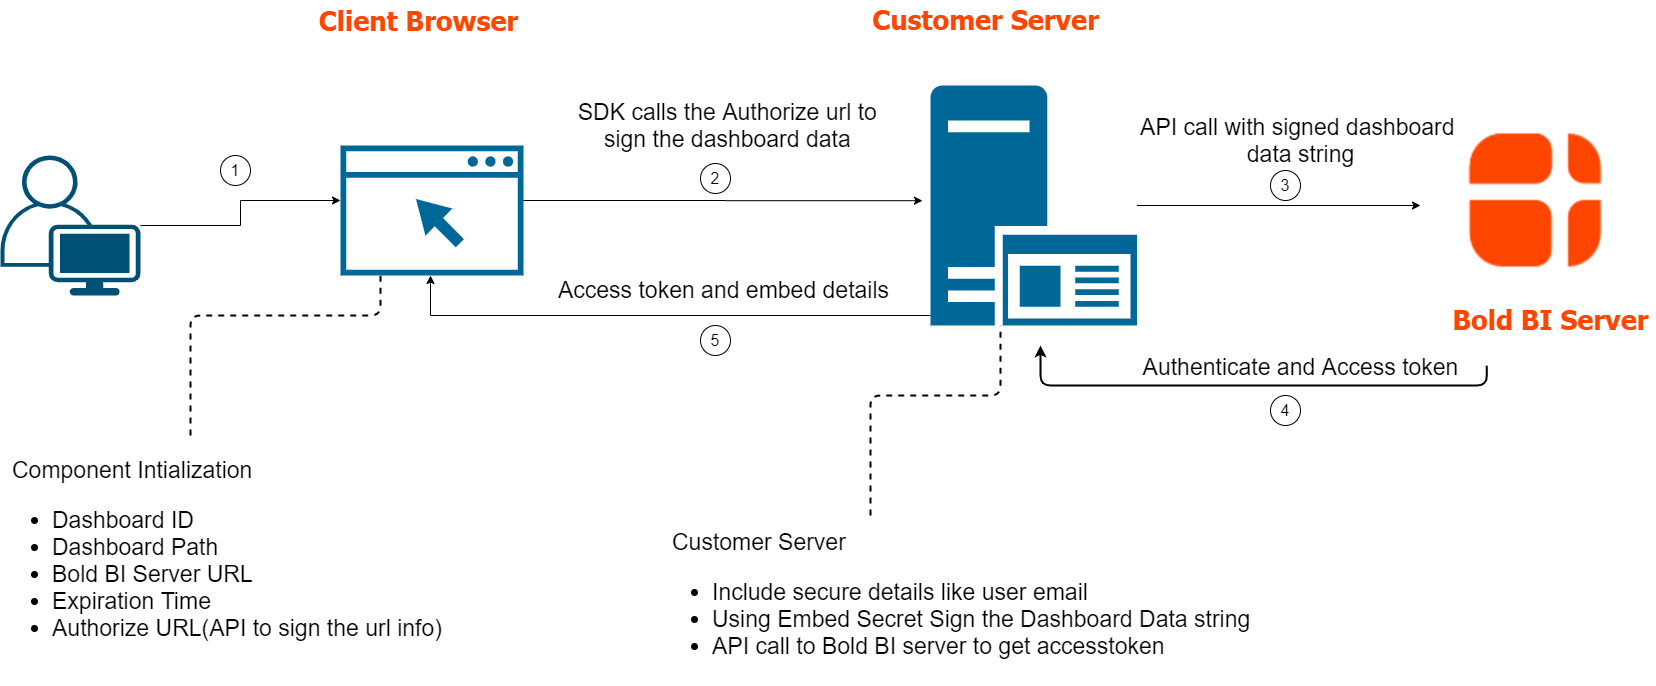
When embedding Bold BI dashboards using the Embed SDK, the Authorization URL plays a crucial role in securely fetching the access token and dashboard data. Here’s a step-by-step breakdown of the workflow:
Overview
The Authorization Server is a secure backend service that acts as the bridge between your client application (where the dashboard is embedded) and the Bold BI server. This is done through a backend endpoint in your application — referred to as the AuthorizationServer, configured using the authorizationServer.url member in the Embed SDK. You can refer this link to know more.
Think of it as a bridge:
- The frontend (using BoldBI SDK) sends a request to your backend.
- Your backend (Authorization Server) signs the request and forwards it to Bold BI.
- Bold BI validates the user and dashboard access, then returns an access token.
How it works
-
SDK Sends Request to Authorization Server
- The SDK sends a POST request to the configured
authorizationServer.url. - The request includes dashboard ID, user identity, and site information.
- The SDK sends a POST request to the configured
-
Authorization Server Validates and Prepares Payload
- It validates the request.
- Constructs the payload with user and dashboard details.
-
Authorization Server Sends Request to Bold BI
- The server forwards the payload to Bold BI’s token endpoint.
- Bold BI verifies the signature and user permissions.
-
Bold BI Responds with Token
- If valid, Bold BI returns an access token and dashboard metadata.
- If invalid, it returns an error message.
-
Authorization Server Forwards Response to SDK
- The token and metadata are returned to the client browser.
- The SDK uses this data to render the embedded dashboard.
Example Integration
Here’s how you can configure the Embed SDK with an Authorization URL in your client-side code:
var boldbiEmbedInstance = BoldBI.create({
    serverUrl: "http://localhost:60515/bi/site/site1",
    dashboardId: "c5bab292-0ee6-4ee7-9dfa-d6b3cffed7ff",
    embedContainerId: "dashboard_container",
    authorizationServer: {
        url: "https://your-backend.com/authorize"
    }
});

boldbiEmbedInstance.loadDashboard();
And a basic example of what your Authorization Server endpoint might look like in your backend ASP.NET Core and Node.js application:
Here the embedQuerString received as a JSON object in the HTTP request body from the Embed SDK, and it contains a URL-style query string like below.

The embedClass is a C# class used to convert (deserialize) that JSON into a usable object.
| Parameter | Value |
|---|---|
| dashboardServerApiUrl | http://localhost:60515/bi/api/site/site1 |
| embedQuerString | embed_nonce=3601299f-541b-4cce-b1f2-aacda277134f&embed_dashboard_id=c5bab292-0ee6-4ee7-9dfa-d6b3cffed7ff&embed_dashboard_ids=&embed_dashboard_path=&embed_dashboard_paths=&pinboard_name=&embed_mode=view&embed_timestamp=1756891690&embed_expirationtime=86400 |
- Node.js
- .NET
- PHP
app.post('/authorize', function (req, response) {
  var embedQuerString = req.body.embedQuerString;
  var dashboardServerApiUrl = req.body.dashboardServerApiUrl;

  embedQuerString += "&embed_user_email=" + userEmail;
  embedQuerString += "&embed_server_timestamp=" + Math.round((new Date()).getTime() / 1000);
  var embedSignature = "&embed_signature=" + GetSignatureUrl(embedQuerString);
  var embedDetailsUrl = "/embed/authorize?" + embedQuerString + embedSignature;

  var serverProtocol = url.parse(dashboardServerApiUrl).protocol == 'https:' ? https : http;
  serverProtocol.get(dashboardServerApiUrl + embedDetailsUrl, function(resultContent){
        var str = '';
        resultContent.on('data', function (chunk) {
               str += chunk;
         });
        resultContent.on('end', function () {
             response.send(str);
        });
  });
})

function GetSignatureUrl(queryString)
{
  var keyBytes = Buffer.from(embedSecret);
  var hmac = crypto.createHmac('sha256', keyBytes);
  data = hmac.update(queryString);
  gen_hmac= data.digest().toString('base64');

  return gen_hmac;
}
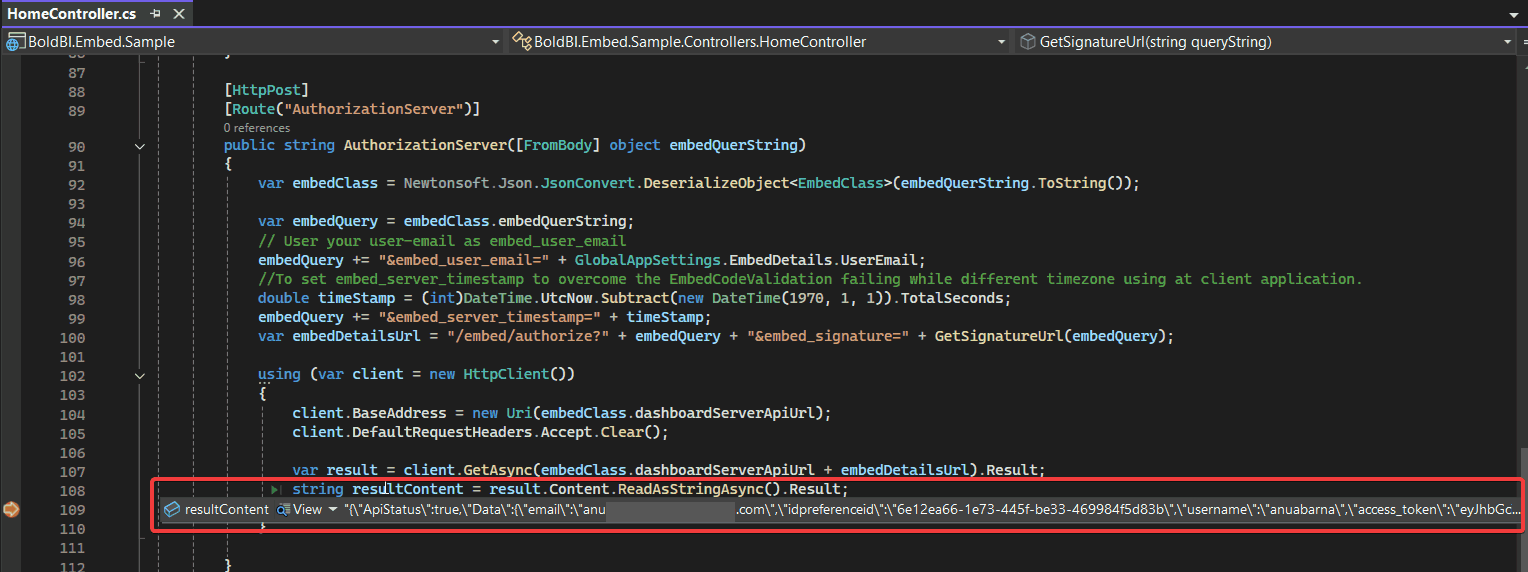
Here, it will return the dashboard details in the resultContent response in the form of a raw JSON string from the Bold BI server if the provided dashboard is valid. Please find the below image of the resultContent.
- JSON
{
  "ApiStatus": true,
  "Data": {
    "email": "[email protected]",
    "username": "testuser",
    "access_token": "eyJhbGciSI6IjE3NTY4OTEwMDYiLCJjdXN0b21fYXR0cmlidXRlIjOiJIUzI1NiIsInR5cCI6IkpXVCJ9.eyJlbWFpbCI6ImFudWFiYXJuYS5iQHN5bmNmdXNpb24uY29tIiwidXBuIjoiYW51YWJhcm5hIiwibmFtZWlkIjoiMSIsInVuaXF1ZV9uYW1lIjoiNmUxMmVhNjYtMWU3My00NDVmLWJlMzMtNDY5OTg0ZjVkODNiIiwiSVAiOiI6OjEiLCJpc3N1ZWRfZGF0Zoie30iLCJuYmYiOjE3NTYMiOiJodHRwOi8vbG9jYWxob3N0OjYwNTE1L2JpL3NpdGUvc2l0ZTEiLCJ4OTEwMDYsImV4cCI6MTc1Njk3NzQwNiwiaWF0IjoxNzU2ODkxMDA2LCJpc3hdWQiOiJodHRwOi8vbG9jYWxob3N0OjYwNTE1L2JpL3NpdGUvc2l0ZTEifQ.O1SqPb4gpcwCnqKHC1LtAdVWvdMnMKzDt8iz3vmIG-o",
    "token_type": "bearer",
    ".expires":"2/12/2026 12:29:05 PM",
    "UserDetail": "{\"DisplayName\":\"Test user B\",\"Email\":\"[email protected]\",\"Username\":\"testuser\",\"FirstName\":\"Test user\"...}",
    "ItemDetail": "{\"CanClone\":false,\"CanCopy\":false,\"CanCreateItem\":false,\"CanDelete\":false,\"CanWrite\":true,\"CategoryDescription\":null,\"CategoryId\":\"3ae74984-a689-4997-88b9-3c4e77f10dda\",\"CategoryName\":\"Getting Started Tutorial\",\"CreatedByDisplayName\":\"Test user B\",\"CreatedById\":1,\"CreatedDate\":\"08/08/2025 11:18 AM\",\"FailureOccurence\":0,\"Description\":\"This supply chain performance dashboard helps to effectively track supply chain KPIs related to the efficiency of sales orders processing.\",\"Id\":\"c5bab292-0ee6-4ee7-9dfa-d6b3cffed7ff\",\"ItemLocation\":\"c5bab292-0ee6-4ee7-9dfa-d6b3cffed7ff/1\",\"Name\":\"Supply Chain Performance Dashboard\"...}"
  },
  "Status": true
}
NOTE: If you’re passing a large payload, use the POST method for the authorization call to avoid URL length limitations. See this KB article for details.