Embed Authentication for the Widget Embedding
This section explains how to embed the Bold BI widget using Authorization Server Authentication.
How to embed Bold BI Widget using Javascript
To embed the widget securely in your application, you can use the JavaScript SDK along with an authorization server. This method ensures that only authenticated users can access and interact with the embedded widget.
-
Include the Bold BI Embed SDK in the
<head>tag of your HTML page. -
Create a
<div>element in the<body>tag with a unique ID to serve as the dashboard container.<head> <script type="text/javascript" src="https://cdn.boldbi.com/embedded-sdk/v14.1.11/boldbi-embed.js"></script> </head> <body> <div id="dashboard_container"></div> </body> -
Define functions in the
<body>to create a Bold BI instance. Use theonloadattribute to initialize the embedding process securely with user-specific access.
Embed a Single Widget Using loadDashboardWidget Method
You can embed a widget in two ways:
-
Using the Widget Name
<body onload="embedSample();"> <div id="dashboard_container"></div> <script> function embedSample() { var boldbiEmbedInstance = BoldBI.create({ serverUrl: "http://localhost:51777/bi/site/site1", dashboardId: "9a4b8ddb-606f-4acd-8c53-8ccdcaa92a87", embedContainerId: "dashboard_container", authorizationServer: { url: "http://example.com/embeddetail/get" } }); boldbiEmbedInstance.loadDashboardWidget("Sales By Country"); // Use widget name } </script> </body> -
Using widget Id
<body onload="embedSample();">
    <div id="embed_container"></div>
    <script>
        function embedSample() {
            var boldbiEmbedInstance = BoldBI.create({
                serverUrl: "http://localhost:51777/bi/site/site1",
                dashboardId: "9a4b8ddb-606f-4acd-8c53-8ccdcaa92a87",
                embedContainerId: "embed_container",
                authorizationServer: {
                    url: "http://example.com/embeddetail/get"
                }
            });
            boldbiEmbedInstance.loadDashboardWidget("efbf2999-f7e7-4831-a492-53c4df394af0"); // Pass widget id as argument to loadDashboardWidget function
        }
    </script>
</body>
Embed Multiple Widgets in a Single Instance Using loadMultipleWidgets Method
-
This method will load multiple widgets of the current dashboard with a single instance call.
        <div id="dashboard"></div>
        <div id="widget1" style="height:500px;width:500px"></div>
        <div id="widget2" style="height:500px;width:500px"></div>
        <div id="widget3" style="height:500px;width:500px"></div>
        var dashboard = BoldBI.create({
            dashboardId: "5cb065f7-dabb-4b0c-9b45-c60a5730e963",
            embedContainerId: "dashboard",
            widgetList: [
                {widgetName: "Medal details by Country", containerId: "widget1" },
                {widgetName: "Total Medals by Country", containerId: "widget2" },
                {widgetName: "Country", containerId: "widget3" }],
            });
        dashboard.loadMultipleWidgets();
Note: For more information on widget members, methods, and events, refer to this link.
Supported Authentication
- Authorization Server Url
- API Key - supports embedding with Widget ID
How to get widget ID
-
We have a REST API for retrieving all the widgets of a specific dashboard, which can be accessed at
https://localhost:[portno]/bi/api/site/site1/v4.0/dashboards/{dashboardId}/widgets. ThedashboardIdparameter specifies the itemId of the desired dashboard.Please find the below code snippet to call the given API,
[HttpGet] [Route("GetDashboardWidgets")] public string GetDashboardWidgets() { var token = GetToken(); using (var client = new HttpClient()) { client.BaseAddress = new Uri(EmbedProperties.RootUrl); client.DefaultRequestHeaders.Accept.Clear(); client.DefaultRequestHeaders.Add("Authorization", token.TokenType + " " + token.AccessToken); var result = client.GetAsync("https://localhost:51777/bi/api/site/site1/v4.0/dashboards/b646b8a1-a4c6-4dee-9877-f9559c82f7fa/widgets").Result; string resultContent = result.Content.ReadAsStringAsync().Result; return resultContent; } } -
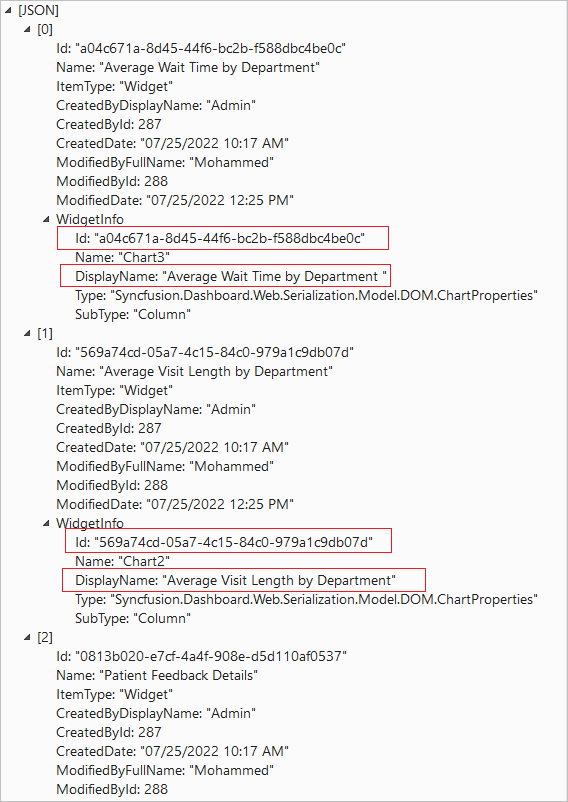
By utilizing the JSON result, you can obtain a collection of widgets that are available in the dashboard, displaying the widget ID and widget name as depicted below.