Embed the dashboard in an iframe
A dashboard can be embedded in the create, edit, and view modes of any application using a URL. In the create mode, a new dashboard can be created. In the edit mode, an existing dashboard can be edited. In the view mode, users can interact with the dashboard by filtering data, adding comments, and saving the filter views.
Steps to embed dashboard in view mode using URL
NOTE: Please follow a similar procedure to display the multi-tab dashboard in view mode.
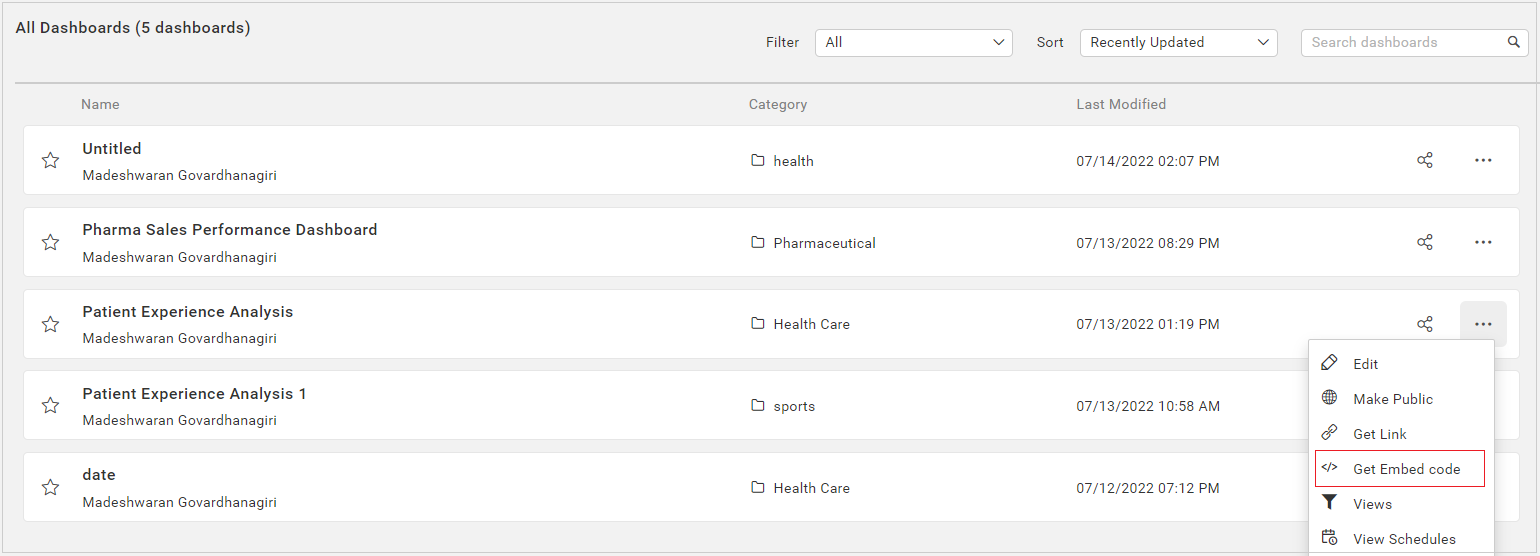
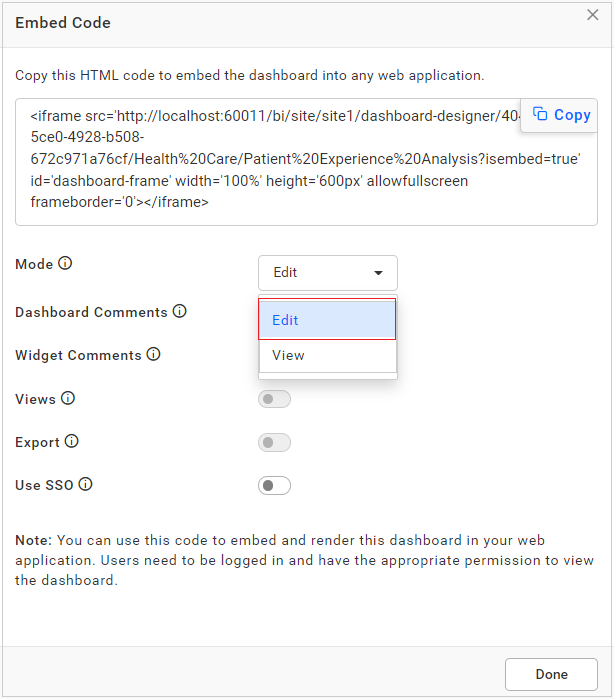
- To obtain the embed URL, click on the context menu of the corresponding dashboard and select the option
Get Embed code.
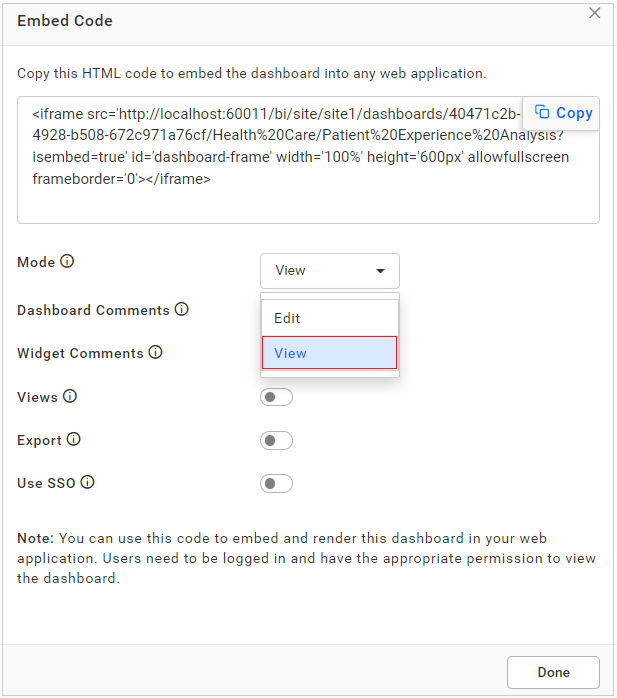
- Choose the mode value as
Viewto render a dashboard in View mode.
-
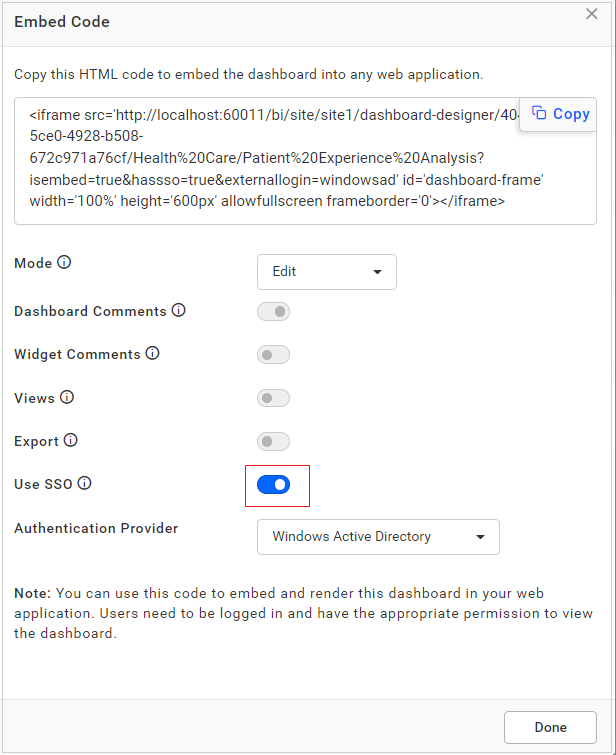
By default, the options for Dashboard Comments, Widget Comments, Saved Views, Export, and SSO are disabled. To enable these options, simply slide the button provided in the embed dialog.
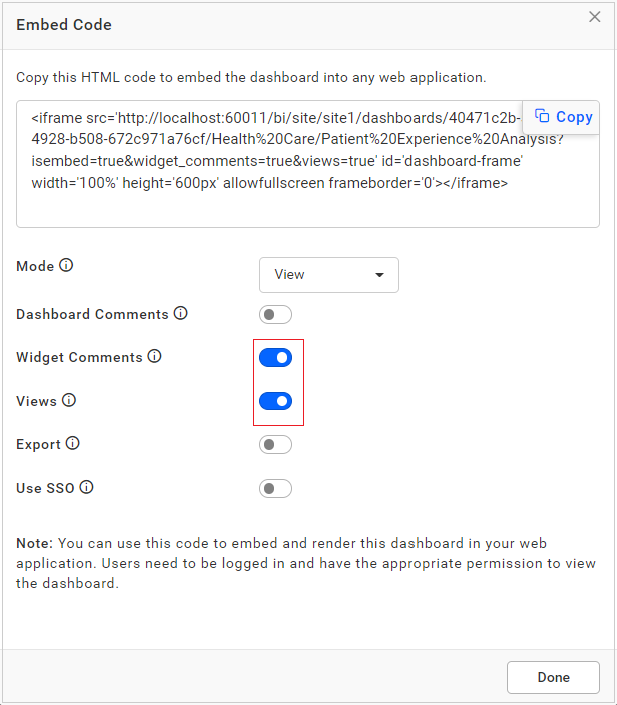
Dashboard Comments Dashboard comment panel would be shown in embedded view if enabled this parameter. Widget Comments Widget comment panel would be shown in embedded view if enabled this parameter. Saved Views Dashboard views panel would be shown in embedded view if enabled this parameter. Export Dashboard/Widget exporting options would be shown in embedded view if enabled this parameter. SSO Single Sign-On authentication is enabled for embedded view if configured authentication is selected as an authentication parameter. -
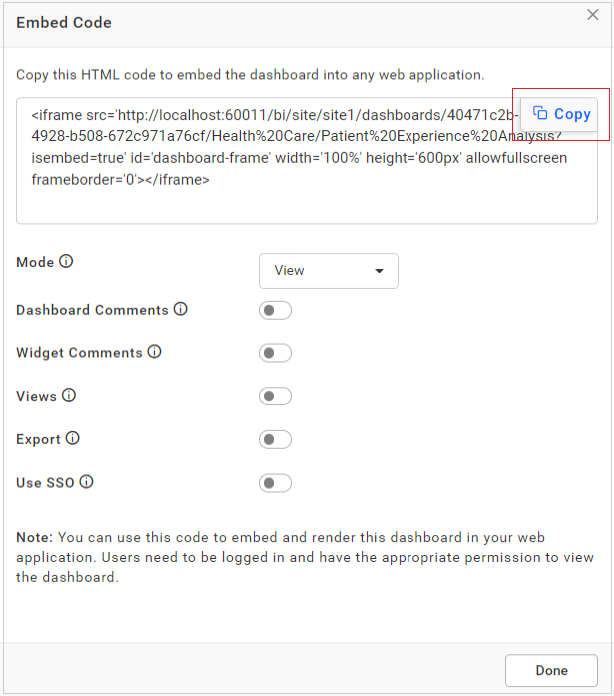
Please copy the embed URL by clicking the copy icon in the Embed Code dialog.
-
Please embed the copied URL into other web applications.
-
When the web application is run, it will display either the login window or the dashboard, depending on the type of dashboard. Once you click on “login” and successfully log in with valid user credentials, the dashboard will automatically load. To bypass the login process, use token based authentication.

NOTE: Please note that if SSO enabled parameters are used, a login prompt will appear if you have not logged in and selected SSO authentication. However, if you have already logged in, the dashboard will be rendered based on the user’s permission granted for that specific dashboard.
Public embedding
If you wish to embed the dashboard without requiring user authentication, you should first make the dashboard public and then proceed to embed it. By making it public, it will automatically be rendered without the need for credentials. However, it is important to note that you cannot enable the comments panel when embedding a public dashboard.
NOTE: Embedding the public dashboard will not work when the public dashboard setting is disabled. Learn more about the Dashboard Settings.
Private embedding
Private dashboards can be embedded and are accessible to users in Bold BI who have read permission. These dashboards would require users to log in to the Bold BI server before rendering. Therefore, whenever private dashboards are embedded and the user is not yet authenticated, the embedded dashboard will display the login page.
NOTE: By default, the dashboard access mode will be set to private until the owner of the dashboard changes it to public.
Advanced security
You can control which websites, IP addresses, and applications can embed the dashboard by using the dashboard security option. Find more information about the Advanced Dashboard Security.
NOTE: Please learn more details about Dashboard Embedding Sample.
Available parameter
| Name | Type | In Dashboards | In Widgets |
|---|---|---|---|
dashboard_comments |
boolean |
Show/hide dashboard comments | NA |
widget_comments |
boolean |
NA | Show/hide widget comments |
embed_dashboard_views_edit |
boolean |
Enable/Disable the Save and Save As view option in the filter overview dropdown. | NA |
embed_dashboard_favorite |
boolean |
Enable/Disable the favorite icon in the dashboard toolbar. | NA |
views |
boolean |
Show/hide dashboard views | NA |
export |
boolean |
Show/hide dashboard export option | Show/hide widget export option |
hide_dashboard_edit |
boolean |
Show/hide the dashboard edit icon. By default the icon will be shown only if user has the permission to edit the specific dashboard otherwise it doesn't shown. | NA |
hide_header |
boolean |
Show/hide dashboard header | NA |
hide_tool |
string |
Show/hide the dashboard options with Predefined values: tm-Theme, dp-Dashboard Parameter, fo-Filter Overview, fs-FullScreen, rf-Refresh, om-Option Menu Example:&hide_tool=tm,fo,fs,dp,rf,om |
NA |
hide_widget_tool |
string |
NA | Show/hide the widget options with Predefined values: fr-Filter, fs-FullScreen, om-Option Menu Example:&hide_widget_tool=fr,fs,om |
hassso |
boolean |
Enable/Disable SSO Authentication | Enable/Disable SSO Authentication |
externallogin |
string |
Predefined values: windowsad, azuread, oauth, openid |
Predefined values: windowsad, azuread, oauth, openid |
embed_theme |
string |
Dashboard theme(custom) which will be applied for entire dashboard. | Dashboard theme(custom) which will be applied for all widgets. |
embed_datasource_filter |
object |
The embedded dashboard can be filtered with passed Dashboard Parameter and URL Parameter.
Example:
&embed_datasource_filter=&&dashboardparametername=parametervalue&urlparametername=parametervalue. |
The embedded dashboard can be filtered with passed Dashboard Parameter and URL Parameter.
Example:
&embed_datasource_filter=&&dashboardparametername=parametervalue&urlparametername=parametervalue. |
How to pass the Dashboard Parameter and URL Parameter filters in iFrame URL
In the iFrame URL, you can pass values for separate filters (Dashboard Parameter/URL Parameter) at the same time.
Pass your filters to the embed_datasource_filter parameter in the iFrame URL as like below.
Example for passing Dashboard Parameter in iFrame URL
<iframe src='http://test.boldbi.com/bi/en-us/site/site1/dashboards/8428c9d9-85db-418c-b877-ea4495dcddd7/Predictive%20Analytics/Personal%20Expense%20Analysis?isembed=true&embed_datasource_filter=&&dashboardparametername=parametervalue' id='dashboard-frame' width='100%' height='600px' allowfullscreen frameborder='0'></iframe>Example for passing URL Parameter in iFrame URL
<iframe src='http://test.boldbi.com/bi/en-us/site/site1/dashboards/8428c9d9-85db-418c-b877-ea4495dcddd7/Predictive%20Analytics/Personal%20Expense%20Analysis?isembed=true&embed_datasource_filter=&urlparametername=parametervalue' id='dashboard-frame' width='100%' height='600px' allowfullscreen frameborder='0'></iframe>Example for passing both Dashboard and URL Parameters in iFrame URL
<iframe src='http://test.boldbi.com/bi/en-us/site/site1/dashboards/8428c9d9-85db-418c-b877-ea4495dcddd7/Predictive%20Analytics/Personal%20Expense%20Analysis?isembed=true&embed_datasource_filter=&&dashboardparametername=parametervalue&urlparametername=parametervalue' id='dashboard-frame' width='100%' height='600px' allowfullscreen frameborder='0'></iframe>-
In the iframe URL, the dashboard parameter filter must be started with a double ampersand
&&. For more details, Refer to the configuring dashboard parameters. -
In the iframe URL, the URL filter parameter must be started with a single ampersand
&. For more details, please refer to the URL Filter.
How to embed the dashboard in create mode using the URL
- To create a new dashboard, you need to change the embed URL as demonstrated in the image below.
  <html>
  <body>
    <iframe src='http://localhost:51777/bi/site/site1/dashboard-designer?isembed=true' id='dashboard-iframe'width='100%' allowfullscreen frameborder='0'></iframe>
  </html>
</body>-
Please embed the above URL into any web application and change the site identifier and server URL.
-
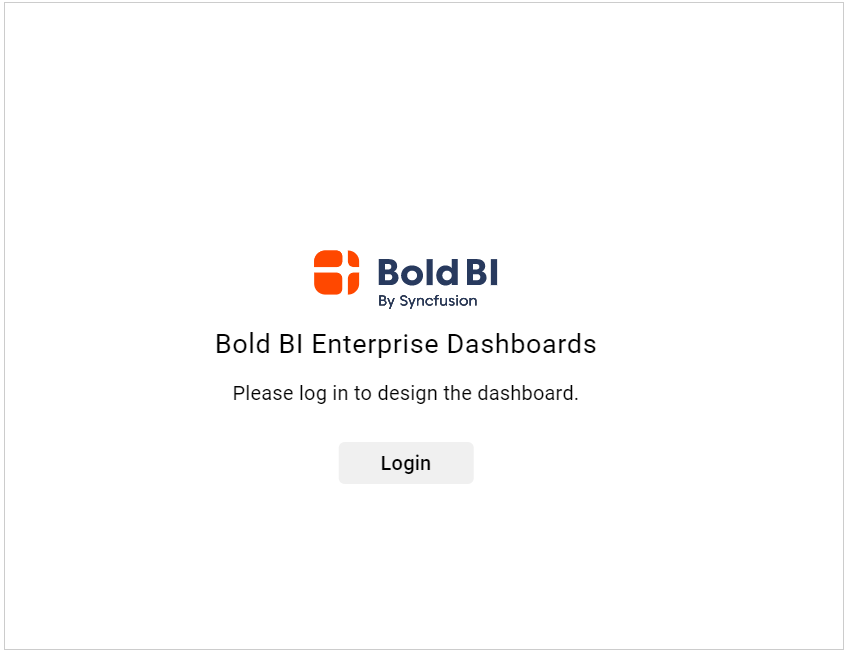
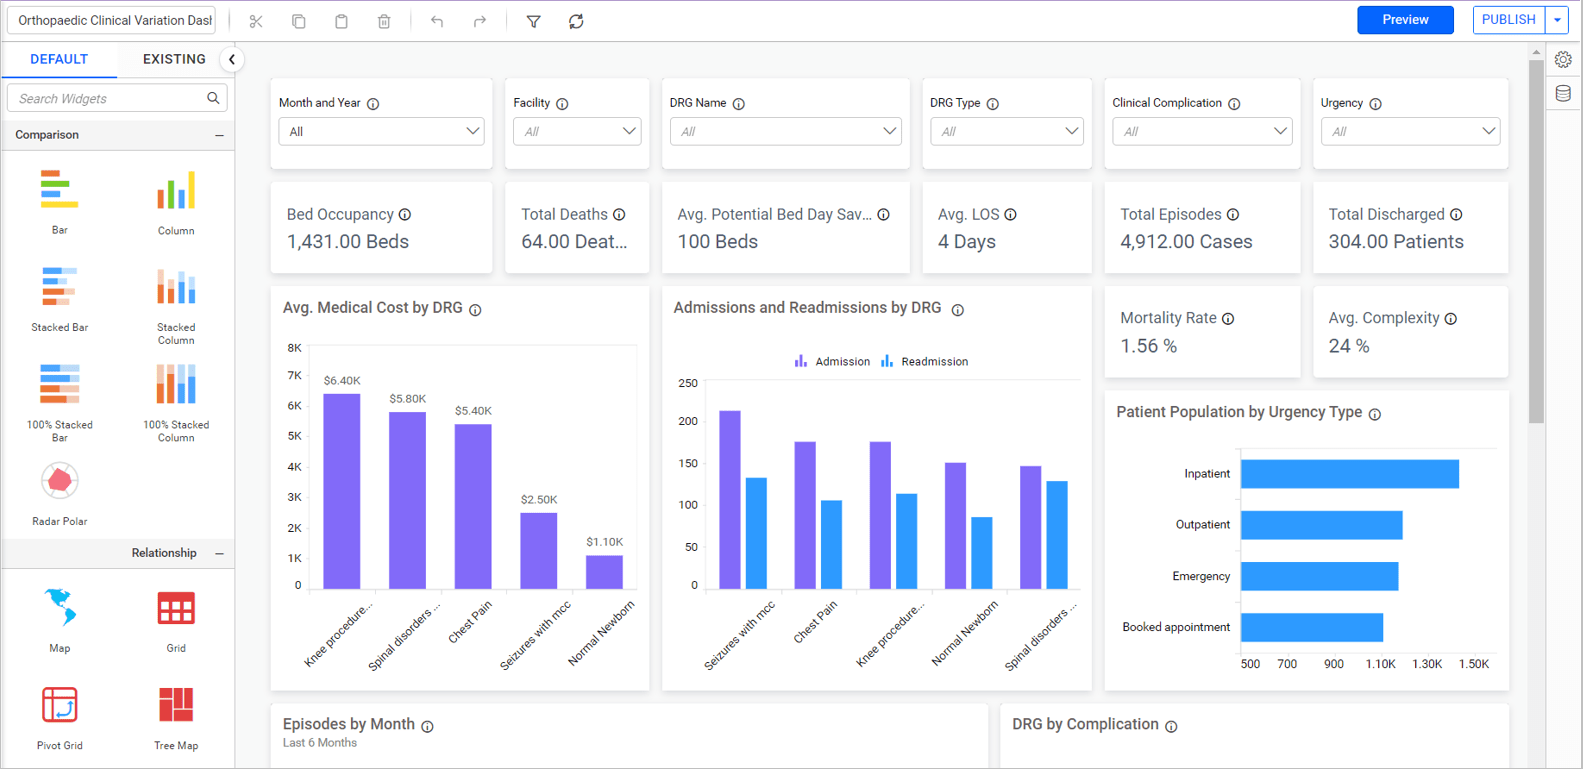
To use the web application, run it. Depending on the type of dashboard, either the login window or the dashboard will be displayed. Click on the login option and enter valid user credentials. After that, the create page will automatically load.
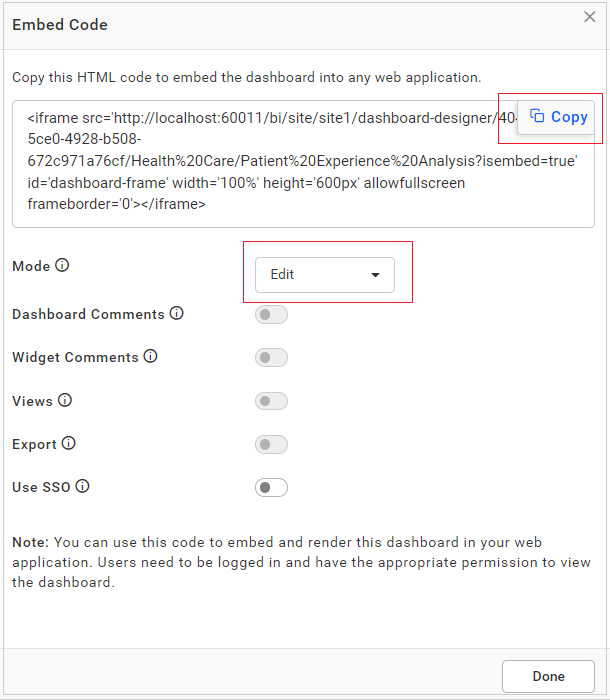
Steps to embed dashboard designer using URL
- To obtain the embed URL, click on the context menu of the dashboard you wish to embed and select the
Get Embed codeoption.

- Select the mode value as
Editfor rendering a dashboard to edit or design.
- The SSO options are disabled by default. To enable this option, slide the button provided in the embed dialog.
| SSO | The Single Sign-On authentication is enabled to support embedding the dashboard designer into other web applications if the configured authentication is selected as an authentication parameter. |
-
Please copy the embed URL by clicking on the copy icon in the embed code dialog.
-
Please embed the copied URL into other web applications.
-
When the web application is run, it will display either the login window or the designer dashboard. Upon clicking the login button and logging in with valid user credentials, the dashboard designer will be rendered automatically.
To avoid login, use the Single Sign-On.
NOTE: To access Single Sign-On, click on the context menu of the corresponding dashboard and select the
Get Embed codeoption. In the Embed Code dialog box, chooseEditas the Mode value. Enable SSO and select one of the following authentication methods:Windows Active Directory,Azure Active Directory,OAuth 2.0andOpenID Connect. This is similar to the Single Sign-On view mode.
Embedding dashboard with filter parameter
You can pass parameters to a dashboard by including them in the dashboard URL when embedding it. By passing parameter values within the URL, filters will be applied to the dashboard upon initial load. For more detailed information, you can learn more here.
Dynamic connection string for dashboard embedding
The Dynamic Connection String feature allows you to change the connection string of data sources in dashboard view mode. This feature is only applicable to embedded dashboards using the Dashboard Embedding feature. Dashboards in the Bold BI application will use the connection string used during data source creation. For more information, please visit the provided Dynamic Connection String.
- Steps to embed dashboard in view mode using URL
- Public embedding
- Private embedding
- Advanced security
- Available parameter
- How to pass the Dashboard Parameter and URL Parameter filters in iFrame URL
- How to embed the dashboard in create mode using the URL
- Steps to embed dashboard designer using URL
- Embedding dashboard with filter parameter
- Dynamic connection string for dashboard embedding