Bold BI Dashboards Embedding in ASP.NET Core Sample with Embedded SDK
A GitHub link has been provided to get the sample application, which demonstrates the rendering of a single dashboard and a list of dashboards in your Bold BI server. This is followed by steps to create a new embedding application in ASP.NET Core on your own.
NOTE: The best way to get started would be to read the Getting Started section of the documentation first. The
Getting Startedguide provides you with enough information that you need to know before working on the sample.
Prerequisites
How to run the sample
-
Please get the ASP.NET Core sample from GitHub.
-
Please ensure that you have enabled embed authentication on the
embed settingssettings page. If it is not currently enabled, please refer to the provided image or detailed instructions to enable it.
-
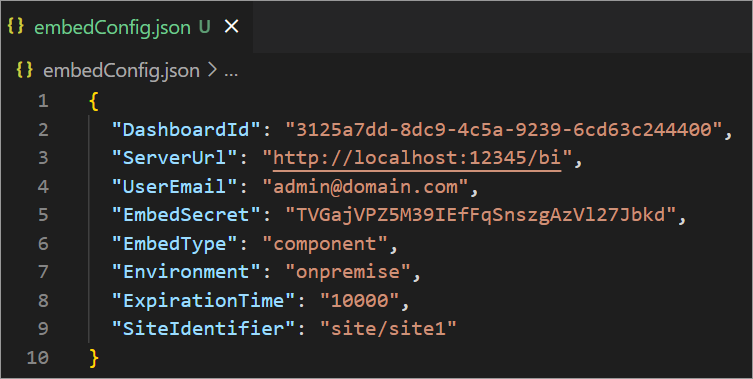
To download the
embedConfig.jsonfile, please follow this link for reference. Additionally, you can refer to the image below for visual guidance.
-
Please copy the downloaded
embedConfig.jsonfile and paste it into the designated location within the application. Make sure that you have placed it correctly in the application, as shown in the image.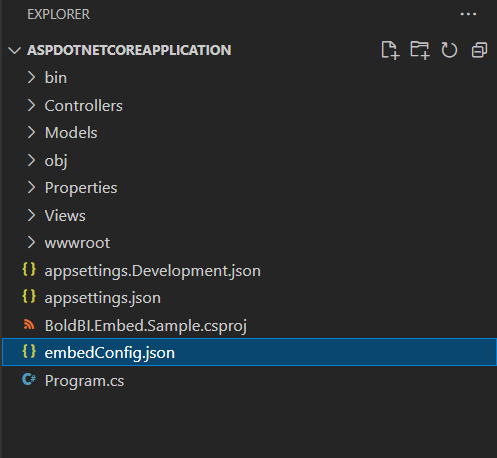
ServerUrl Dashboard Server BI URL (ex: http://localhost:5000/bi, https://demo.boldbi.com/bi) SiteIdentifier For the Bold BI Enterprise edition, it should be like site/site1. For Bold BI Cloud, it should be an empty string. UserEmail UserEmail of the Admin in your Bold BI, which would be used to get the dashboard list. EmbedSecret Get your EmbedSecret key from the Embed tab by enabling the Enable embed authenticationin the Administration pageEnvironment Your Bold BI application environment. (If it is a cloud analytics server, use `BoldBI.Environment.Cloud`; if it is your server, use `BoldBI.Environment.Enterprise`) DashboardId Item ID of the dashboard to be embedded in your application. ExpirationTime Token expiration time. (In the EmbedConfig.json file, the default token expiration time is 10000 seconds) -
Open your project in
Visual Studio Codeand use the commanddotnet restoreto restore the necessary packages. After the packages have been restored, use the commanddotnet buildto build the project. -
To run your ASP.NET Core sample in Visual Studio Code, use the command
dotnet run.
NOTE: By default, we display the dashboard embedding without the dashboard listing sidebar. To enable the dashboard list, you need to navigate to the
dashboardlistingURL (e.g.,https://localhost:5001/dashboardlisting).
How this sample works
-
Based on the values in the
embedConfig.jsonfile, you will obtain the user token and verify its validity. Following that, you will be able to retrieve the list of dashboards from the server by utilizing the appropriate API.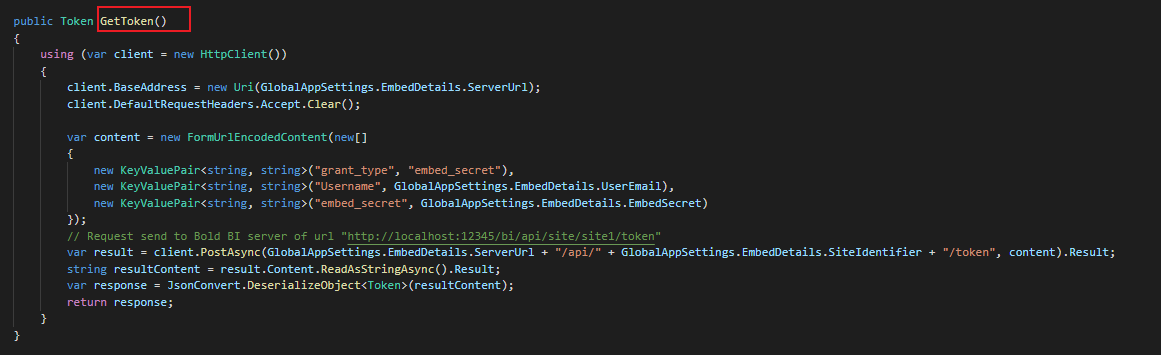
-
In the
HomeController.cs, add theGetDashboards()action, which will use theGetTokenmethod to retrieve the list of dashboards while initializing the DOM in theIndex.html.
-
To generate an access token, call the
TokenGenerationAPI with the providedembedConfigvalues.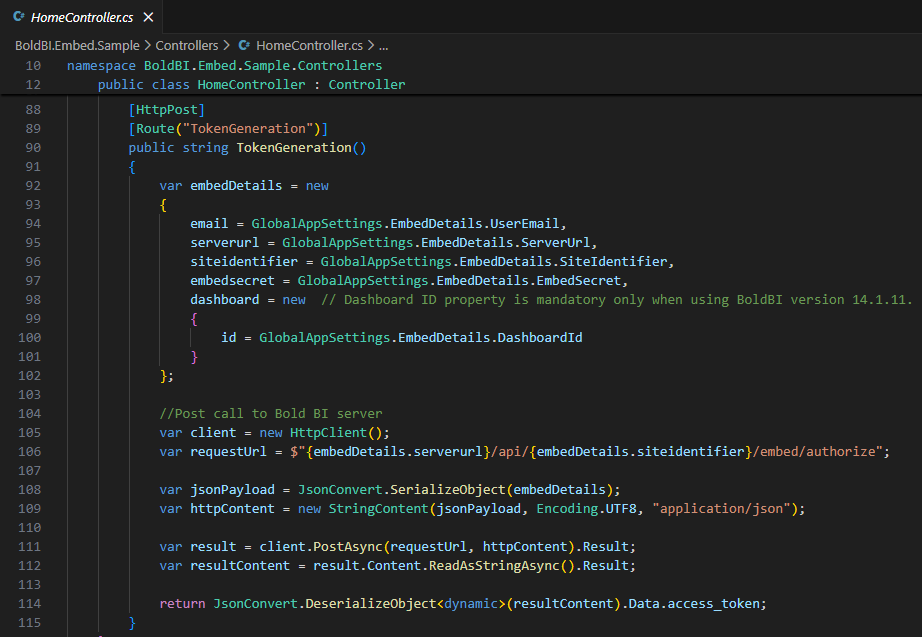
-
Once the token is generated, it will be returned to the
index.htmlfile and the dashboard will start to render it.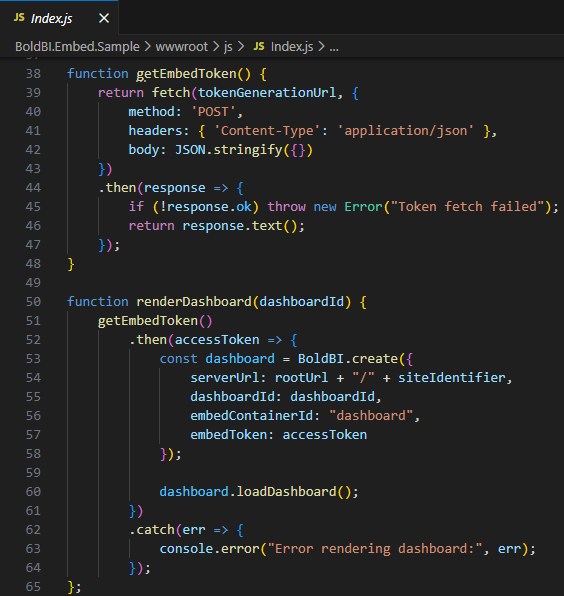
Steps to create ASP.NET Core application to embed dashboard
-
Please create a folder in the desired location and open it in Visual Studio Code.
-
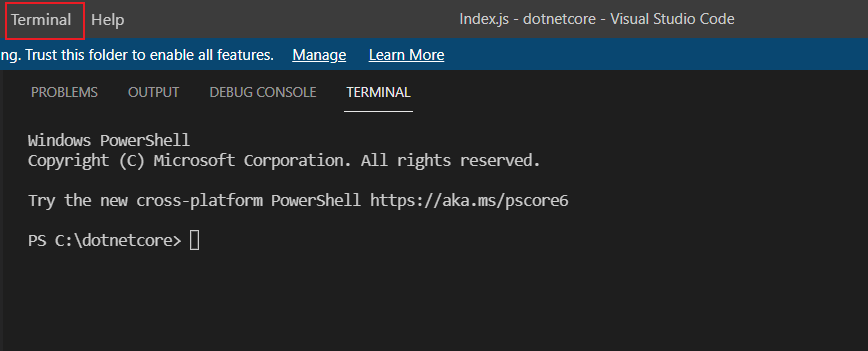
Next, open the terminal in Visual Studio Code. For reference, please see the image below.
-
In order to create a new project, we must execute this command within the terminal.
dotnet new webapp -
Please make sure that you have enabled embed authentication on the
embed settingspage. If it is currently not enabled, please refer to the provided image or detailed instructions in order to enable it. -
To download the
embedConfig.jsonfile, please click on this link for reference. Additionally, you can refer to the following image for visual guidance. -
Please copy the downloaded
embedConfig.jsonfile and paste it into the designated location within the application. Please make sure that you have correctly placed it in the application, as shown in the following image.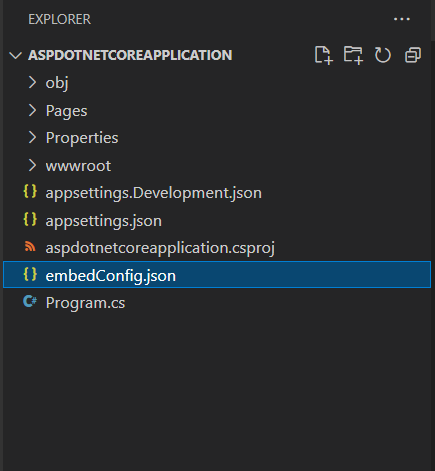
-
Please create a new folder named
Modelsand within it, create a model class calledDataClass.csto define the following properties. These properties will be utilized to retrieve the list of dashboards from the server.To add the necessary references to the project, execute the following command in the terminal:
dotnet add package Newtonsoft.Json. Make sure to include theNewtonsoft.Jsonnamespaces in theDataClass.csmodel file.public class EmbedDetails { public string Environment { get; set; } public string SiteIdentifier { get; set; } public string ServerUrl { get; set; } public string EmbedSecret { get; set; } public string UserEmail { get; set; } public string EmbedType { get; set; } public string DashboardId { get; set; } } -
Please create another model class called
GlobalAppSettings.csto define the following properties. These properties will maintain the object of theembedConfig.jsonfile within theGlobalAppSettings.public class GlobalAppSettings { public static EmbedDetails EmbedDetails { get; set; } } -
Please create a new folder called
Homewithin the application. Then, create a new file calledIndex.cshtmlwithin theHomefolder.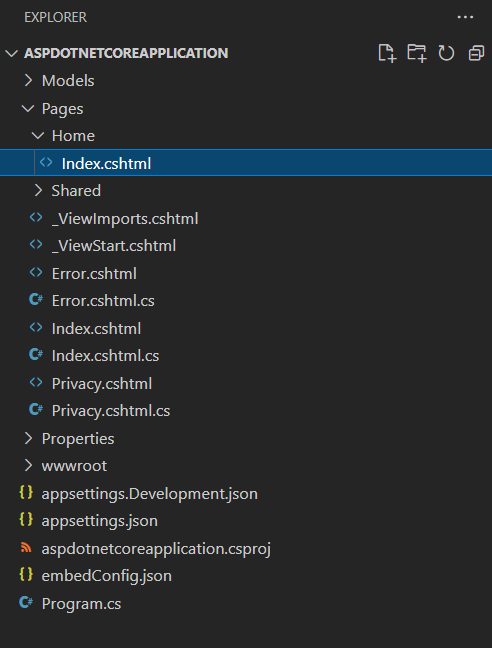
-
The following script is necessary to display the dashboard. Set the
Layout = nullat the top and add the following code in your\Pages\Home\Index.cshtmlpage within the<head>tag.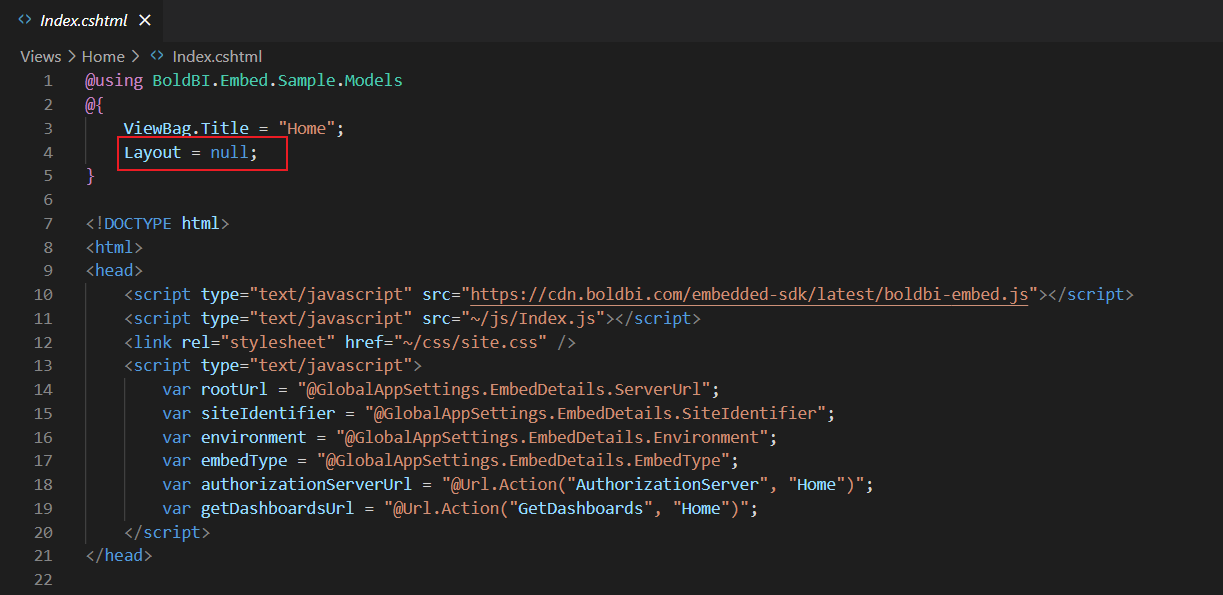
<script type="text/javascript" src="https://cdn.boldbi.com/embedded-sdk/latest/boldbi-embed.js"></script> <script type="text/javascript" src="~/js/Index.js"></script> <link rel="stylesheet" href="~/css/site.css" /> <script type="text/javascript"> var rootUrl = "@ViewBag.ServerUrl"; var dashboardId = "@ViewBag.DashboardId"; var siteIdentifier = "@ViewBag.SiteIdentifier"; var tokenGenerationUrl = "@Url.Action("TokenGeneration", "Home")"; </script> -
In the
<body>section, include the<div id="viewer-section">that contains a<div id="dashboard">. This container can be utilized to display the dashboard.<body onload="renderDashboard(dashboardId)"> <div id="viewer-section" style="width: 100%";> <div id="dashboard"></div> </div> </body> -
Please create a new folder called
Controllers. Then, create a new file calledHomeController.cswithin theControllersfolder. To obtain specific dashboard details with token, define an APITokenGeneration(). In this API, get the required embed details in the object model. Make sure to include theNewtonsoft.Json,System.Collections.Generic,System.Net.Http,System.Text, andMicrosoft.AspNetCore.Mvcnamespaces.public IActionResult Index() { try { string basePath = AppDomain.CurrentDomain.BaseDirectory; string jsonString = System.IO.File.ReadAllText(Path.Combine(basePath, "embedConfig.json")); GlobalAppSettings.EmbedDetails = JsonConvert.DeserializeObject<EmbedDetails>(jsonString); // Pass specific properties to the view using ViewBag ViewBag.DashboardId = GlobalAppSettings.EmbedDetails.DashboardId; ViewBag.ServerUrl = GlobalAppSettings.EmbedDetails.ServerUrl; ViewBag.EmbedType = GlobalAppSettings.EmbedDetails.EmbedType; ViewBag.Environment = GlobalAppSettings.EmbedDetails.Environment; ViewBag.SiteIdentifier = GlobalAppSettings.EmbedDetails.SiteIdentifier; return View(); } catch { return View("EmbedConfigErrorLog"); } } [HttpPost] [Route("TokenGeneration")] public string TokenGeneration() { var embedDetails = new { email = GlobalAppSettings.EmbedDetails.UserEmail, serverurl = GlobalAppSettings.EmbedDetails.ServerUrl, siteidentifier = GlobalAppSettings.EmbedDetails.SiteIdentifier, embedsecret = GlobalAppSettings.EmbedDetails.EmbedSecret, dashboard = new // Dashboard ID property is mandatory only when using BoldBI version 14.1.11. { id = GlobalAppSettings.EmbedDetails.DashboardId } }; //Post call to Bold BI server var client = new HttpClient(); var requestUrl = $"{embedDetails.serverurl}/api/{embedDetails.siteidentifier}/embed/authorize"; var jsonPayload = JsonConvert.SerializeObject(embedDetails); var httpContent = new StringContent(jsonPayload, Encoding.UTF8, "application/json"); var result = client.PostAsync(requestUrl, httpContent).Result; var resultContent = result.Content.ReadAsStringAsync().Result; return JsonConvert.DeserializeObject<dynamic>(resultContent).Data.access_token; } -
Please remove the lines
app.MapRazorPages()andbuilder.Services.AddRazorPages()from theProgram.csInstead, add the following lines of code:builder.Services.AddControllersWithViews(); app.MapControllerRoute(name: "default", pattern: "{controller=Home}/{action=Index}/{id?}").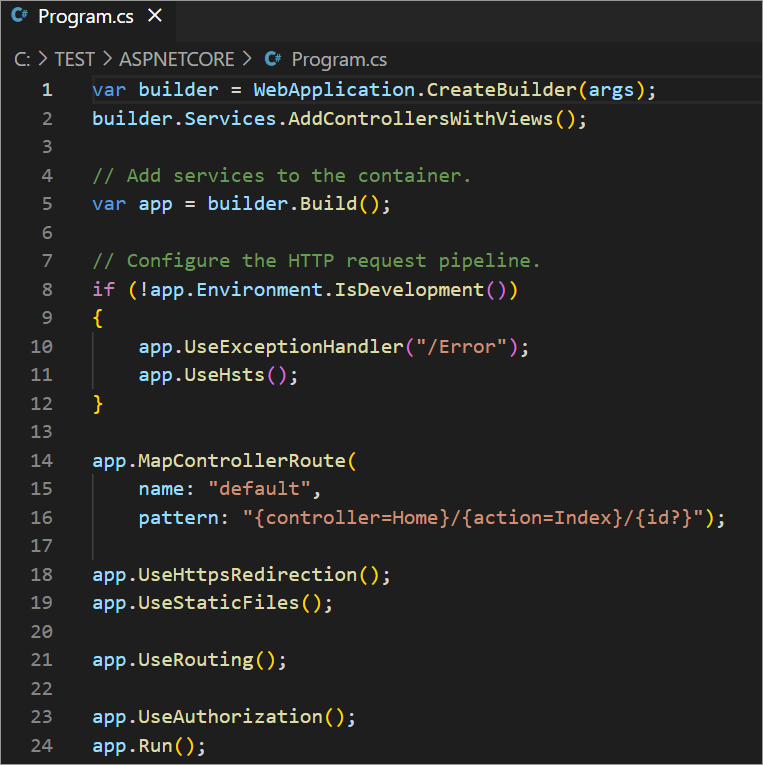
-
Please create the
Index.jsfile under thewwwroot/jsfolder. Define therenderDashboard()method. Then, create an instance and call theloadDashboard()method to render the dashboard. TherenderDashboard()method will be used to render the dashboard using theEmbed SDKfile.
function getEmbedToken() { return fetch(tokenGenerationUrl, { method: 'POST', headers: { 'Content-Type': 'application/json' }, body: JSON.stringify({}) }) .then(response => { if (!response.ok) throw new Error("Token fetch failed"); return response.text(); }); } function renderDashboard(dashboardId) { getEmbedToken() .then(accessToken => { const dashboard = BoldBI.create({ serverUrl: rootUrl + "/" + siteIdentifier, dashboardId: dashboardId, embedContainerId: "dashboard", embedToken: accessToken }); dashboard.loadDashboard(); }) .catch(err => { console.error("Error rendering dashboard:", err); }); }; -
To restore the necessary packages, run the command
dotnet restore. After the packages have been restored, use the commanddotnet buildto build the project. -
To run your ASP.NET Core sample in Visual Studio Code, use the command
dotnet run.
- Prerequisites
- How to run the sample
- How this sample works
- Steps to create ASPNET Core application to embed dashboard
Having trouble getting help?
Contact Support- Prerequisites
- How to run the sample
- How this sample works
- Steps to create ASPNET Core application to embed dashboard
Having trouble getting help?
Contact Support