Steps to embed Bold BI in your application
Please follow these steps to embed the dashboard in your application.
NOTE: We do support scrollable dashboards when they are embedded in your application.
You may also watch the below video to learn more about embedding Bold BI dashboard in an ASP.NET Core application.
How to use Bold BI wrapper inside your html page
-
In your .html page, you need to add the following Embed SDK URL in the
headtag of your page.<head> <script type="text/javascript" src="https://cdn.boldbi.com/embedded-sdk/v16.1.70/boldbi-embed.js"></script> </head> -
In the
bodytag, you need to create thedivelement with your own id name. This element will be used for dashboard embedding.<body> <div id="dashboard_container"></div> </body>
NOTE: If you use hyphens in ID, your code may become more prone to errors and be harder to read while using Jquery. Instead, use underscores or camelCase if you are in control of the ID.
-
In the
bodytag, you need to add the function to create BoldBI instance with following properties and call that function in the body using theonloadattribute as follows. Also, call theloadDashboard()function.You can embed the dashboard using either the dashboard ID or dashboard path, as shown in the samples below.
Embed using dashboard ID
 <body onload="embedSample();">
     <div id="dashboard_container"></div>
     <script>
         function embedSample() {
             var boldbiEmbedInstance = BoldBI.create({
                 serverUrl: "http://localhost:51777/bi/site/site1",
                 dashboardId: "755e99c7-f858-4058-958b-67577b283309",
                 embedContainerId: "dashboard_container",// This should be the container id where you want to embed the dashboard
                 authorizationServer: {
                     url: "http://example.com/embeddetail/get"
                 }
             });
             boldbiEmbedInstance.loadDashboard();
         }
     </script>
 </body>
NOTE: By default,
BoldBI.Environment.Enterpriseis used for the Environment API member. For Cloud sites, you must set the Environment member value toBoldBI.Environment.Cloud.
Embed using dashboard path
 <body onload="embedSample();">
     <div id="dashboard_container"></div>
     <script>
         function embedSample() {
             var boldbiEmbedInstance = BoldBI.create({
                 serverUrl: "http://localhost:51777/bi/site/site1",
                 dashboardPath: "/Sales/Sales Analysis Dashboard",
                 embedContainerId: "dashboard_container",// This should be the container id where you want to embed the dashboard
                 authorizationServer: {
                     url: "http://example.com/embeddetail/get"
                 }
             });
             boldbiEmbedInstance.loadDashboard();
         }
     </script>
</body>-
Please refer to the following table for the values of the previous properties based on your application.
serverUrl Use your Bold BI server url (http://localhost:[portno]/bi/site/site1) dashboardId Use item id of the dashboard, which need to be embed in your application. dashboardPath dashboardPath will be like `/{category_name}/{dashboard_name}` Use item id of the dashboard, which need to be embed in your application. embedContainerId Id of the created div element in your body. embedType BoldBI.EmbedType.Component height The height is an optional member of the API. If you do not specify a height for the API, it will automatically take the dimensions of your embedding container. If no value is provided, it will inherit the height from the dimensions of the parent container of the embedding. For more details please refer to this link here. width The width is an optional member of the API. If you do not specify a width for the API, it will automatically take the dimensions of your embedding container. If no value is provided, it will inherit the width from the dimensions of the parent container of the embedding. For more details please refer to this link here. authorizationServer Use your authorization URL expirationTime Token expiration time -
Please copy the previous embedSample() function and paste it into your page. Make sure to update the values with the appropriate properties.
NOTE: The embedContainerId should be the same as the value of your div element id.
NOTE: For Bold BI v5.2.48 or lower versions, you must add the following dependent scripts and also refer to the Embed SDK URL of the respective Bold BI version below.
https://cdn.boldbi.com/embedded-sdk/v5.2.48/embed-js.js
Bold BI Version |
Dependent Scripts |
|---|---|
v5.2.48 or Lower |
|
v5.3.53 |
|
v14.1.11(latest) |
|
How to embed the Multi-tabbed dashboard
To embed the multi-tabbed dashboard, you can use either the dashboard ID or the dashboard path, similar to embedding a regular dashboard. Please refer to the code sample below for embedding a multi-tabbed dashboard.
<body onload="embedSample();">
    <div id="dashboard_container"></div>
    <script>
        function embedSample() {
            var boldbiEmbedInstance = BoldBI.create({
                serverUrl: "http://localhost:51777/bi/site/site1",
                dashboardId: "119c6622-62e7-42d2-955a-55c938ab8583",  // Multi-tabbed dashboard id
                embedContainerId: "dashboard_container",// This should be the container id where you want to embed the dashboard
                authorizationServer: {
                    url: "http://example.com/embeddetail/get"
                }
            });
            boldbiEmbedInstance.loadDashboard();
        }
    </script>
</body>
How to implement the authorize server with user email or user name
-
You need to implement an authorization endpoint in your application. This will act as the bridge between your application and the Bold BI server. Additionally, you need to update the secure details, such as email and group-based access. To learn more about the authorization server.
-
To create the authorization-server action method, copy the following snippet into your controller. You can use the currently logged-in user’s email at
[email protected]orusername, but this user should have access to the dashboard.[HttpPost] [Route("embeddetail/get")] public string GetEmbedDetails(string embedQuerString, string dashboardServerApiUrl) { // Use your user-email as embed_user_email embedQuerString += "&[email protected]"; // Use your username as embed_user_email //embedQuerString += "&embed_user_email=username"; //To set embed_server_timestamp to overcome the EmbedCodeValidation failing while different timezone using at client application. double timeStamp = (int)DateTime.UtcNow.Subtract(new DateTime(1970, 1, 1)).TotalSeconds; embedQuery += "&embed_server_timestamp=" + timeStamp; var embedSignature = "&embed_signature=" + GetSignatureUrl(embedQuerString); var embedDetailsUrl = "/embed/authorize?" + embedQuerString + embedSignature; using (var client = new HttpClient()) { client.BaseAddress = new Uri(dashboardServerApiUrl); client.DefaultRequestHeaders.Accept.Clear(); var result = client.GetAsync(dashboardServerApiUrl + embedDetailsUrl).Result; string resultContent = result.Content.ReadAsStringAsync().Result; return resultContent; } } -
Please add the GetSignatureUrl method, which will be called from the previous GetEmbedDetails action. Follow the next section to obtain the EmbedSecret key from the Bold BI application.
public string GetSignatureUrl(string queryString)
{
    // Get the embedSecret key from Bold BI.
    var embedSecret = "8apLLNabQisvriG2W1nOI7XWkl2CsYY";
    var encoding = new System.Text.UTF8Encoding();
    var keyBytes = encoding.GetBytes(embedSecret);
    var messageBytes = encoding.GetBytes(queryString);
    using (var hmacsha1 = new HMACSHA256(keyBytes))
    {
        var hashMessage = hmacsha1.ComputeHash(messageBytes);
        return Convert.ToBase64String(hashMessage);
    }
}
How to pass the Dashboard Parameter and URL Filter Parameter in the authorization endpoint dynamically
In the authorization endpoint, you can pass both types of filters (Dashboard Parameter/Filter Parameter) at the same time.
To pass filters to the embed_datasource_filter parameter in the authorization endpoint, refer to the following sample in C# (it may differ based on your platform language). Here, we need to set both types of filters to the embed_datasource_filter property in the endpoint.
[HttpPost]
[Route("embeddetail/get")]
public string GetEmbedDetails(string embedQuerString, string dashboardServerApiUrl)
{
    // Use your user-email as embed_user_email
    embedQuerString += "&[email protected]" + "&embed_datasource_filter=" + "[{&&Parameter=Value&Parameter=Value}]";

    //To set embed_server_timestamp to overcome the EmbedCodeValidation failing while different timezone using at client application.
    double timeStamp = (int)DateTime.UtcNow.Subtract(new DateTime(1970, 1, 1)).TotalSeconds;
    embedQuery += "&embed_server_timestamp=" + timeStamp;

    var embedSignature = "&embed_signature=" + GetSignatureUrl(embedQuerString);

    var embedDetailsUrl = "/embed/authorize?" + embedQuerString + embedSignature;

    using (var client = new HttpClient())
    {
        client.BaseAddress = new Uri(dashboardServerApiUrl);
        client.DefaultRequestHeaders.Accept.Clear();

        var result = client.GetAsync(dashboardServerApiUrl + embedDetailsUrl).Result;
        string resultContent = result.Content.ReadAsStringAsync().Result;
        return resultContent;
    }
}-
The
Dashboard Parameterfilter must be started with a double ampersand&&in the endpoint. Please refer to the configuring dashboard parameters for more details. -
The
URL Parameterfilter must be started with a single ampersand&in the endpoint. Please refer to the URL Filter for more details.
Please refer to the table below for the values of the filter properties related to your filter.
| Scenario | Appending Query |
|---|---|
| If passing Dashboard Parameter only | "&embed_datasource_filter=[{&&Parameter=Value}]" |
| If passing URL Parameter only | "&embed_datasource_filter=[{&Parameter=Value}]" |
| If passing multiple Dashboard Parameters | "&embed_datasource_filter=[{&&Parameter=Value&&Parameter1=Value1}]" |
| If passing multiple URL Parameters | "&embed_datasource_filter=[{&Parameter=Value&Parameter1=Value1}]" |
| If passing both Dashboard Parameter and URL Parameter | "&embed_datasource_filter=[{&&Parameter=Value&Parameter=Value}]" |
| If passing both URL Parameter and Dashboard Parameter | "&embed_datasource_filter=[{&Parameter=Value&&Parameter=Value}]" |
NOTE: The filter value should be enclosed with square brackets and curly braces as mentioned above.
How to get Embed Secret key from Bold BI application
You can obtain your Embed Secret key from the administrator’s settings section. Please refer to the Embed Settings for further information.
How to get common Embed Secret key from UMS
If you are using multi-tenant Bold BI server sites and are looking to embed the Dashboard in your application, we recommend using the common embed secret instead of a separate embed secret for each site. You can refer to this link to obtain the common embed secret.
How to use Server URL for embedding the Bold BI in different scenarios
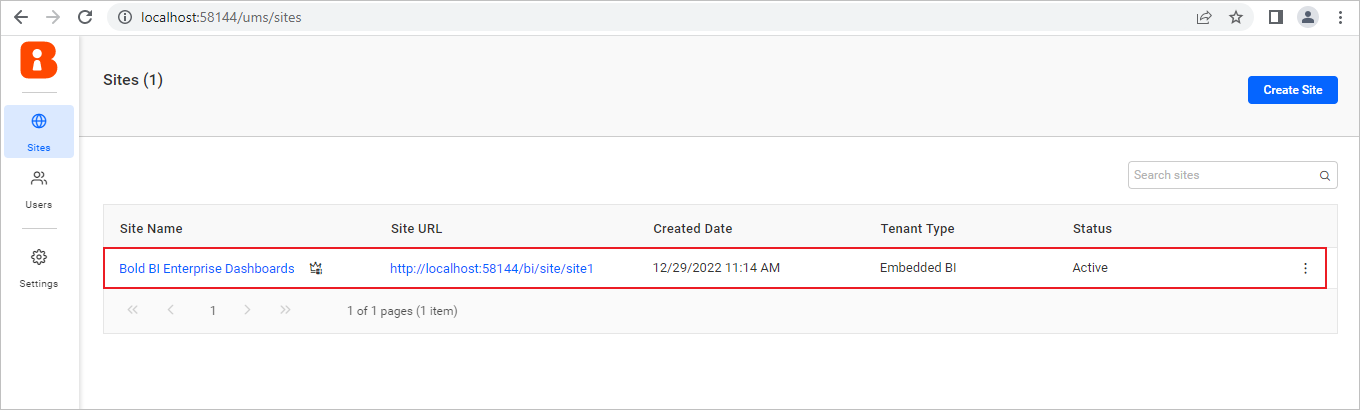
To obtain the Server URL of the corresponding Bold BI tenant, refer to the UMS sites management page.
Note: The Site Management page is only accessible for OnPremise or Enterprise deployment.
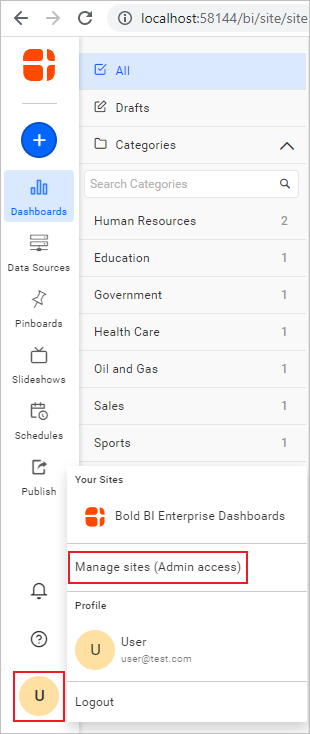
To open the UMS page, open the OnPremise dashboard listing page. From there, select the user profile in the side menu and click on the Manage sites (Admin access) option.
Please refer to the table below for instructions on how to use the server URL in various scenarios to embed Bold BI.
ServerUrl - Combination of the rootURL and siteIdentifier.
| Scenarios | URL from UMS page | Example Code |
|---|---|---|
| By default, Multi-tenancy enabled case | https://example.boldbi.com/bi/site/site1 |
|
| Multi-tenancy disabled case | `https://example.boldbi.com/bi` |
|
| Hosted as one level sub application with Multi-tenancy enabled case | https://example.boldbi.com/bold/bi/site/site1 |
|
| Hosted as one level sub application with Multi-tenancy disabled case | https://example.boldbi.com/bold/bi |
|
| Hosted as two level sub application with Multi-tenancy enabled case | https://example.boldbi.com/bold/test/bi/site/site1 |
|
| Hosted as two level sub application with Multi-tenancy disabled case | https://example.boldbi.com/bold/test/bi |
|