Bold BI Dashboards embedding in React with ASP.NET Core using Embedded SDK
A GitHub link has been provided to get the sample application that demonstrates the rendering of the dashboard on your Bold BI server. This will be followed by steps to create a new embedding application in React with ASP.NET Core on your own.
NOTE: The best way to get started would be by reading the Getting Started section of the documentation first. The
Getting Startedguide provides all the necessary information you need to know before working on the sample.
Prerequisites
NOTE: Node.js versions 18.18 to 20.15 are supported.
How to run the sample
-
Please get the React with ASP.NET Core sample from GitHub.
-
Please ensure that you have enabled embed authentication on the
embed settingspage. If it is not currently enabled, please refer to the provided image or detailed instructions to enable it.
-
To download the
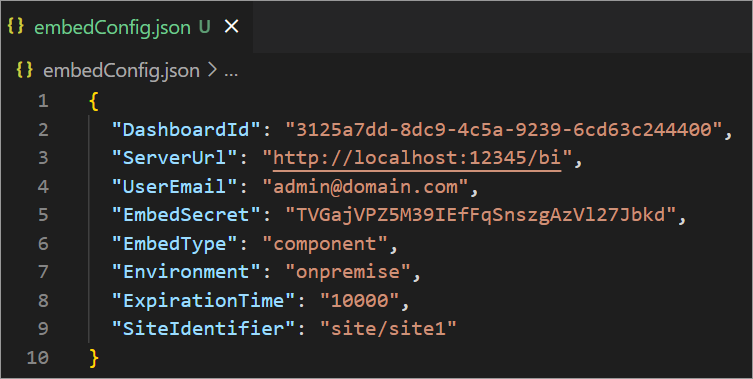
embedConfig.jsonfile, please follow this link as a reference. Additionally, you can consult the following image for visual guidance.
-
Please copy the downloaded
embedConfig.jsonfile and paste it into the designated location within the application. Make sure you have placed it in the application as shown in the following image.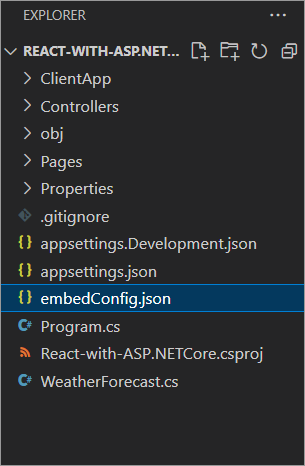
ServerUrl Dashboard Server BI URL (ex: http://localhost:5000/bi, https://demo.boldbi.com/bi) SiteIdentifier For the Bold BI Enterprise edition, it should be like site/site1. For Bold BI Cloud, it should be an empty string. UserEmail UserEmail of the Admin in your Bold BI, which would be used to get the dashboard list. EmbedSecret Get your EmbedSecret key from the Embed tab by enabling the Enable embed authenticationin the Administration pageEnvironment Your Bold BI application environment. (If it is a cloud analytics server, use `BoldBI.Environment.Cloud`; if it is your server, use `BoldBI.Environment.Enterprise`) DashboardId Item ID of the dashboard to be embedded in your application. ExpirationTime Token expiration time. (In the EmbedConfig.json file, the default token expiration time is 10000 seconds) -
Open your React with ASP.NET Core project in
Visual Studio Codeand install all dependent packages by using the following commandnpm install. -
Execute the command
dotnet restoreto restore the necessary packages. Once the packages have been restored, use thedotnet buildcommand to build the project. -
Run your React with ASP.NET Core sample by using the command
dotnet runin Visual Studio Code.
NOTE:
- If you are experiencing issues with the validity of the ASP.NET Core developer certificate, you can try the following commands to resolve it:
dotnet dev-certs https --clean,dotnet dev-certs httpsanddotnet dev-certs https --trust.- If you are using a React version lower than v18.0, you can update the
index.jsfile by adding the following line. Make sure to replace the existingcreateRootline with the following line.
 import ReactDOM from 'react-dom';
 ReactDOM.render(<App />, document.getElementById('root'));
How this sample works
-
The
renderDashboardmethod will be invoked from thecomponentDidMount()function based on the configured embedConfig values in theDashboard.jsfile.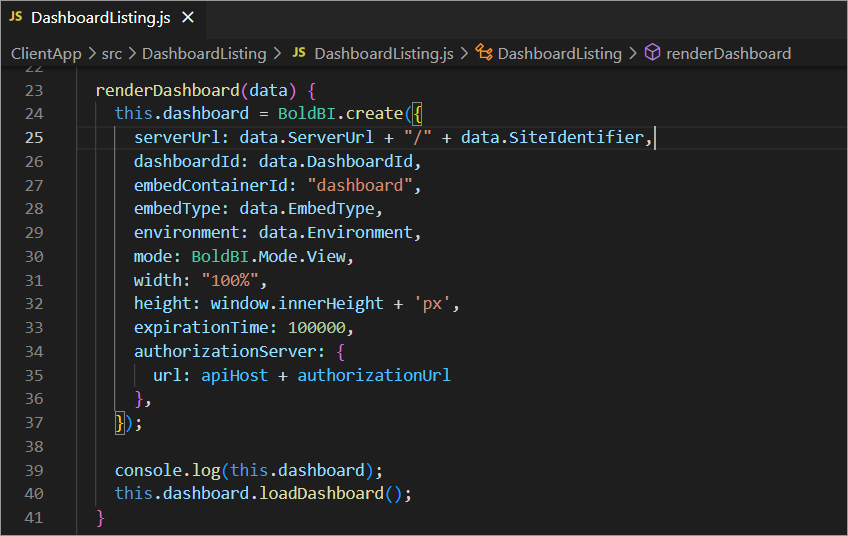
-
Before rendering, call the
tokenGenerationUrl, which redirects to theTokenGenerationaction in theBoldBIEmbedController. This action generates the access token using the providedembedDetailsof the ASP.NET Core application.
-
Once the token is generated, it will be returned to the
Dashboard.jsfile and the dashboard will start to render it.
Steps to create new React with ASP.NET Core application to embed dashboard
-
Create a folder in the desired location and open it in Visual Studio Code.
-
Open the terminal in Visual Studio Code. Please refer to the image below.

-
To create a new project, you should run this command in the terminal.
dotnet new react -
Please ensure that you have enabled embed authentication on the
embed settingspage. If it is not currently enabled, please refer to the following image or detailed instructions to enable it. -
To download the
embedConfig.jsonfile, please click on the following link for reference. Furthermore, you can consult the accompanying image for visual assistance.
-
Copy the downloaded
embedConfig.jsonfile and paste it into the designated location within the application. Make sure you have placed it correctly in the application, as shown in the following image. -
Please create a new folder named
Models. Inside this folder, create a model class calledDataClass.csto define the following properties. These properties are used to retrieve the dashboard details from the server.To add the necessary references to the project, execute the following commands in the terminal:
dotnet add package Newtonsoft.Jsonanddotnet add package System.Runtime.Serialization.Primitives. Make sure to include theSystem.Runtime.SerializationandNewtonsoft.Jsonnamespaces in theDataClass.csmodel file.[DataContract] public class EmbedClass { [DataMember] public string embedQuerString { get; set; } [DataMember] public string dashboardServerApiUrl { get; set; } } public class EmbedDetails { public string Environment { get; set; } public string SiteIdentifier { get; set; } public string ServerUrl { get; set; } public string EmbedSecret { get; set; } public string UserEmail { get; set; } public string EmbedType { get; set; } public string DashboardId { get; set; } } -
Create another model class,
GlobalAppSettings.csto define the following properties. These properties maintain the object of theembedConfig.jsonfile within theGlobalAppSettings.public class GlobalAppSettings { public static EmbedDetails EmbedDetails { get; set; } } -
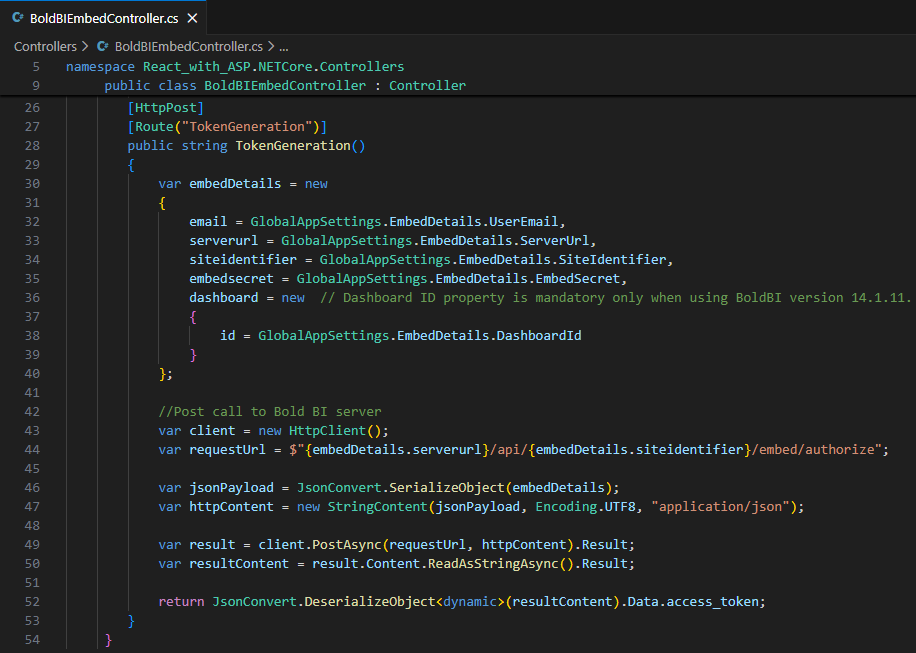
Create a new controller named
BoldBIEmbedController.cs. Inside theControllers\BoldBIEmbedController.csfile, define an API calledAuthorizationServer()to retrieve specific dashboard details. This API should use theGetSignatureUrl()method to generate the algorithm. Append theembedQuerString,userEmailand the value obtained from theGetSignatureUrl()method as query parameters in the URL to retrieve the details of a particular dashboard. Finally, call therenderDashboard()method in the React application using these details.Ensure the
System.Security.CryptographyandMicrosoft.AspNetCore.Mvcnamespaces in theBoldBIEmbedController.cs.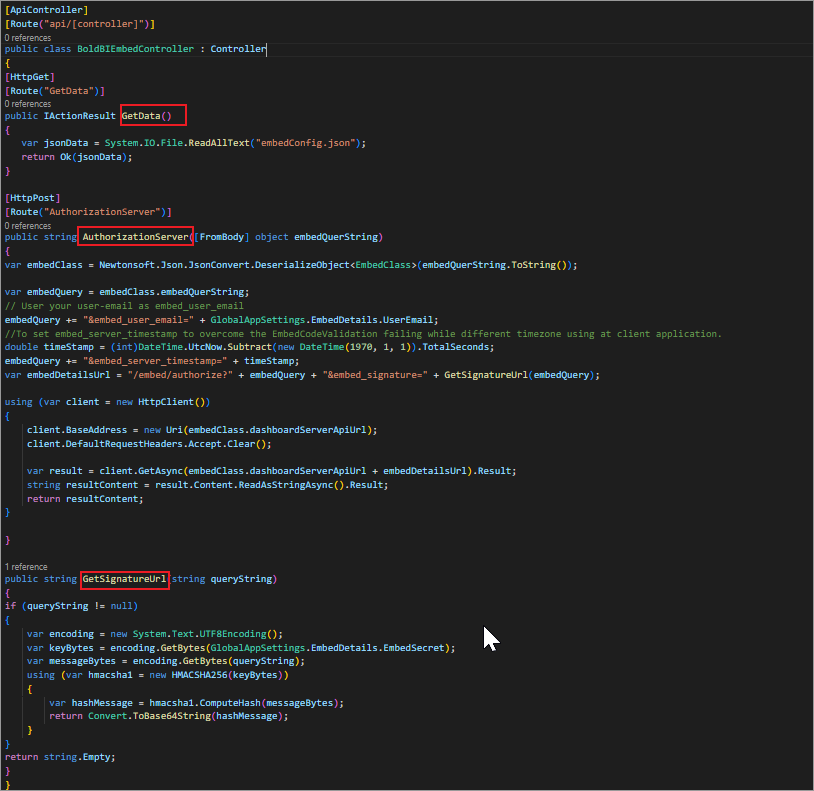
[ApiController] [Route("api/[controller]")] public class BoldBIEmbedController : Controller { [HttpGet] [Route("GetData")] public IActionResult GetData() { var jsonData = System.IO.File.ReadAllText("embedConfig.json"); return Ok(jsonData); } [HttpPost] [Route("AuthorizationServer")] public string AuthorizationServer([FromBody] object embedQuerString) { var embedClass = Newtonsoft.Json.JsonConvert.DeserializeObject<EmbedClass>(embedQuerString.ToString()); var embedQuery = embedClass.embedQuerString; // User your user-email as embed_user_email embedQuery += "&embed_user_email=" + GlobalAppSettings.EmbedDetails.UserEmail; //To set embed_server_timestamp to overcome the EmbedCodeValidation failing while different timezone using at client application. double timeStamp = (int)DateTime.UtcNow.Subtract(new DateTime(1970, 1, 1)).TotalSeconds; embedQuery += "&embed_server_timestamp=" + timeStamp; var embedDetailsUrl = "/embed/authorize?" + embedQuery + "&embed_signature=" + GetSignatureUrl(embedQuery); using (var client = new HttpClient()) { client.BaseAddress = new Uri(embedClass.dashboardServerApiUrl); client.DefaultRequestHeaders.Accept.Clear(); var result = client.GetAsync(embedClass.dashboardServerApiUrl + embedDetailsUrl).Result; string resultContent = result.Content.ReadAsStringAsync().Result; return resultContent; } } public string GetSignatureUrl(string queryString) { if (queryString != null) { var encoding = new System.Text.UTF8Encoding(); var keyBytes = encoding.GetBytes(GlobalAppSettings.EmbedDetails.EmbedSecret); var messageBytes = encoding.GetBytes(queryString); using (var hmacsha1 = new HMACSHA256(keyBytes)) { var hashMessage = hmacsha1.ComputeHash(messageBytes); return Convert.ToBase64String(hashMessage); } } return string.Empty; } } -
Open the
Program.csfile. These lines of code configure a permissiveCORSpolicy that allows requests from any origin, HTTP method, and headers. It is crucial to consider the security implications and adapt the policy to meet the application requirements. Make sure to ensure theNewtonsoft.Jsonnamespaces in theProgram.csfiles.app.UseCors(corsPolicyBuilder => corsPolicyBuilder .AllowAnyOrigin().AllowAnyMethod().AllowAnyHeader()); string basePath = AppDomain.CurrentDomain.BaseDirectory; string jsonString = System.IO.File.ReadAllText(Path.Combine(basePath, "embedConfig.json")); GlobalAppSettings.EmbedDetails = JsonConvert.DeserializeObject<EmbedDetails>(jsonString); -
Create a new file and name it
package.json. It is essential to install the packages that are listed in the dependencies section below.{ "name": "embedded-bi-react", "version": "0.1.0", "private": true, "dependencies": { "@boldbi/boldbi-embedded-sdk": "^6.4.6", "@testing-library/jest-dom": "^4.2.4", "@testing-library/react": "^9.4.0", "@testing-library/user-event": "^7.2.1", "axios": "^0.19.2", "jquery": "^3.5.1", "react": "^16.12.0", "react-dom": "^16.12.0", "react-scripts": "^3.4.0" } } -
Open the
ClientApp\srcfolder. Within theClientApp\srcfolder, create a new folder namedDashboardListing. Inside theDashboardListingfolder, create a file namedDashboardListing.js. In theDashboardListing.jsfile, define the mandatory properties and implement the methodsrenderDashboard()to render the dashboard,render()to create the DOM elements andcomponentDidMount()to contact server as follows.import React from 'react'; import '../index'; import { BoldBI } from '@boldbi/boldbi-embedded-sdk'; //ASP.NET Core application would be run on "https://localhost:7222;http://localhost:5137", which needs to be set as `apiHost` const apiHost = "https://localhost:7222"; //Url of the AuthorizationServer action in ValuesController of the ASP.NET Core application const authorizationUrl = "/api/boldbiembed/authorizationserver"; var BoldBiObj; class DashboardListing extends React.Component { constructor(props) { super(props); this.state = { toke: undefined, items: [], embedConfig: {}, }; this.BoldBiObj = new BoldBI(); } }
NOTE: Open the
launchSettings.jsonfile and copy theapplicationUrl. Paste it in theapiHost.
-
In
DashboardListing.jsfile, include this method. Inside therenderDashboard()method, use the following code to render the dashboard.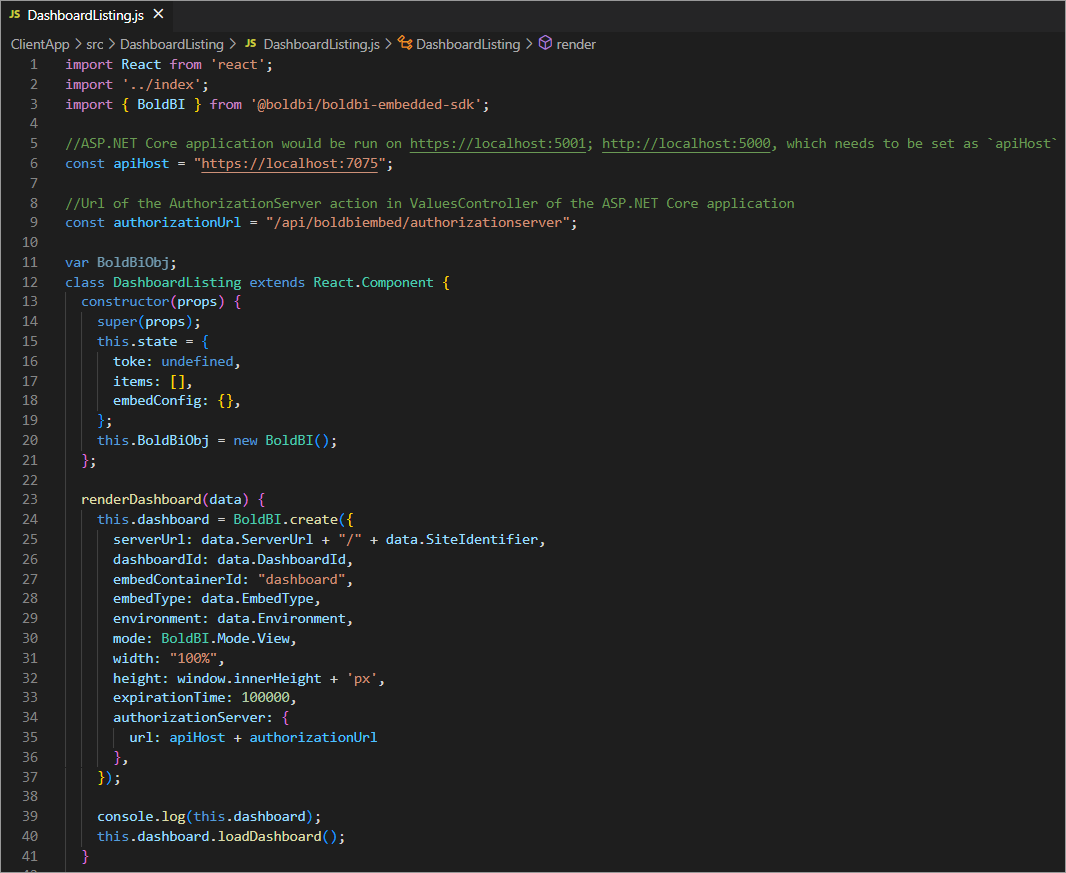
renderDashboard(data) { this.dashboard = BoldBI.create({ serverUrl: data.ServerUrl + "/" + data.SiteIdentifier, dashboardId: data.DashboardId, embedContainerId: "dashboard", embedType: data.EmbedType, environment: data.Environment, mode: BoldBI.Mode.View, width: "100%", height: window.innerHeight + 'px', expirationTime: 100000, authorizationServer: { url: apiHost + authorizationUrl }, }); console.log(this.dashboard); this.dashboard.loadDashboard(); } -
In
DashboardListing.jsfile, include this method. Create a DOM element with the IDdashboard. which will be utilized in therenderDashboard()method to render the dashboard within it.render() { return ( <div id="viewer-section"> <div id="dashboard"></div> </div> ); } -
In
DashboardListing.jsfile, include this method. ThecomponentDidMount()method contacts the server to retrieve the token. With this token, specific dashboard details are collected and passed to therenderDashboard()method for rendering.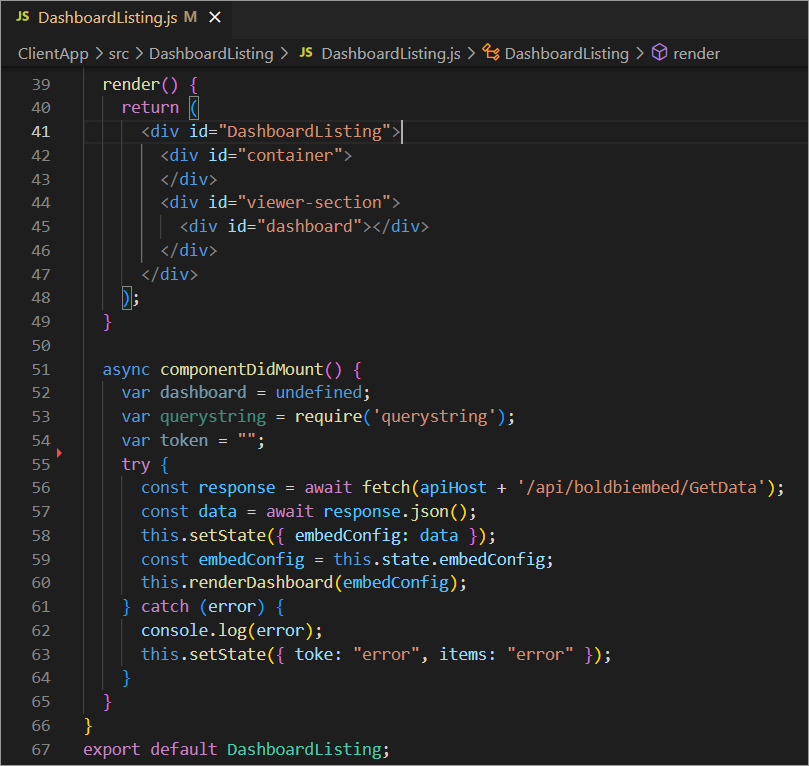
async componentDidMount() { var dashboard = undefined; var querystring = require('querystring'); var token = ""; try { const response = await fetch(apiHost + '/api/boldbiembed/GetData'); const data = await response.json(); this.setState({ embedConfig: data }); const embedConfig = this.state.embedConfig; this.renderDashboard(embedConfig); } catch (error) { console.log(error); this.setState({ toke: "error", items: "error" }); } } export default DashboardListing; -
Open the
App.js, replace the code below. This code imports the necessary modules, defines theAppcomponent, renders theDashboardListingcomponent, and exports it for use in other files.import React from 'react'; import DashboardListing from './DashboardListing/DashboardListing'; class App extends React.Component { render() { return ( <div> <DashboardListing/> </div> ); } } export default App; -
Open the
Index.jsfile and replace the code below. These lines of code import the necessary modulesReactandReactDOM. import theAppcomponent, and useReactDOM.renderto render the App component into the specified HTML element.import React from 'react'; import ReactDOM from 'react-dom'; import App from './App'; ReactDOM.render(<App />, document.getElementById('root')); -
To install all dependent packages, use the following command
npm install. Run the commanddotnet restoreto restore the necessary packages. Once the packages have been restored, use thedotnet buildcommand to build the project. -
Run the React sample with Core sample, use the following command
dotnet runin visual Studio Code.
NOTE: If you encounter any issues with the validity of the ASP.NET Core developer certificate, you can try resolving it by using the following commands:
dotnet dev-certs https --clean,dotnet dev-certs httpsanddotnet dev-certs https --trust.