Bold BI Dashboards embedding in React with Go using Embedded SDK
A GitHub link has been provided to get the sample application, which demonstrates the rendering of a dashboard available on your Bold BI server. This is followed by a series of steps to create a new embedding application in React with Go on your own.
NOTE: The best way to get started would be to read the Getting Started section of the documentation first. The
Getting Startedguide provides you with enough information that you need to know before working on the sample.
Requirements/Prerequisites
NOTE: Node.js versions 18.17 to 20.15 are supported.
How to run the sample
-
Please get the React with Go Application.
-
Please ensure that you have enabled embed authentication on the
embed settingspage. If it is not enabled, please refer to the following image or detailed instructions to enable it.
-
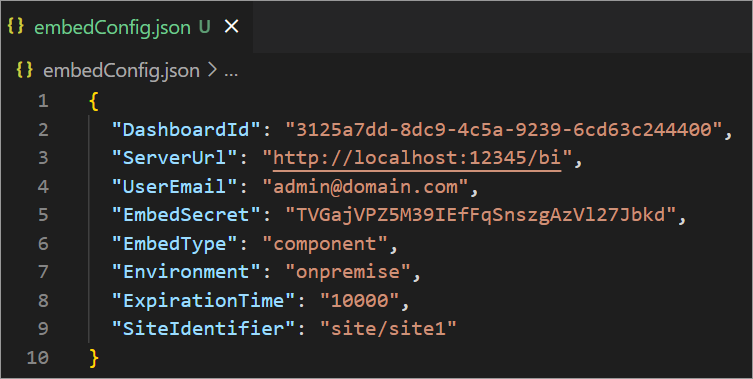
To download the
embedConfig.jsonfile, please follow this link for reference. Additionally, refer to the following image for visual guidance.
-
Please copy the downloaded
embedConfig.jsonfile and paste it into the designated location within the application. Please make sure you have placed it in the application as shown in the following image.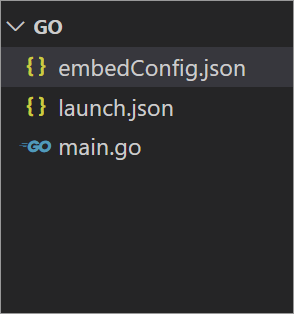
ServerUrl Dashboard Server BI URL (ex: http://localhost:5000/bi, http://demo.boldbi.com/bi) SiteIdentifier For Bold BI Enterprise edition, it should be like site/site1. For Bold BI Cloud, it should be empty string.Environment Your Bold BI application environment. (If it is cloud analytics server, use BoldBI.Environment.Cloud; if it is your own server, useBoldBI.Environment.Enterprise).DashboardId Item id of the dashboard to be embedded in your application. EmbedSecret Get your EmbedSecret key from the Embed tab by enabling the Enable embed authenticationin the Administration pageUserEmail UserEmail of the Admin in your Bold BI, which would be used to get the dashboard ExpirationTime Token expiration time. (In the EmbedConfig.json file, the default token expiration time is 10000 seconds). -
Open the
Gosample in Visual Studio Code. -
To run the back-end
Gosample, use the following commandgo run tokengeneration.go. -
Open the
Reactsample in a new window of Visual Studio Code. -
To install all the necessary packages, use the command
npm install. -
Please run your
Reactsample using the commandnpm start.
NOTE: If you are using a React version lower than v18.0, you can update the
index.jsfile by adding the following line. Make sure to replace the existingcreateRootline with the following line.
 import ReactDOM from 'react-dom';
 ReactDOM.render(<App />, document.getElementById('root'));
How this sample works
-
When the
componentDidMountfunction is triggered in a front-end React application, it invokes the/getServerDetailsendpoint. This endpoint fetches data from theembedConfig.jsonfile. If the JSON file cannot be found, an error message will be shown.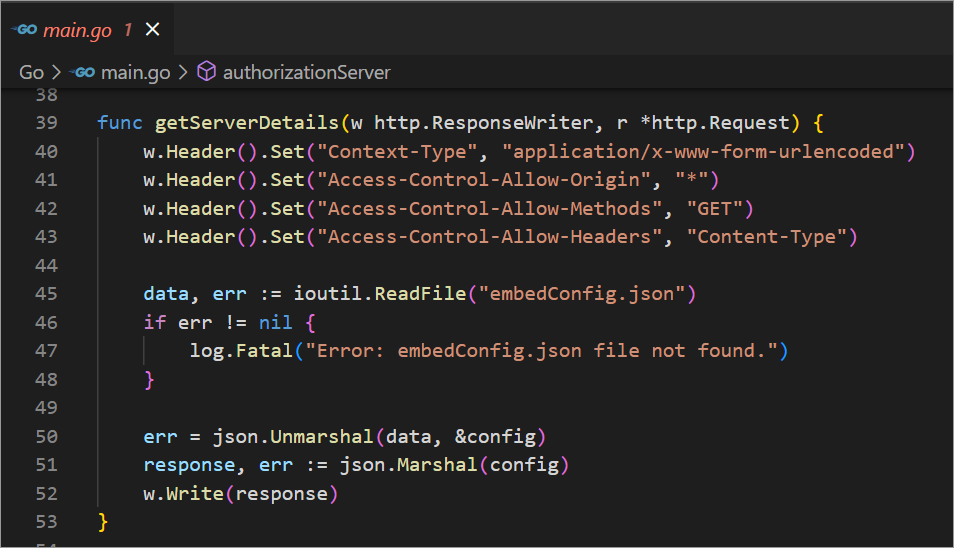
-
The dashboard will be rendered using the data obtained from the
/getserverdetailsendpoint.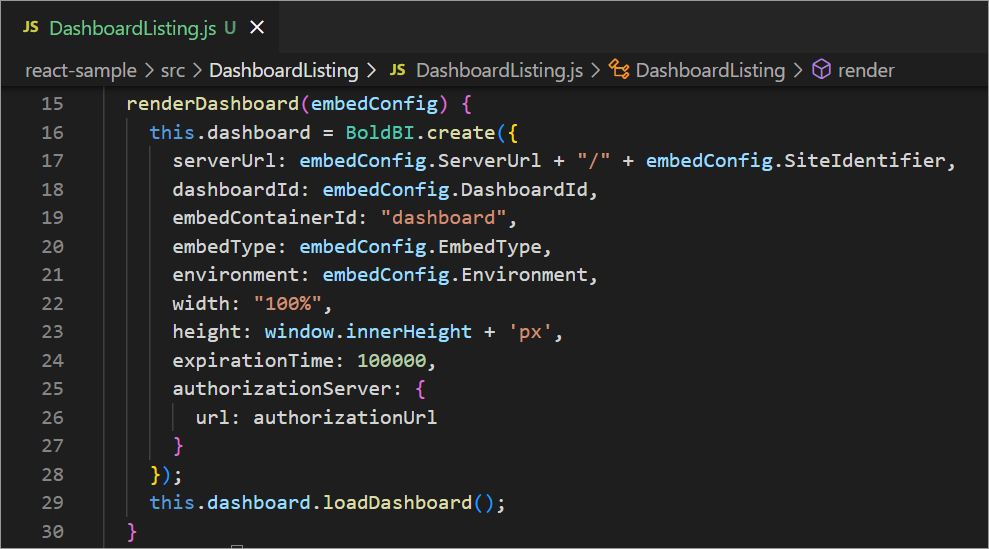
-
Before rendering, the
tokenGenerationUrlis called, which redirects to thetokenGenerationaction. This action generates the response of dashboard details with token.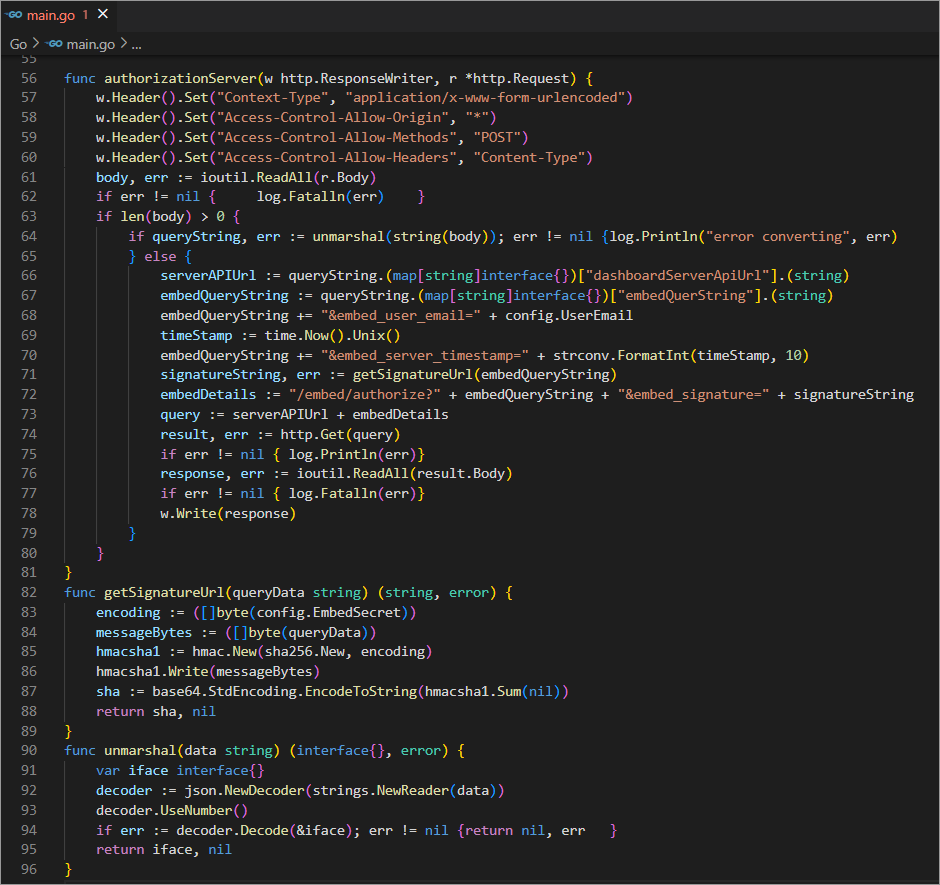
-
Once the token is generated, it will be returned to the
Dashboard.jsfile and the dashboard will start to render it.
Steps to create new React with Go application to embed dashboard
-
Please create a folder in the desired location and open it in Visual Studio Code.
-
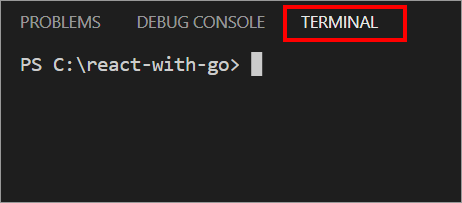
Open the terminal in Visual Studio Code. Please refer to the following image.
-
Please make sure that you have enabled embed authentication on the
embed settingspage. If it is currently not enabled, please refer to the following image or detailed instructions to enable it. -
To download the
embedConfig.jsonfile, please follow this link for reference. Moreover, you can refer to the accompanying image for visual guidance. -
Please copy the downloaded
embedConfig.jsonfile and paste it into the designated location within the application. Please make sure you have placed it in the application as shown in the following image. -
Create a new file called
main.go. Next, include the provided code to retrieve data fromembedConfig.json.package main import ( "crypto/hmac" "crypto/sha256" "encoding/base64" "encoding/json" "os" "io" "log" "net/http" "strconv" "strings" "time" "fmt" ) var embedConfig map[string]interface{} type EmbedConfig struct { DashboardId string `json:"DashboardId"` ServerUrl string `json:"ServerUrl"` EmbedType string `json:"EmbedType"` Environment string `json:"Environment"` SiteIdentifier string `json:"SiteIdentifier"` } func main() { http.HandleFunc("/authorizationServer", authorizationServer) http.HandleFunc("/getServerDetails", getServerDetails) fmt.Println("Go server is running on port 8086") log.Fatal(http.ListenAndServe(":8086", nil)) } func getServerDetails(w http.ResponseWriter, r *http.Request) { w.Header().Set("Context-Type", "application/x-www-form-urlencoded") w.Header().Set("Access-Control-Allow-Origin", "*") w.Header().Set("Access-Control-Allow-Methods", "GET") w.Header().Set("Access-Control-Allow-Headers", "Content-Type") data, err := os.ReadFile("embedConfig.json") if err != nil { log.Fatal("Error: embedConfig.json file not found.") } err = json.Unmarshal(data, &embedConfig) // Create a custom struct to hold the specific properties you want to return. clientEmbedConfigData := EmbedConfig{ DashboardId: embedConfig["DashboardId"].(string), ServerUrl: embedConfig["ServerUrl"].(string), SiteIdentifier: embedConfig["SiteIdentifier"].(string), EmbedType: embedConfig["EmbedType"].(string), Environment: embedConfig["Environment"].(string), } jsonResponse, err := json.Marshal(clientEmbedConfigData) w.Write(jsonResponse) } -
In
main.go, include the following code and create a function calledauthorizationServer()that utilizes thegetSignatureUrl()method to generate the algorithm. Within this function, append theembedQueryString,userEmail, and the value obtained from thegetSignatureUrl()method as query parameters in the URL to retrieve details of a specific dashboard.func authorizationServer(w http.ResponseWriter, r *http.Request) { w.Header().Set("Context-Type", "application/x-www-form-urlencoded") w.Header().Set("Access-Control-Allow-Origin", "*") w.Header().Set("Access-Control-Allow-Methods", "POST") w.Header().Set("Access-Control-Allow-Headers", "Content-Type") body, err := io.ReadAll(r.Body) if err != nil { log.Fatalln(err) } if len(body) > 0 { if queryString, err := unmarshal(string(body)); err != nil { log.Println("error converting", err) } else { userEmail := embedConfig["UserEmail"].(string) serverAPIUrl := queryString.(map[string]interface{})["dashboardServerApiUrl"].(string) embedQueryString := queryString.(map[string]interface{})["embedQuerString"].(string) embedQueryString += "&embed_user_email=" + userEmail timeStamp := time.Now().Unix() embedQueryString += "&embed_server_timestamp=" + strconv.FormatInt(timeStamp, 10) signatureString, err := getSignatureUrl(embedQueryString) embedDetails := "/embed/authorize?" + embedQueryString + "&embed_signature=" + signatureString query := serverAPIUrl + embedDetails result, err := http.Get(query) if err != nil { log.Println(err) } response, err := io.ReadAll(result.Body) if err != nil { log.Fatalln(err) } w.Write(response) } } } func getSignatureUrl(queryData string) (string, error) { embedSecret := embedConfig["EmbedSecret"].(string) encoding := ([]byte(embedSecret)) messageBytes := ([]byte(queryData)) hmacsha1 := hmac.New(sha256.New, encoding) hmacsha1.Write(messageBytes) sha := base64.StdEncoding.EncodeToString(hmacsha1.Sum(nil)) return sha, nil } func unmarshal(data string) (interface{}, error) { var iface interface{} decoder := json.NewDecoder(strings.NewReader(data)) decoder.UseNumber() if err := decoder.Decode(&iface); err != nil { return nil, err } return iface, nil } -
Create a folder in the desired location and open it in Visual Studio Code.
-
To create a new React project as the front-end, we need to run this command in the terminal and navigate to the directory.
npx create-react-app . -
Open the
srcfolder. Within thesrcfolder, create a new folder namedDashboard. Inside theDashboardfolder, create a file namedDashboard.js. In theDashboard.jsfile, define the mandatory properties and implement the methodsrenderDashboard()to render the dashboard,render()to create the DOM elements, andcomponentDidMount()to contact the server as follows:import React from 'react'; import '../index'; import { BoldBI } from '@boldbi/boldbi-embedded-sdk'; //Url of the authorizationserver action in the Go application(http://localhost:8086/authorizationserver). const authorizationUrl = "http://localhost:8086/authorizationServer"; class Dashboard extends React.Component { constructor(props) { super(props); this.state = { toke: undefined, items: [] }; this.BoldBiObj = new BoldBI(); }; } export default Dashboard; -
Inside the
Dashboard.jsfile, add the code below to render the dashboard.renderDashboard(embedConfig) { this.dashboard = BoldBI.create({ serverUrl: embedConfig.ServerUrl + "/" + embedConfig.SiteIdentifier, dashboardId: embedConfig.DashboardId, embedContainerId: "dashboard", width: "100%", height: window.innerHeight + 'px', authorizationServer: { url: authorizationUrl } }); this.dashboard.loadDashboard(); } -
Inside the
Dashboard.jsfile, add the following code: Create a DOM element with the IDdashboard. This element will be used in therenderDashboard()method to render the dashboard within it.render() { return ( <div id="DashboardListing"> <div id="viewer-section"> <div id="dashboard"></div> </div> </div> ); } -
Inside the
Dashboard.jsfile, add the following code: ThecomponentDidMount()method contacts the server to retrieve the token. With this token, specific dashboard details are collected and passed to therenderDashboard()method for rendering.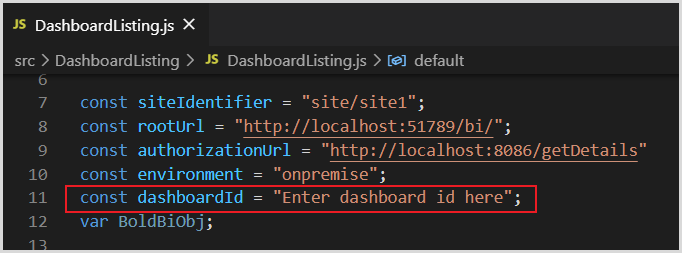
async componentDidMount() { try { const response = await fetch('http://localhost:8086/getServerDetails'); const embedConfig = await response.json(); this.renderDashboard(embedConfig); } catch (error) { console.log("Error: embedConfig.json file not found."); this.setState({ toke: "error", items: "error" }); } } -
Open the
App.jsfolder and replace the following code: The code imports the necessary modules, defines theAppcomponent, renders theDashboardcomponent, and exports it for use in other files.import React from 'react'; import './App.css'; import Dashboard from './Dashboard/Dashboard'; class App extends React.Component { render() { return ( <div> <Dashboard/> </div> ); } } export default App; -
Open the
index.jsfile and replace the following code: These lines of code import the necessary modulesReactandcreateRoot. They also import theAppcomponent and usecreateRoot.renderto render the App component into the specified HTML element.import React from 'react'; import {createRoot } from 'react-dom/client'; import App from './App'; import * as serviceWorker from './serviceWorker'; createRoot(document.getElementById('root')).render(<App />); // If you want your app to work offline and load faster, you can change // unregister() to register() below. Note this comes with some pitfalls. // Learn more about service workers: https://bit.ly/CRA-PWA serviceWorker.unregister(); -
Please replace the code in
package.jsonwith thepackageslisted in the following dependencies section. Installing these packages is essential.{ "name": "embedded-bi-react", "version": "0.1.0", "private": true, "dependencies": { "@boldbi/boldbi-embedded-sdk": "^14.1.11", "@testing-library/jest-dom": "^5.17.0", "@testing-library/react": "^13.4.0", "@testing-library/user-event": "^13.5.0", "axios": "^0.28.0", "jquery": "^3.5.1", "react": "^18.2.0", "react-dom": "^18.2.0", "react-scripts": "5.0.1" }, "scripts": { "start": "react-scripts start", "build": "react-scripts build", "test": "react-scripts test", "eject": "react-scripts eject" }, "eslintConfig": { "extends": [ "react-app", "react-app/jest" ] }, "browserslist": { "production": [ ">0.2%", "not dead", "not op_mini all" ], "development": [ "last 1 chrome version", "last 1 firefox version", "last 1 safari version" ] } } -
Next, execute the
Goapplication by running the commandgo run main.go. -
To begin, open the
Reactapplication and install the required dependencies using the commandnpm install. After installation, run the sample by executing the commandnpm startto render the dashboard.