Bold BI Dashboards Embedding in Java using Spring Boot Sample with Embedded SDK
A GitHub link has been provided to get the sample application, which demonstrates the dashboard rendering functionality available in your Bold BI server. This is followed by steps to create a new embedding application using Spring Boot on your own.
NOTE: The best way to get started would be to read the Getting Started section of the documentation first. The
Getting Startedguide provides enough information for you to know before working on the sample.
Prerequisites
NOTE: In addition to Spring Boot, this sample also supports Quarkus, an advanced Java framework optimized for cloud‑native and containerized applications.
How to run the sample
-
Please obtain the Spring Boot sample from GitHub.
-
Please make sure that you have enabled embed authentication on the
embed settingspage. If it is not enabled, please refer to the following image or the detailed instructions to enable it.
-
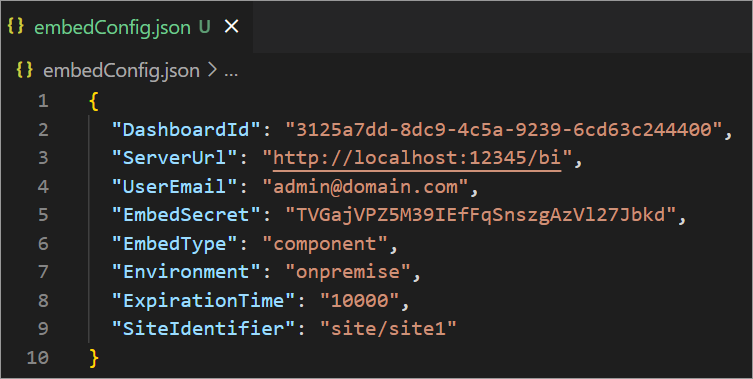
To download the
embedConfig.jsonfile, please follow this link for reference. Moreover, you can refer to the accompanying image for visual guidance.
-
Please copy the downloaded
embedConfig.jsonfile and paste it into the designated location within the application. Please make sure that you have placed it in the application as shown in the following image.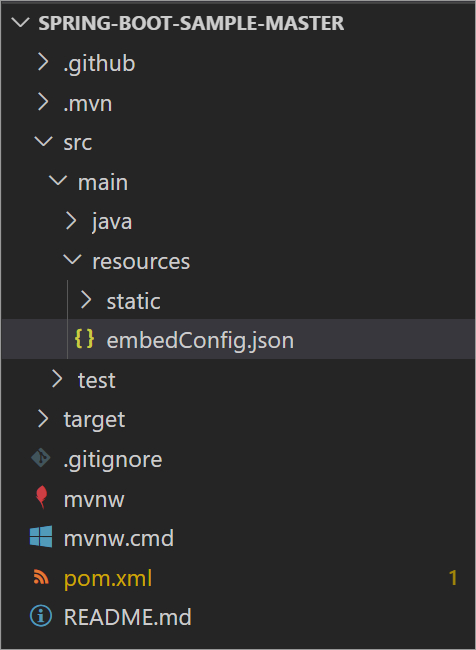
ServerUrl Dashboard Server BI URL (ex: http://localhost:5000/bi, http://demo.boldbi.com/bi). SiteIdentifier For Bold BI Enterprise edition, it should be like site/site1. For Bold BI Cloud, it should be empty string.Environment Your Bold BI application environment. (If it is cloud analytics server, use BoldBI.Environment.Cloud; if it is your own server, useBoldBI.Environment.Enterprise).DashboardId Item id of the dashboard to be embedded in your application. EmbedSecret Get your EmbedSecret key from the Embed tab by enabling the Enable embed authentication in the Administration page. UserEmail UserEmail of the Admin in your Bold BI, which would be used to get the dashboard. ExpirationTime Token expiration time. (In the EmbedConfig.json file, the default token expiration time is 10000 seconds). -
To run the sample, use the Spring Boot Dashboard in the Activity Bar on the side.
How this sample works
-
The
renderEmbedConfig()function is called to send a GET request to the/getEmbedConfigAPI and retrieve JSON data. Afterwards, it calls therenderDashboard(data)function to render the dashboard ifembedConfig.jsonis provided. If not, it displays an error message.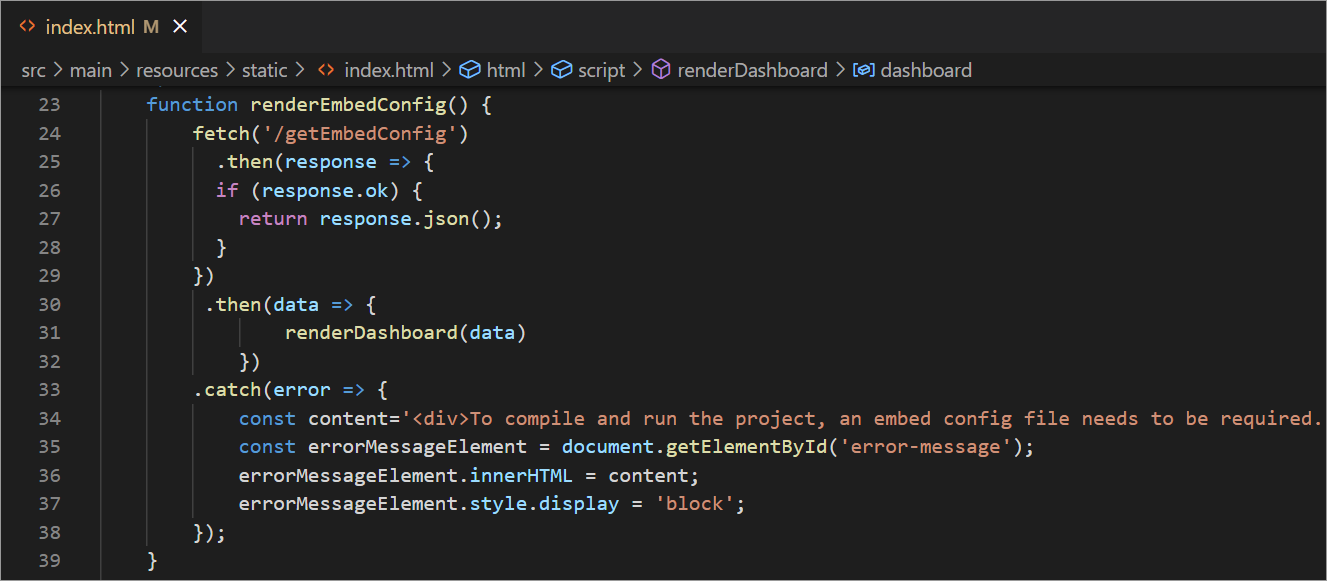
-
The
/getEmbedConfigendpoint is handled by thegetEmbedConfig()method in theHomeControllerclass. This method reads the contents of theembedConfig.jsonfile and returns an EmbedProperties object.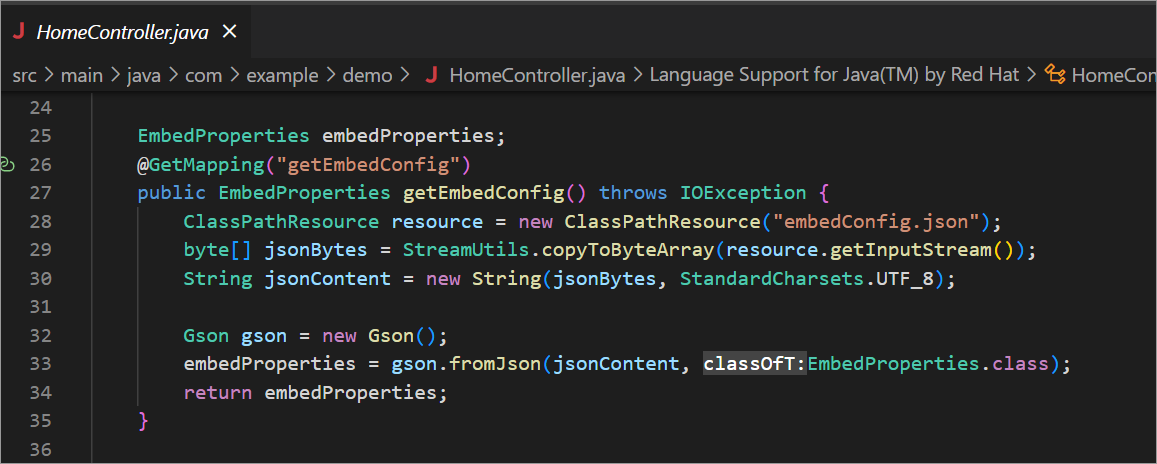
-
The
renderDashboard(data)function renders the dashboard using the retrieved data from thegetEmbedConfig().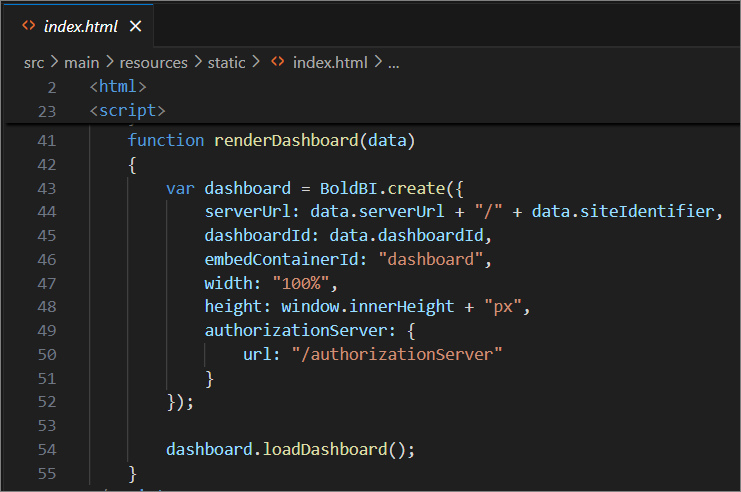
-
Before rendering, the
authorizationUrlis called. ThisauthorizationUrlredirects to theauthorizationServeraction in theHomeController. TheHomeControllerthen generates theEmbedSignatureusing the embed secret from theembedConfig.jsonfile.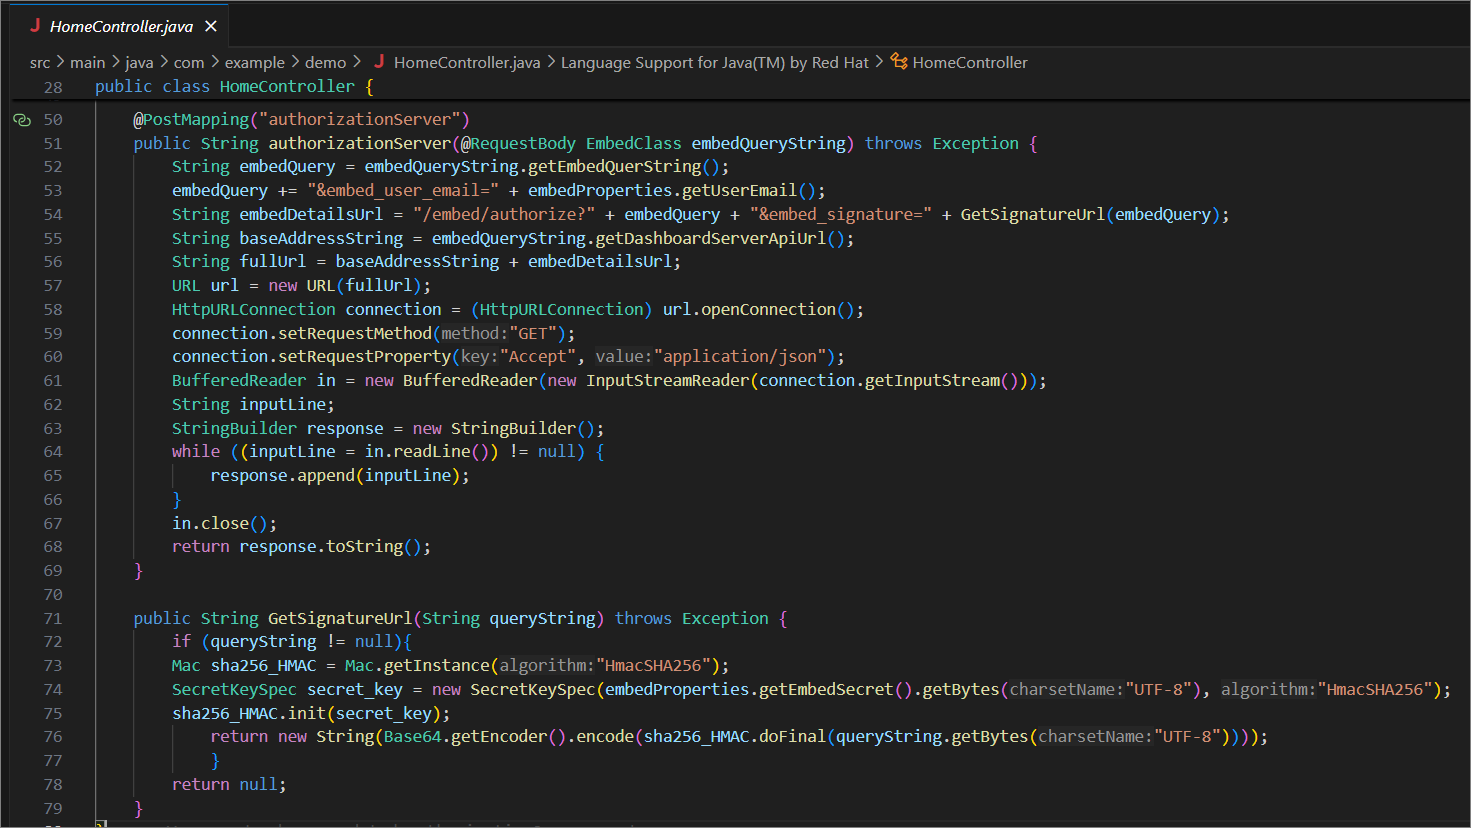
-
These details will be sent to the Bold BI server and validated there. Once the details are validated, the dashboard starts to render.
Steps to create Spring Boot application to embed dashboard
-
Please create a new Spring Boot sample by using this link
-
After creating the sample, open it in your VS code.
-
Please make sure that you have enabled embed authentication on the
embed settingspage. If it is not enabled, please refer to the following image or detailed instructions to enable it. -
To download the
embedConfig.jsonfile, please follow this link for reference. Furthermore, you can refer to the accompanying image for visual guidance.
-
Please copy the downloaded
embedConfig.jsonfile and paste it into the designated location within the application. Make sure you have placed it in the application exactly as shown in the following image. -
Create a new class called
EmbedProperties.javain thesrc\main\java\com\example\demofolder to define the following properties. These properties store the data from theembedConfig.jsonfile.import com.google.gson.annotations.SerializedName; public class EmbedProperties { @SerializedName("DashboardId") public String dashboardId; @SerializedName("ServerUrl") public String serverUrl; @SerializedName("UserEmail") public String userEmail; @SerializedName("EmbedSecret") public String embedSecret; @SerializedName("EmbedType") public String embedType; @SerializedName("Environment") public String environment; @SerializedName("ExpirationTime") public String expirationTime; @SerializedName("SiteIdentifier") public String siteIdentifier; public String getDashboardId() { return dashboardId; } public void setDashboardId(String DashboardId) { this.dashboardId = DashboardId; } public String getServerUrl() { return serverUrl; } public void setServerUrl(String ServerUrl) { this.serverUrl = ServerUrl; } public String getUserEmail() { return userEmail; } public void setUserEmail(String UserEmail) { this.userEmail = UserEmail; } public String getEmbedSecret() { return embedSecret; } public void setEmbedSecret(String EmbedSecret) { this.embedSecret = EmbedSecret; } public String getEmbedType() { return embedType; } public void setEmbedType(String EmbedType) { this.embedType = EmbedType; } public String getEnvironment() { return environment; } public void setEnvironment(String Environment) { this.environment = Environment; } public String getExpirationTime() { return expirationTime; } public void setExpirationTime(String ExpirationTime) { this.expirationTime = ExpirationTime; } public String getSiteIdentifier() { return siteIdentifier; } public void setSiteIdentifier(String SiteIdentifier) { this.siteIdentifier = SiteIdentifier; } } -
Create a new model class called
EmbedClass.javainsrc\main\java\com\example\demoto define the following properties. The dashboard details are obtained from the server using these properties.public class EmbedClass { private String embedQuerString; private String dashboardServerApiUrl; public String getEmbedQuerString(){ return embedQuerString; } public void setEmbedQuerString( String embedQuerString){ this.embedQuerString = embedQuerString; } public String getDashboardServerApiUrl(){ return dashboardServerApiUrl; } public void setDashboardServerApiUrl( String dashboardServerApiUrl){ this.dashboardServerApiUrl = dashboardServerApiUrl; } } -
Create a file named
index.htmlin thesrc\main\resources\staticfolder and include the following code in the<head>section.<head> <title>Bold BI</title> <script type="text/javascript" src="https://cdn.boldbi.com/embedded-sdk/latest/boldbi-embed.js"></script> </head> -
In the
<body>section, include the following code. The dashboard can be rendered using this container.<body onload="renderEmbedConfig()"> <div id="viewer-section"> <div id="dashboard"></div> </div> <div id="error-message" ></div> </body> -
Add the following code in the
<script>section of theindex.htmlfile to render the dashboard.<script> function renderEmbedConfig() { fetch('/getEmbedConfig') .then(response => { if (response.ok) { return response.json(); } }) .then(data => { renderDashboard(data) }) .catch(error => { const content='<div>To compile and run the project, an embed config file needs to be required. Please use the <a href="/site-administration/embed-settings/">link</a> to obtain the JSON file from the Bold BI server.</div>'; const errorMessageElement = document.getElementById('error-message'); errorMessageElement.innerHTML = content; errorMessageElement.style.display = 'block'; }); } function renderDashboard(data) { var dashboard = BoldBI.create({ serverUrl: data.serverUrl + "/" + data.siteIdentifier, dashboardId: data.dashboardId, embedContainerId: "dashboard", width: "100%", height: window.innerHeight + "px", authorizationServer: { url: "/authorizationServer" } }); dashboard.loadDashboard(); } </script> -
Include the following XML code in the
pom.xml's <dependencies>section.<dependency> <groupId>com.google.code.gson</groupId> <artifactId>gson</artifactId> <version>2.8.9</version> </dependency> -
Create a
HomeController.javafile insrc\main\java\com\example\demoin order to obtain specific dashboard details. Define an APIauthorizationServer()that utilizes theGetSignatureUrl()method to generate the algorithm. In this API, append theembedQueryString,userEmail, and the value from theGetSignatureUrl()method as query parameters in the URL to retrieve the details of the specific dashboard.@RestController @CrossOrigin @RequestMapping("/") public class HomeController { EmbedProperties embedProperties; @GetMapping("getEmbedConfig") public EmbedProperties getEmbedConfig() throws IOException { ClassPathResource resource = new ClassPathResource("embedConfig.json"); byte[] jsonBytes = StreamUtils.copyToByteArray(resource.getInputStream()); String jsonContent = new String(jsonBytes, StandardCharsets.UTF_8); Gson gson = new Gson(); embedProperties = gson.fromJson(jsonContent, EmbedProperties.class); return embedProperties; } @PostMapping("authorizationServer") public String authorizationServer(@RequestBody EmbedClass embedQueryString) throws Exception { String embedQuery = embedQueryString.getEmbedQuerString(); embedQuery += "&embed_user_email=" + embedProperties.getUserEmail(); String embedDetailsUrl = "/embed/authorize?" + embedQuery + "&embed_signature=" + GetSignatureUrl(embedQuery); String baseAddressString = embedQueryString.getDashboardServerApiUrl(); String fullUrl = baseAddressString + embedDetailsUrl; URL url = new URL(fullUrl); HttpURLConnection connection = (HttpURLConnection) url.openConnection(); connection.setRequestMethod("GET"); connection.setRequestProperty("Accept", "application/json"); BufferedReader in = new BufferedReader(new InputStreamReader(connection.getInputStream())); String inputLine; StringBuilder response = new StringBuilder(); while ((inputLine = in.readLine()) != null) { response.append(inputLine); } in.close(); return response.toString(); } public String GetSignatureUrl(String queryString) throws Exception { if (queryString != null){ Mac sha256_HMAC = Mac.getInstance("HmacSHA256"); SecretKeySpec secret_key = new SecretKeySpec(embedProperties.getEmbedSecret().getBytes("UTF-8"), "HmacSHA256"); sha256_HMAC.init(secret_key); return new String(Base64.getEncoder().encode(sha256_HMAC.doFinal(queryString.getBytes("UTF-8")))); } return null; } } -
Include these import statements in
HomeController.java.import java.io.BufferedReader; import java.io.IOException; import java.io.InputStreamReader; import java.net.HttpURLConnection; import java.net.URL; import java.nio.charset.StandardCharsets; import java.util.Base64; import java.util.HashMap; import java.util.Map; import javax.crypto.Mac; import javax.crypto.spec.SecretKeySpec; import org.springframework.core.io.ClassPathResource; import org.springframework.util.StreamUtils; import org.springframework.web.bind.annotation.CrossOrigin; import org.springframework.web.bind.annotation.GetMapping; import org.springframework.web.bind.annotation.PostMapping; import org.springframework.web.bind.annotation.RequestBody; import org.springframework.web.bind.annotation.RequestMapping; import org.springframework.web.bind.annotation.RestController; import com.google.gson.Gson; -
Now, you can run the sample using the Spring Boot Dashboard in the Activity Bar on the side.
-
You can access your application by opening a web browser and navigating to this URL
http://localhost:8080.