Embedding Bold BI Dashboards in WPF using the Embedded SDK
A GitHub link has been provided to get the sample application that demonstrates the rendering of the dashboard available on your Bold BI server. This will be followed by steps to create a new embedding application in WPF on your own.
NOTE: Reading the Getting Started section of the documentation is the best way to begin. The
Getting Startedguide provides you with the necessary information you need to know before working on the sample.
Sample to embed dashboard
-
Please get the WPF Forms sample.
-
You must set the following properties in the
EmbedProperties.csfile as shown below.

RootUrl Dashboard Server BI URL (ex: http://localhost:5000/bi, http://dashboard.syncfusion.com/bi) SiteIdentifier For Bold BI Enterprise edition, it should be like site/site1. For Bold BI Cloud, it should be empty string.DashboardId Provide the dashboard id of the dashboard you want to embed here. Please refer below how to get the dashboard id. UserEmail UserEmail of the Admin in your Bold BI, which will be used to get the dashboards list UserPassword Password of the Admin in Bold BI, which will be used to get the dashboards list EmbedSecret You can get your EmbedSecret key from embed tab by enabling Enable embedauthenticationin Administration page. -
Then, you can run your WPF application.
-
The dashboard can be rendered in design mode or created by making the following changes in the
InitializeAsync()method.async void InitializeAsync(string resultContent) { var html = @" <!DOCTYPE html> <html><head><meta http-equiv='X-UA-Compatible' content='IE=Edge' /> <script src='https://cdn.polyfill.io/v2/polyfill.min.js'></script> <script type='text/javascript' src='https://cdn.boldbi.com/embedded-sdk/v16.1.70/boldbi-embed.js'></script>" + "<script type='text/javascript'>$(document).ready(function() " + "{this.dashboard = BoldBI.create({ serverUrl:'" + EmbedProperties.RootUrl + EmbedProperties.SiteIdentifier + "', dashboardId:'" + EmbedProperties.DashboardId + "',embedContainerId: 'dashboard',embedType:'" + BoldBI.EmbedType.Component + "',environment:'" + BoldBI.Environment.Enterprise, /* If Cloud, you should use BoldBI.Environment.Cloud */ + "'mode: '" + BoldBI.Mode.Design + "',width: window.innerWidth - 20 + 'px',height: window.innerHeight - 20 + 'px',expirationTime: 100000,authorizationServer:{url: '', data:" + resultContent + "}});this.dashboard.loadDesigner();});</script>" + "</head>" + "<body><div id ='viewer-section'>" + "<div id ='dashboard'></div></div>" + "</body>" + "</ html>"; await wbSample.EnsureCoreWebView2Async(null); if (wbSample != null && wbSample.CoreWebView2 != null) { File.WriteAllText(System.IO.Path.Combine(Environment.CurrentDirectory, @"MyWebView.html"), html); wbSample.CoreWebView2.Navigate(System.IO.Path.Combine(Environment.CurrentDirectory, @"MyWebView.html")); } }serverUrl Dashboard Server BI URL (ex: http://localhost:5000/bi/site/site1, http://dashboard.syncfusion.com/bi/site/site1) dashboardId Provide the dashboard id of the dashboard you want to embed in view or edit mode. Ignore this property to create new dashboard. embedContainerId Container Id in which dashboard renders.It should not contain hypen. mode In which mode you want to render dashboard. It can either be 'View' or 'Design' mode. expirationTime Set the duration for the token to be alive. authorizationServer Url of the 'GetDetails' action in the application.
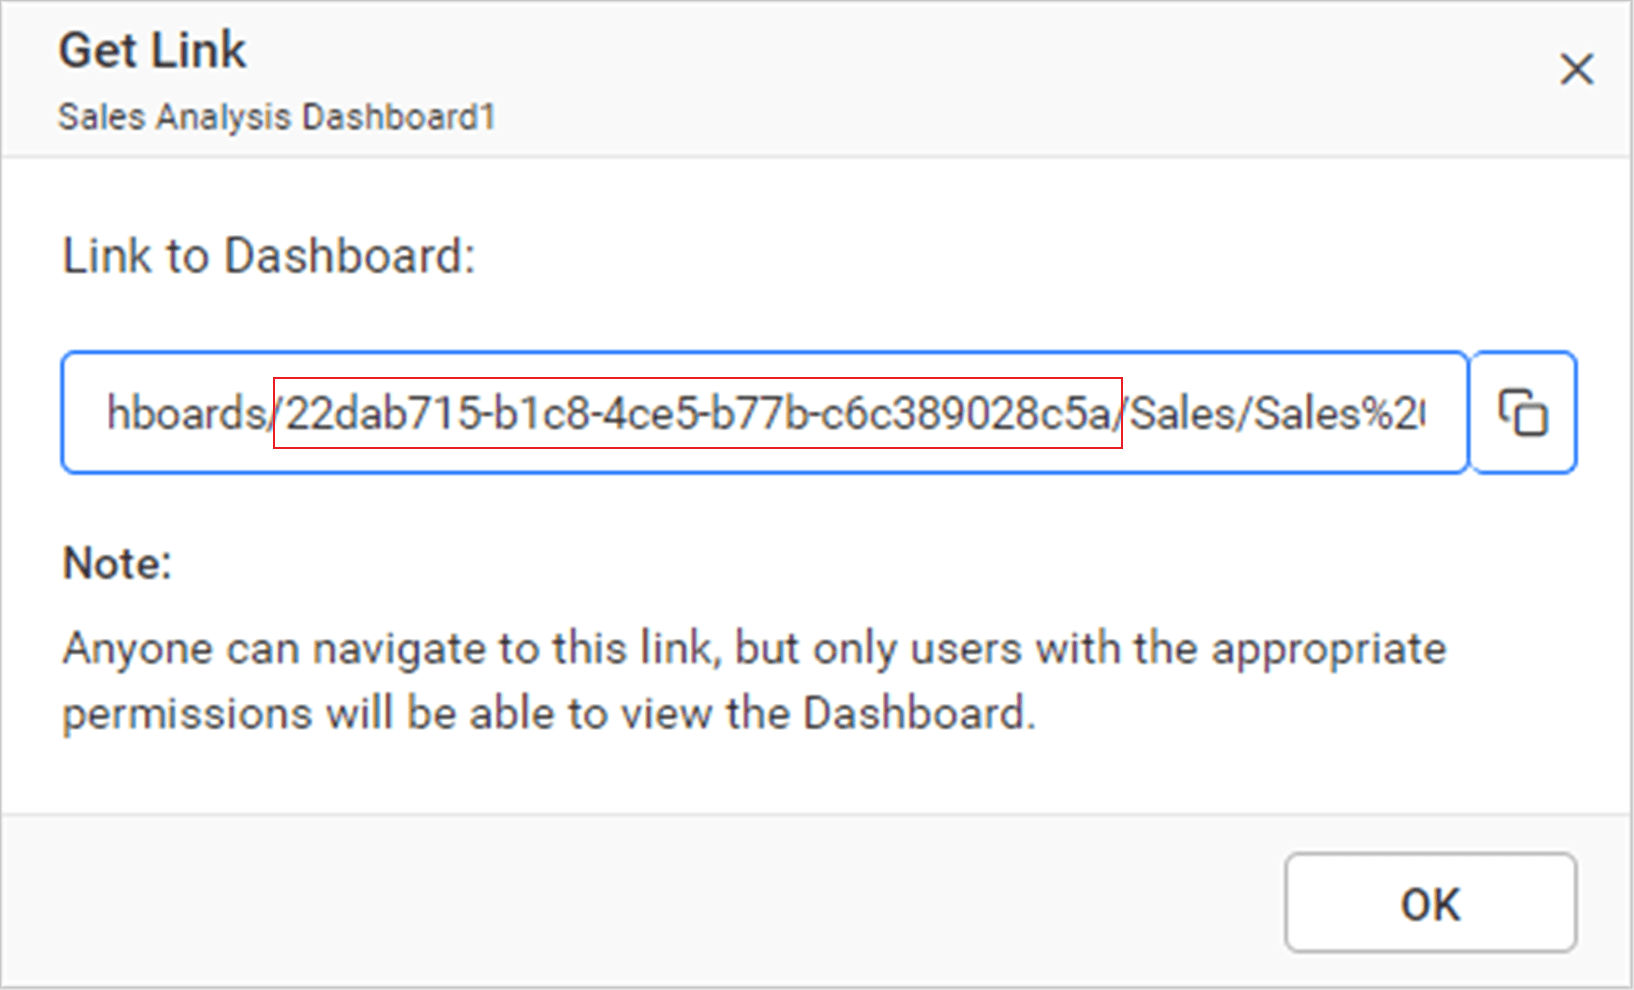
Get dashboard ID
Please obtain the item ID of the dashboard from the BI server. Kindly refer to this link and the accompanying screenshot.
After making the above changes in the sample, run the WPF forms and the dashboard will be displayed.
How this sample works
-
Use
WebViewto render the BoldBI Dashboard in the WPF application. -
Since you are using the
WebView, you need to generate the HTML file to append it to theWebView. -
To authorize the application, call the
MainWindowmethod in the following manner.
-
In the above authorization, the
SignatureUrlis generated with the providedEmbedSecret. Using the signature, you will validate the details and BoldBI will return the token. You will pass the token with theHtmlStringas follows.
-
In the
EmbedProperties.csfile, modify thedashboard Idof the desired dashboard according to your embedding preference.
Steps to create new WPF Core application to embed dashboard
-
Open Visual Studio and search for WPF in the search template.

-
Choose the one highlighted above, then click
Next. -
Change the project name as desired, then click on
Create. -
Create the model class
EmbedProperties.csand define the properties as follows.public class EmbedProperties { public static string RootUrl = "";//Dashboard Server BI URL (ex: http://localhost:5000/bi, http://dashboard.syncfusion.com/bi) public static string SiteIdentifier = "site/site1";//For Bold BI Enterprise edition, it should be like site/site1. For Bold BI Cloud, it should be empty string. public static string Environment = "enterprise"; public static string EmbedType = "component"; public static string DashboardId = "";//Provide the dashboard id of the dashboard you want to embed here. Please refer below how to get the dashboard id. public static string UserEmail = ""; //UserEmail of the Admin in your Bold BI, which will be used to get the dashboards list public static string UserPassword = "";//Password of the Admin in Bold BI, which will be used to get the dashboards list public static string EmbedSecret = "";//You can get your EmbedSecret key from embed tab by enabling<code>Enable embedauthentication</code> in Administration page } -
In this method, the
embedQueryString,userEmail, and the value from theGetSignatureUrl()method are appended as query parameters in the URL to obtain details of a specific dashboard.public MainWindow() { InitializeComponent(); //this.RenderSize = Screen.PrimaryScreen.WorkingArea.Size; this.WindowState = WindowState.Maximized; decimal time = (decimal)Math.Round((DateTime.Now.ToUniversalTime() - new DateTime(1970, 1, 1)).TotalMilliseconds / 1000); var dashboardServerApiUrl = EmbedProperties.RootUrl + "api/" + EmbedProperties.SiteIdentifier; var embedQuerString = "embed_nonce=" + Guid.NewGuid() + "&embed_dashboard_id=" + EmbedProperties.DashboardId + "&embed_timestamp=" + Math.Round(time) + "&embed_expirationtime=100000"; embedQuerString += "&embed_user_email=" + EmbedProperties.UserEmail; var embedDetailsUrl = "/embed/authorize?" + embedQuerString + "&embed_signature=" + GetSignatureUrl(embedQuerString); using (var client = new HttpClient()) { client.BaseAddress = new Uri(dashboardServerApiUrl); client.DefaultRequestHeaders.Accept.Clear(); var result = client.GetAsync(dashboardServerApiUrl + embedDetailsUrl).Result; string resultContent = result.Content.ReadAsStringAsync().Result; //wbSample.ObjectForScripting = this; InitializeAsync(resultContent); } } public string GetSignatureUrl(string message) { var encoding = new System.Text.UTF8Encoding(); var keyBytes = encoding.GetBytes(EmbedProperties.EmbedSecret); var messageBytes = encoding.GetBytes(message); using (var hmacsha1 = new HMACSHA256(keyBytes)) { var hashMessage = hmacsha1.ComputeHash(messageBytes); return Convert.ToBase64String(hashMessage); } } -
In the
InitializeAsync()method, create the HTML content and include the mandatory CDN files in it. Create a DOM element with the id “dashboard” where thedashboardis rendered.async void InitializeAsync(string resultContent) { var html = @" <!DOCTYPE html> <html><head><meta http-equiv='X-UA-Compatible' content='IE=Edge' /> <script src='https://cdn.polyfill.io/v2/polyfill.min.js'></script> <script type='text/javascript' src='https://cdn.boldbi.com/embedded-sdk/v16.1.70/boldbi-embed.js'></script>" + "<script type='text/javascript'>$(document).ready(function() " + "{this.dashboard = BoldBI.create({ serverUrl:'" + EmbedProperties.RootUrl + EmbedProperties.SiteIdentifier + "', dashboardId:'" + EmbedProperties.DashboardId + "',embedContainerId: 'dashboard',embedType:'" + BoldBI.EmbedType.Component + "',environment:'" + BoldBI.Environment.Enterprise, /* If Cloud, you should use BoldBI.Environment.Cloud */ + "'mode: '" + BoldBI.Mode.View + "',width: window.innerWidth - 20 + 'px',height: window.innerHeight - 20 + 'px',expirationTime: 100000,authorizationServer:{url: '', data:" + resultContent + "}});this.dashboard.loadDashboard();});</script>" + "</head>" + "<body><div id ='viewer-section'>" + "<div id ='dashboard'></div></div>" + "</body>" + "</ html>"; await wbSample.EnsureCoreWebView2Async(null); if (wbSample != null && wbSample.CoreWebView2 != null) { File.WriteAllText(System.IO.Path.Combine(Environment.CurrentDirectory, @"MyWebView.html"), html); wbSample.CoreWebView2.Navigate(System.IO.Path.Combine(Environment.CurrentDirectory, @"MyWebView.html")); } }