Embed Token Generation
Note: This is the enhanced approach to token generation. If you need a lower version below 14.1 of the token generation approach, please refer to this link.
To embed a Bold BI dashboard securely in your application, you must generate an Embed Token. From Bold BI v14.1, we introduced an object model structure to generate a token by calling the token generation endpoint via a POST API call, which makes it easier to provide the necessary details.
The generated Embed Token authorizes access and ensures that only permitted users can view or interact with the dashboard.
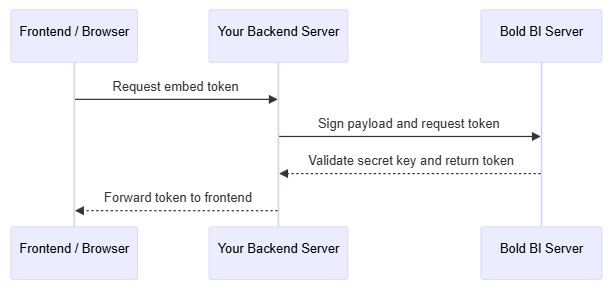
The following diagram illustrates the token generation flow:

- NODE
- .NET
- PHP
var http = require("http");
var https = require("https");
var express = require('express');
var cors = require('cors');
var app = express();

app.use(cors());
// Parse JSON bodies (as sent by API clients)
app.use(express.json());

app.post('/tokenGeneration', function (request, response) {
  const embedDetails = {
    serverurl: "<Bold BI Server URL>",
    siteidentifier: "<Site Identifier>",
    email: "<User Email>",
    embedsecret: "<Embed Secret Key>",
    dashboard: { // Dashboard ID property is mandatory only when using BoldBI version 14.1.11.
      id: "<Dashboard Id>"
    }
  }

  const parsedUrl = new URL(embedDetails.serverurl);
  const postData = JSON.stringify(embedDetails);
  const client = parsedUrl.protocol === 'https:' ? https : http;
  const options = {
    hostname: parsedUrl.hostname,
    port: parsedUrl.port || (parsedUrl.protocol === 'https:' ? 443 : 80),
    path: `${parsedUrl.pathname}/api/${embedDetails.siteidentifier}/embed/authorize`,
    method: 'POST',
    headers: {
      'Content-Type': 'application/json',
      'Content-Length': Buffer.byteLength(postData)
    }
  };

  const authRequest = client.request(options, authResponse => {
    let result = '';
    authResponse.setEncoding('utf8');
    authResponse.on('data', chunk => result += chunk);
    authResponse.on('end', () => {
      const resultparse = JSON.parse(result);
      response.send(resultparse?.Data?.access_token);
    });
  });

  authRequest.on('error', (e) => {
    console.error("Error fetching embed token:", e.message);
  });

  authRequest.write(postData);
  authRequest.end();
});
Note: Here we are generating a token based on the provider user permission. This token can be used for all other supported types of embedding. The dashboard ID is a mandatory valid property that should be used when using the Bold BI version 14.1.11 only. After that version, we removed the dashboard ID as a mandatory requirement to generate the token.
Note: The supported embeddings are dashboard viewer, dashboard designer, create dashboard, datasource designer, connection, and pinboard.
The following mandatory values must be configured in your backend application to generate an embed token.
| Parameter | Description |
|---|---|
serverurl |
Base URL of your Bold BI application (e.g.,
https://your-company.boldbi.com/bi).
|
siteidentifier |
Unique site/tenant identifier in Bold BI (e.g., site/tenant) |
dashboard: { id: } |
Unique ID of the dashboard How To get: Open the dashboard in BI application and copy the ID from the browser's URL. |
useremail |
Email of the user viewing the dashboard. The user must exist in Bold BI and have permission to access it. |
embedsecret |
Secret key used to sign authorization requests. How To get: Retrieve this from the Bold BI settings page. |
Important: Never expose
embedSecretto the client. Generate tokens only on your backend and returnaccess_tokento the browser.
Token Generation Response (JSON)
The Bold BI server returns the response in JSON format, including the access_token and dashboard details, if the request is valid. Please find the below image of the resultContent.
- JSON
{
  "ApiStatus": true,
  "Data": {
    "email": "[email protected]",
    "username": "testuser",
    "access_token": "eyJhbGciSI6IjE3NTY4OTEwMDYiLCJjdXN0b21fYXR0cmlidXRlIjOiJIUzI1NiIsInR5cCI6IkpXVCJ9.eyJlbWFpbCI6ImFudWFiYXJuYS5iQHN5bmNmdXNpb24uY29tIiwidXBuIjoiYW51YWJhcm5hIiwibmFtZWlkIjoiMSIsInVuaXF1ZV9uYW1lIjoiNmUxMmVhNjYtMWU3My00NDVmLWJlMzMtNDY5OTg0ZjVkODNiIiwiSVAiOiI6OjEiLCJpc3N1ZWRfZGF0Zoie30iLCJuYmYiOjE3NTYMiOiJodHRwOi8vbG9jYWxob3N0OjYwNTE1L2JpL3NpdGUvc2l0ZTEiLCJ4OTEwMDYsImV4cCI6MTc1Njk3NzQwNiwiaWF0IjoxNzU2ODkxMDA2LCJpc3hdWQiOiJodHRwOi8vbG9jYWxob3N0OjYwNTE1L2JpL3NpdGUvc2l0ZTEifQ.O1SqPb4gpcwCnqKHC1LtAdVWvdMnMKzDt8iz3vmIG-o",
    "token_type": "bearer",
    ".expires":"2/12/2026 12:29:05 PM",
    "UserDetail": "{\"DisplayName\":\"Test user B\",\"Email\":\"[email protected]\",\"Username\":\"testuser\",\"FirstName\":\"Test user\"...}",
    "ItemDetail": "{\"CanClone\":false,\"CanCopy\":false,\"CanCreateItem\":false,\"CanDelete\":false,\"CanWrite\":true,\"CategoryDescription\":null,\"CategoryId\":\"3ae74984-a689-4997-88b9-3c4e77f10dda\",\"CategoryName\":\"Getting Started Tutorial\",\"CreatedByDisplayName\":\"Test user B\",\"CreatedById\":1,\"CreatedDate\":\"08/08/2025 11:18 AM\",\"FailureOccurence\":0,\"Description\":\"This supply chain performance dashboard helps to effectively track supply chain KPIs related to the efficiency of sales orders processing.\",\"Id\":\"c5bab292-0ee6-4ee7-9dfa-d6b3cffed7ff\",\"ItemLocation\":\"c5bab292-0ee6-4ee7-9dfa-d6b3cffed7ff/1\",\"Name\":\"Supply Chain Performance Dashboard\"...}"
  },
  "Status": true
}