Manage Schedules in the Bold BI
This section explains how to add, edit, and delete schedules and also how to run the schedules on-demand, enable or disable schedules, and view schedule run history in the Bold BI platform.
The Schedules page displays the schedules that are accessible to the user based on their permissions.
Add Schedules
Schedules can only be created if the user has the Create All Schedules permission. Schedules can be added in three ways:
- Add schedule from schedules page.
- Add schedule from
+button in the left side menu. - Add schedule from context menu of the respective dashboards.
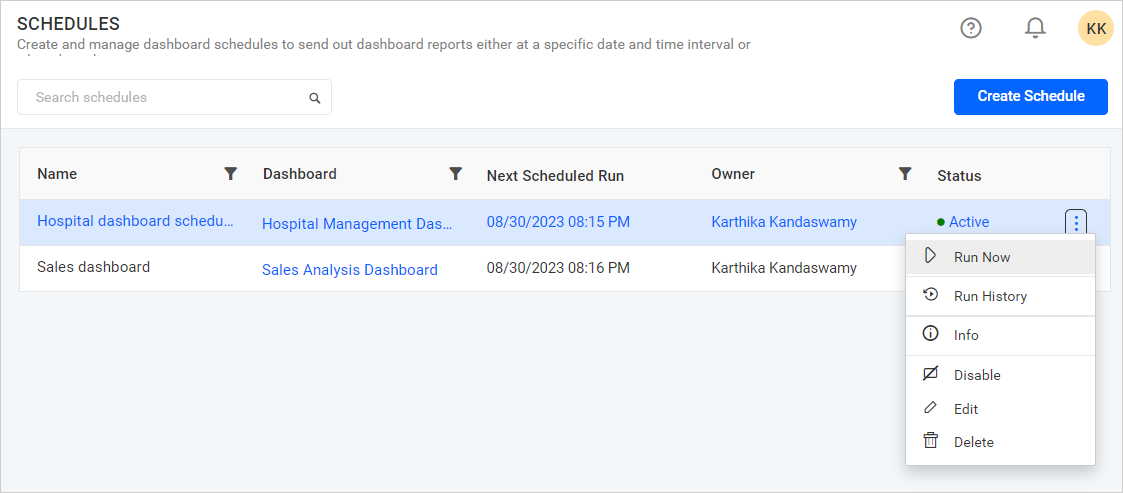
Add schedule from schedules page
-
Click on the
Create Scheduleoption in the top right corner of the Schedules page.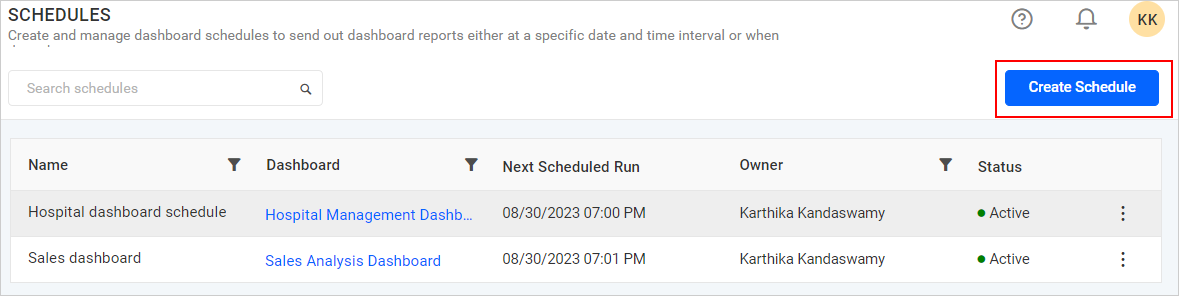
Add schedule from + button menu
-
Click on the
+button in the left side menu and selectScheduleunderCreateto add a schedule.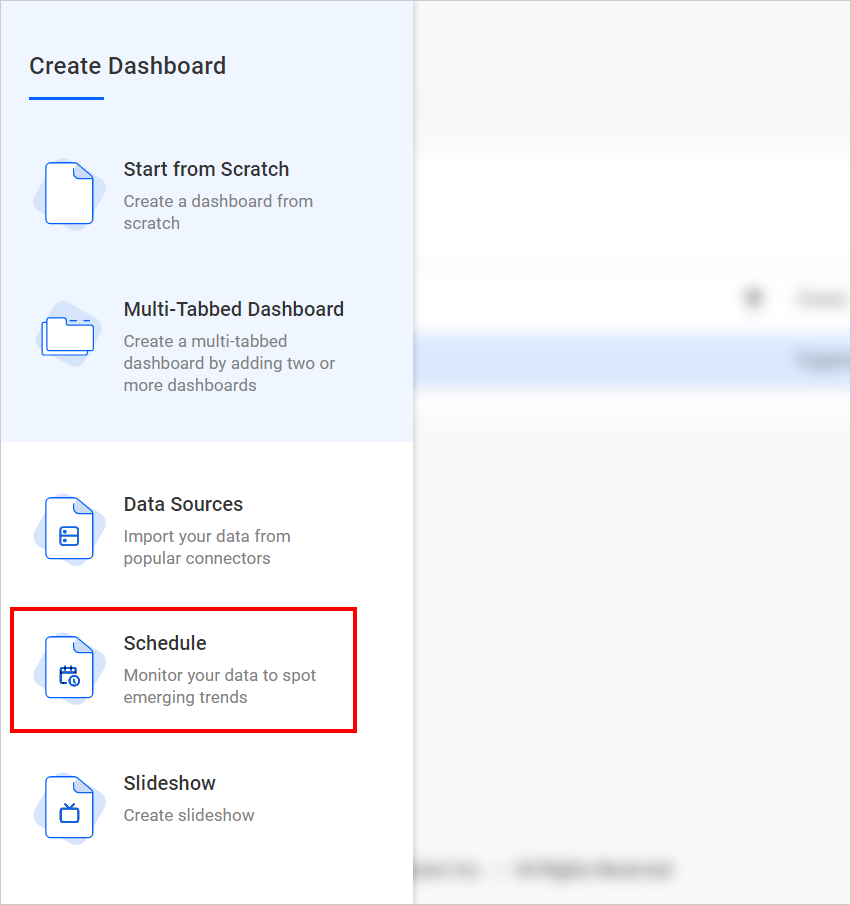
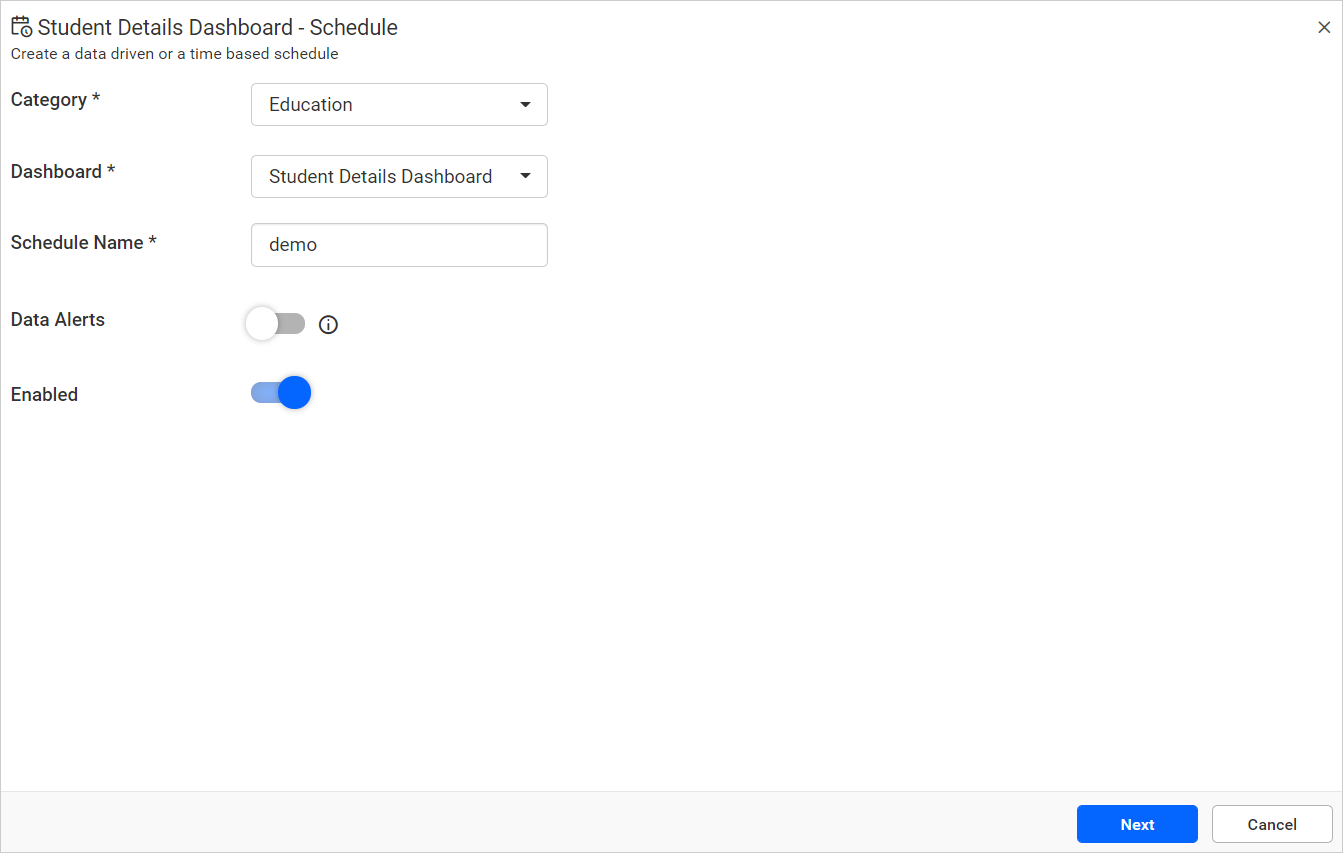
-
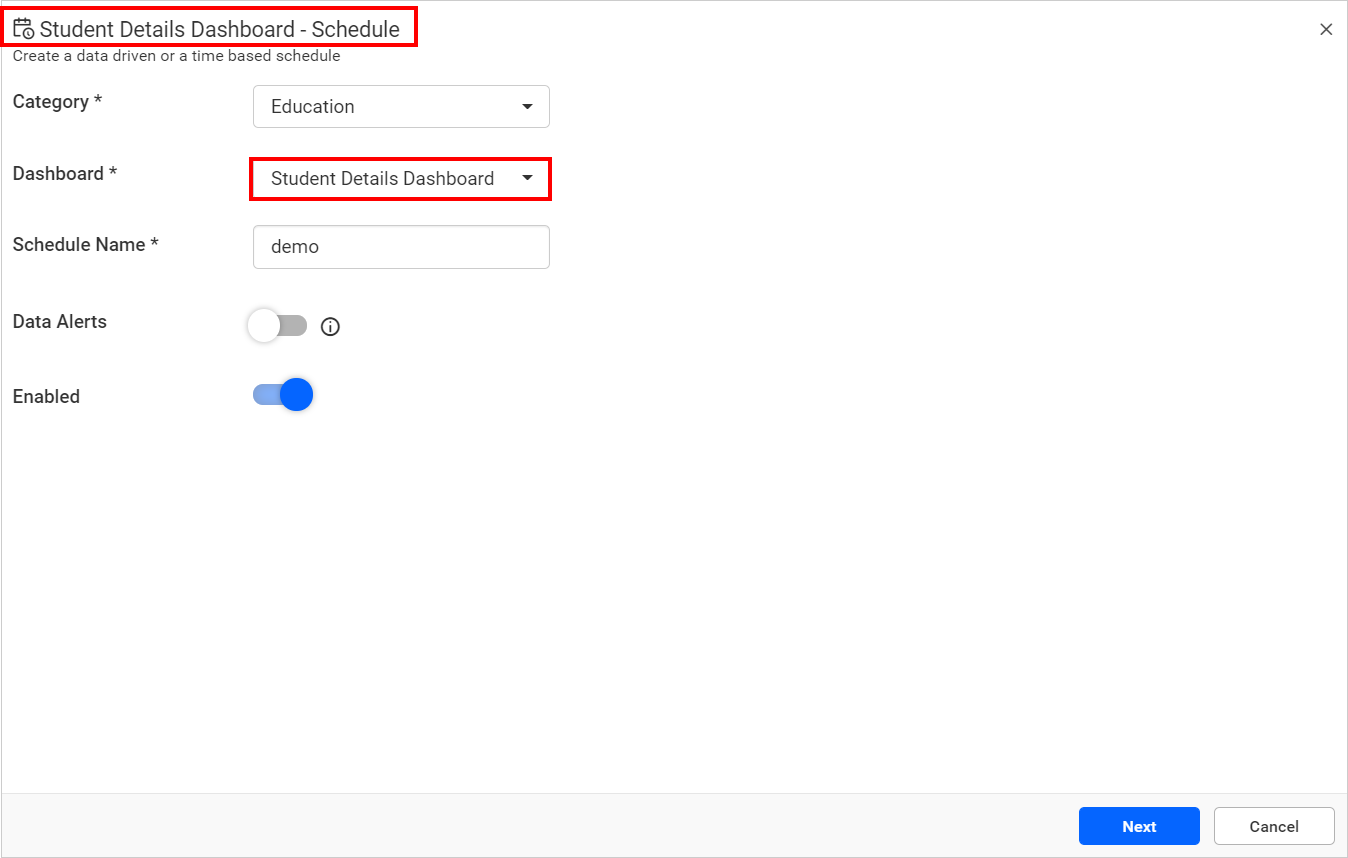
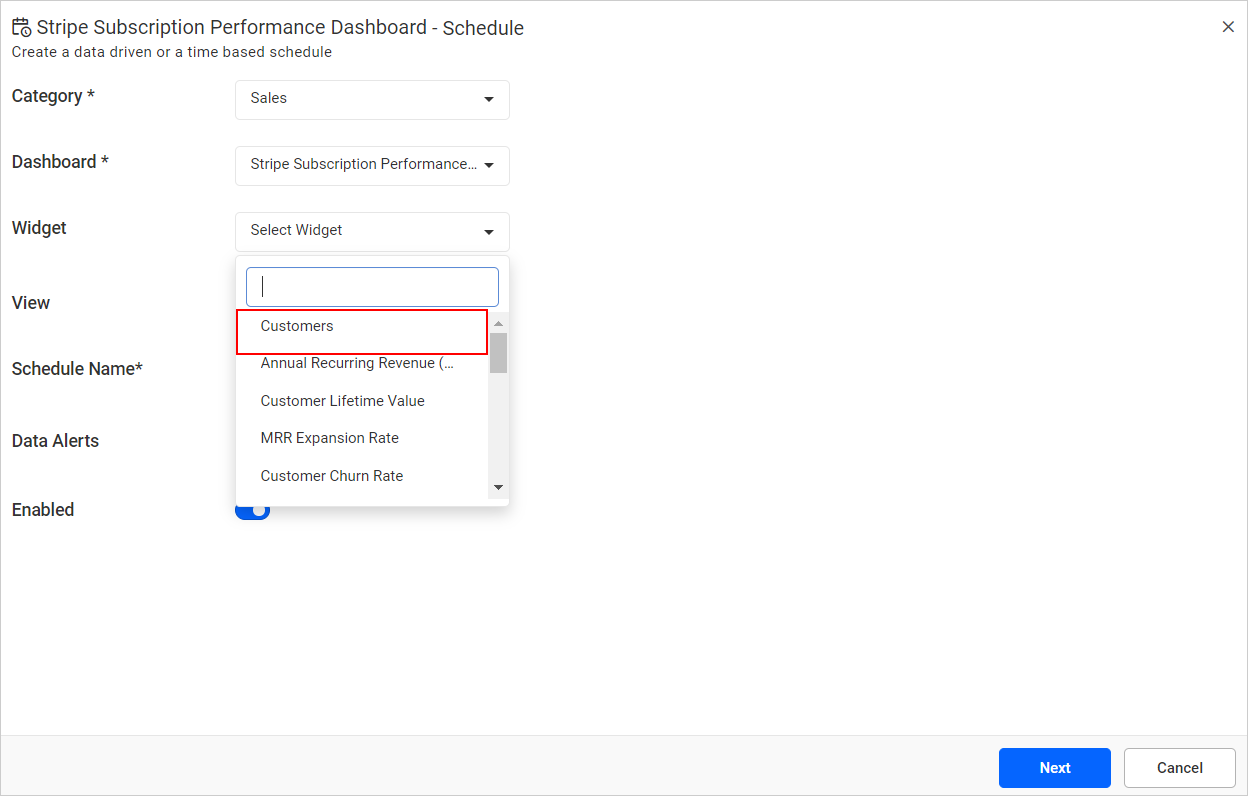
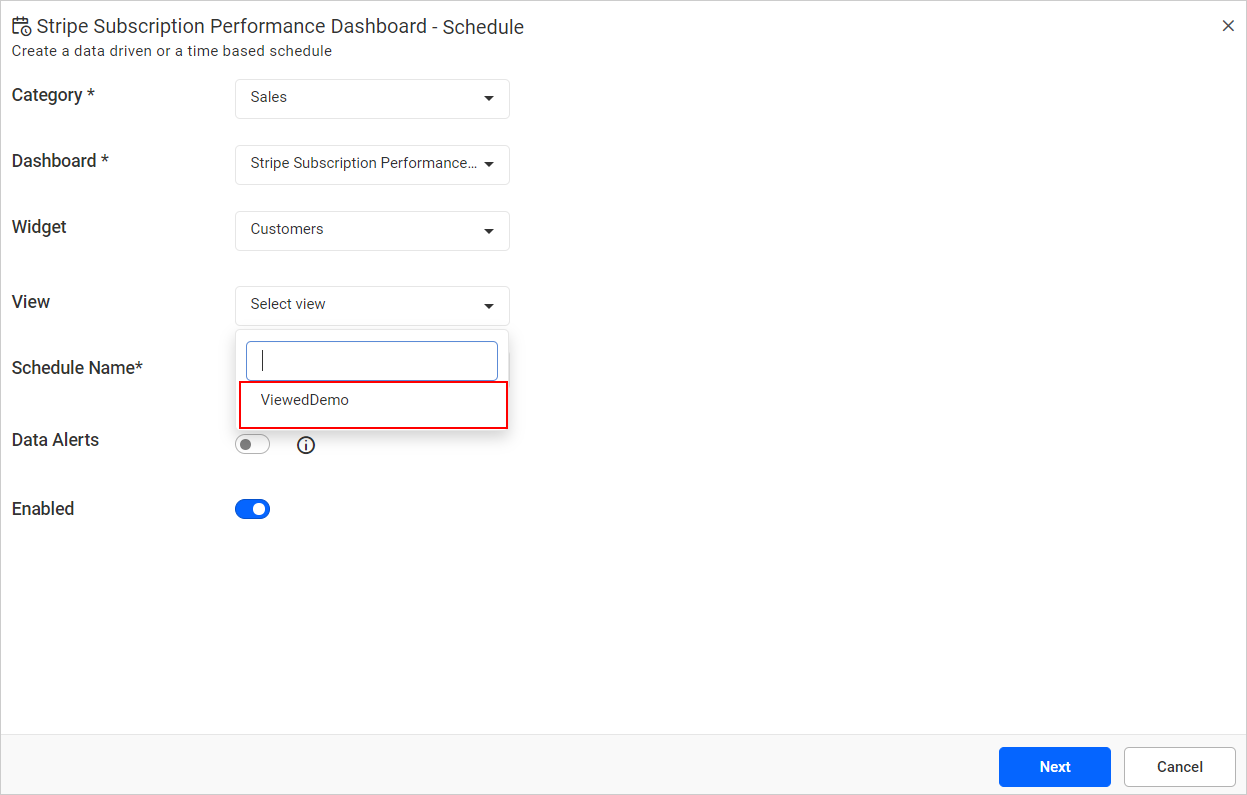
Choose the required category from the
Categorydropdown. Once a category is selected, the corresponding dashboards under that category will be displayed in theDashboarddropdown. Once a dashboard is selected, the corresponding widget and views under the dashboard will be displayed in theWidgetandViewdropdown. -
Select the desired category from the dropdown.
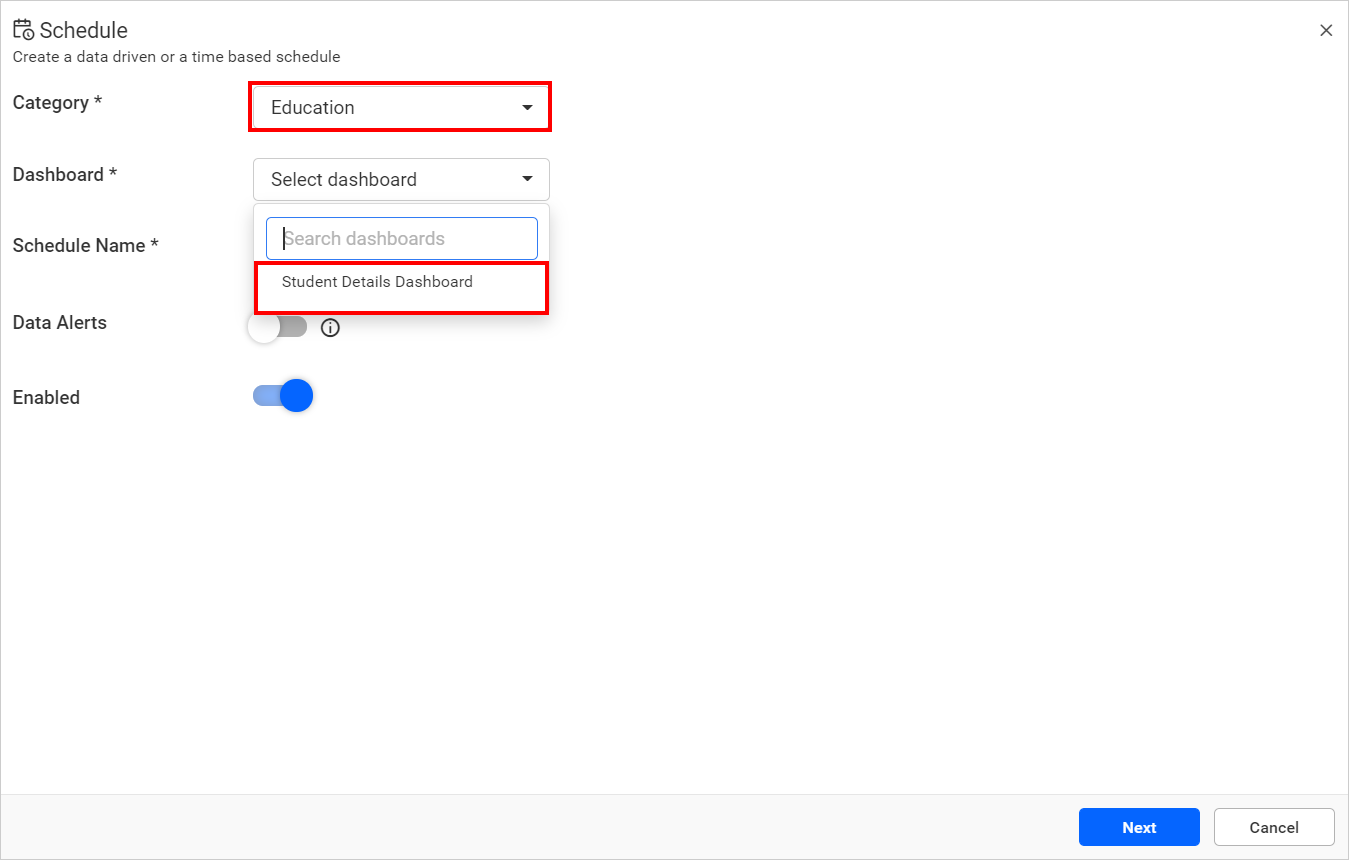
-
Select the desired dashboard from the dropdown.
-
Select the desired widget from the dropdown. You can also select multiple widgets.
-
Select the desired view form the dropdown.
-
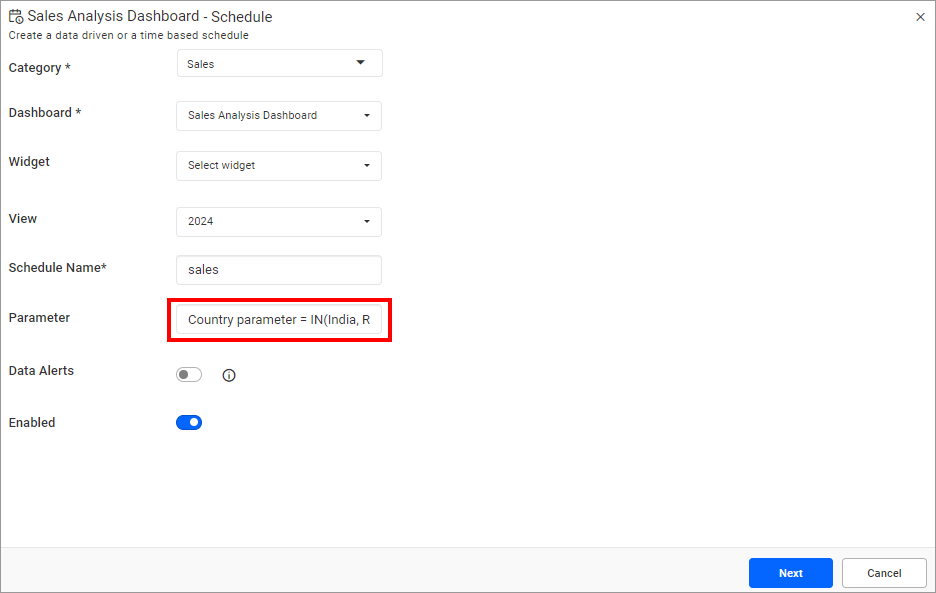
Provide the valid parameter. For instructions on how to create parameters in Bold BI, please refer to this link.
Add schedule from dashboard viewer page
If the user has Read permission for a specific dashboard and Create permission for the schedule, then they can create a schedule in that dashboard.
To learn about creating a schedule on the dashboard viewer page, please check the create schedule in dashboard viewer page
Add schedule from context menu of the respective dashboards
-
Click on the
Actionsbutton in the dashboard grid context menu and chooseCreate Scheduleto schedule the corresponding dashboard.
-
Once the dialog is opened, the category and dashboard values are selected by default. The user can choose view and widget from the dropdown menu if needed.
NOTE: Categories, Dashboards, Views, Widgets and Parameter can be changed from schedule dialog box itself.
- After adding schedule details, click
Nextin the schedule dialog.
Customizing schedule email Content
-
Customize the email content that needs to be sent during the schedule.
-
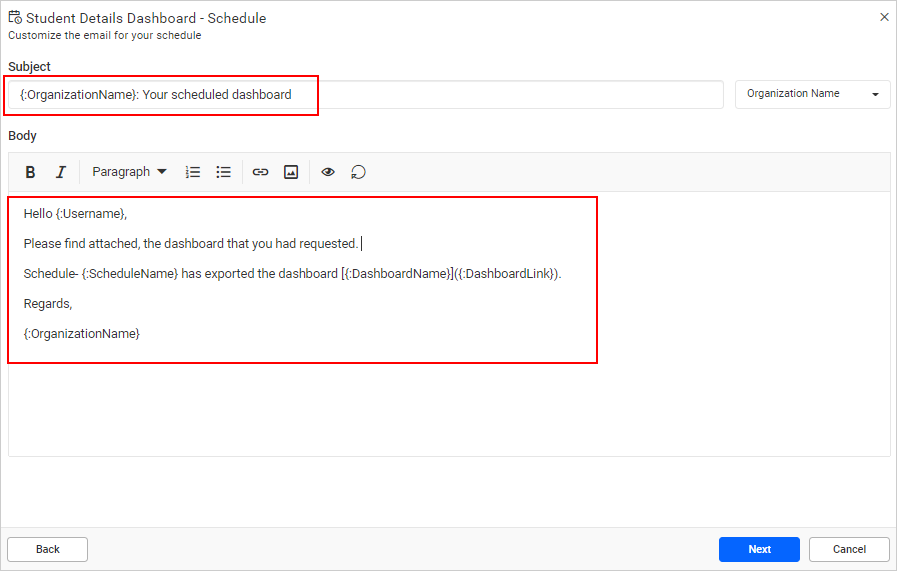
The scheduled email content page will feature default content based on the selected system template, as shown in the following image. Additionally, users are not permitted to customize the default system template content.
-
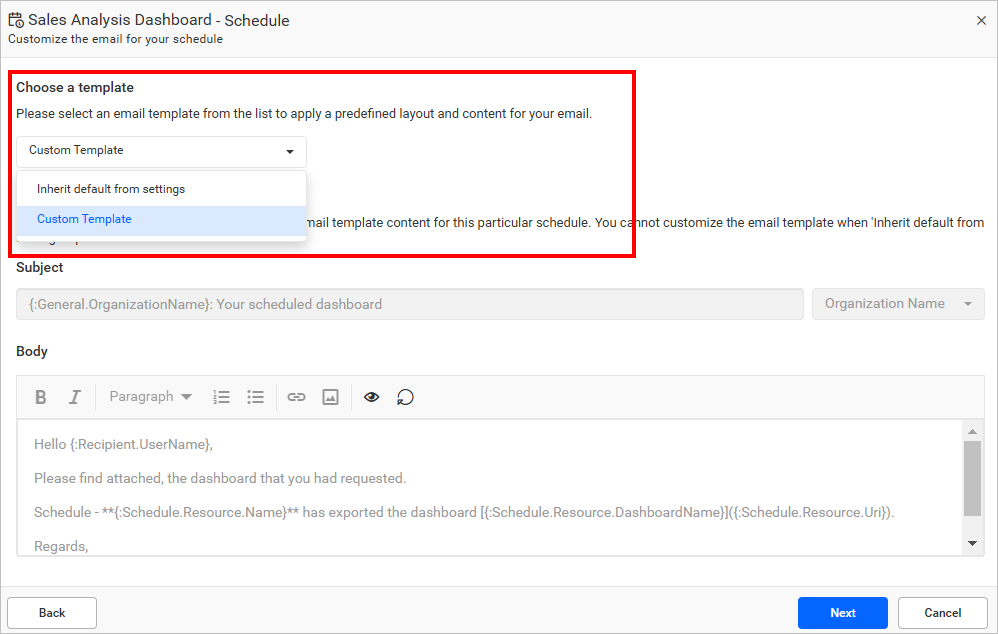
You can also create a new template using
Timed Dashboard ExportorAlert-Driven Dashboard Exporttemplate from email template settings and select it from the dropdown menu to customize the email content.Timed Dashboard Export: Send a notification when a dashboard is exported on a predetermined frequency.For Example: This template will be used to notify people added to the dashboard schedule if a dashboard is configured to export on Mondays.
Alert-Driven Dashboard Export: Send a notification when a condition is satisfied and a dashboard is exported automatically.For Example: This template will be used to notify people who have been added to the dashboard schedule if a threshold is reached and an export is initiated.
-
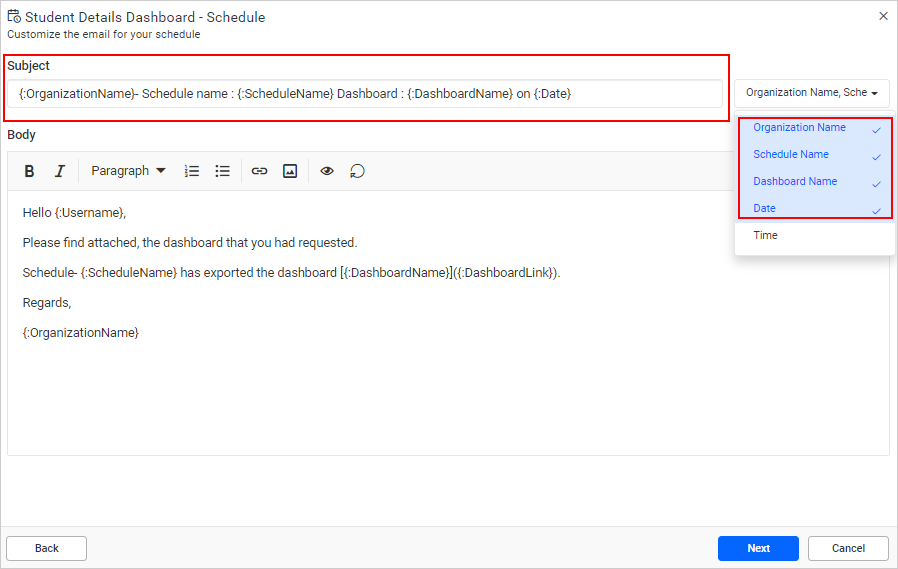
To customize the subject and body content of an email, you can enable the
Email Customizationtoggle button.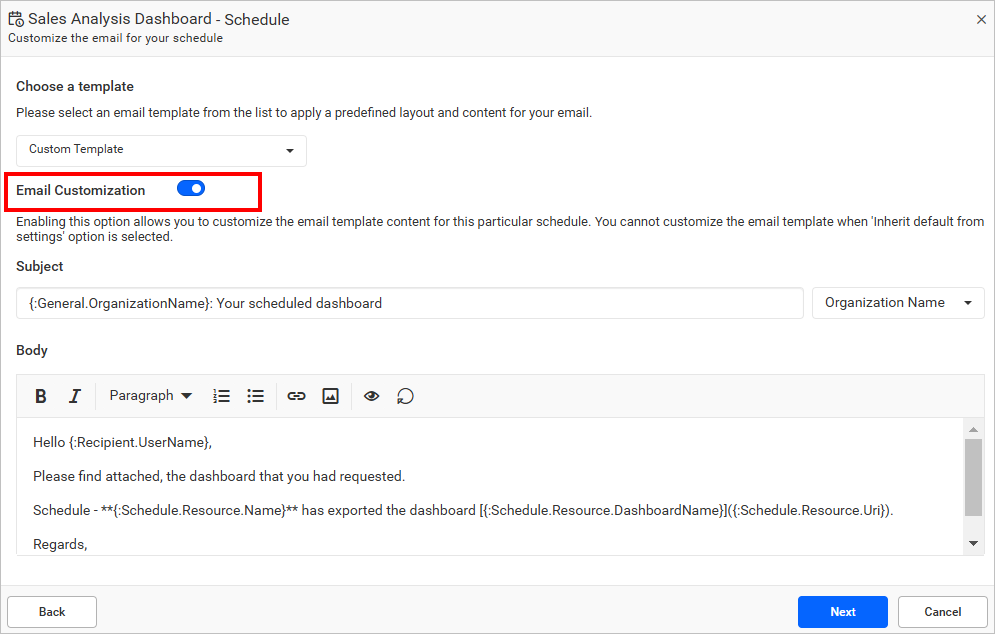
-
To customize the subject, use the variables in the drop-down menu next to the subject field. Once you select a variable from the drop-down, the default subject content will be reset.
-
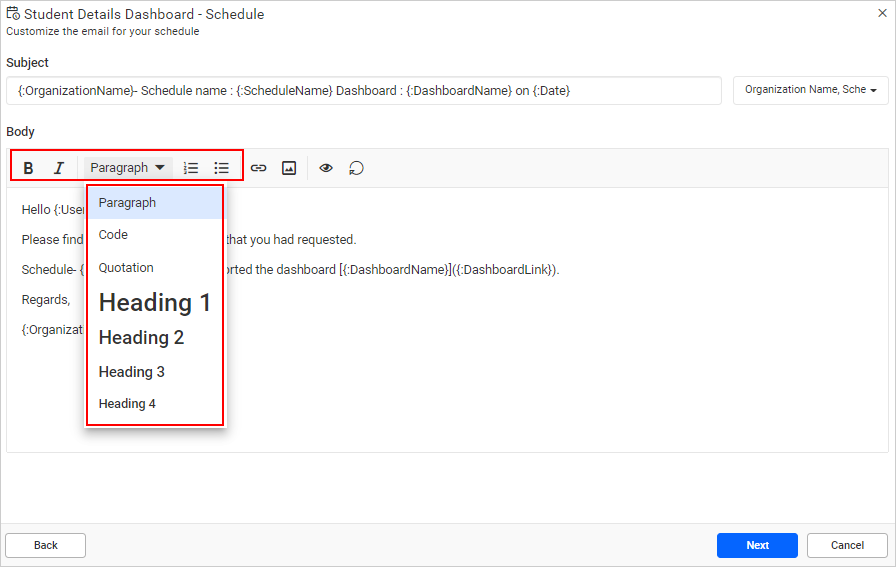
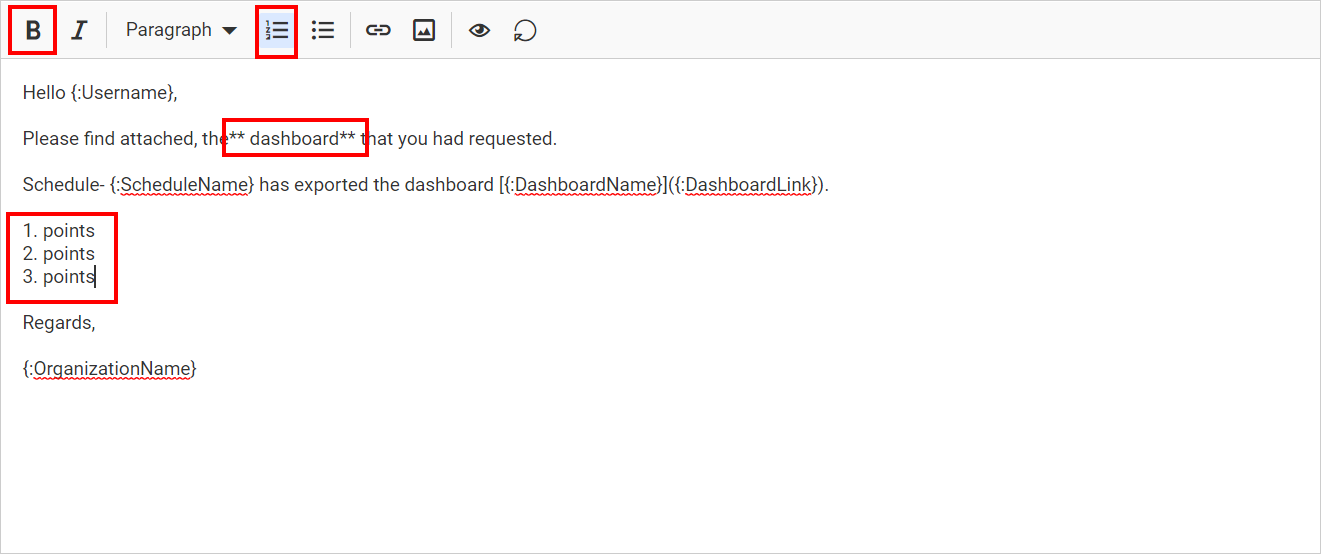
Customize the email body content and enhance it by using bold, italic, bullet points, numbers, font size, code, and quotation options as shown in the following images.
-
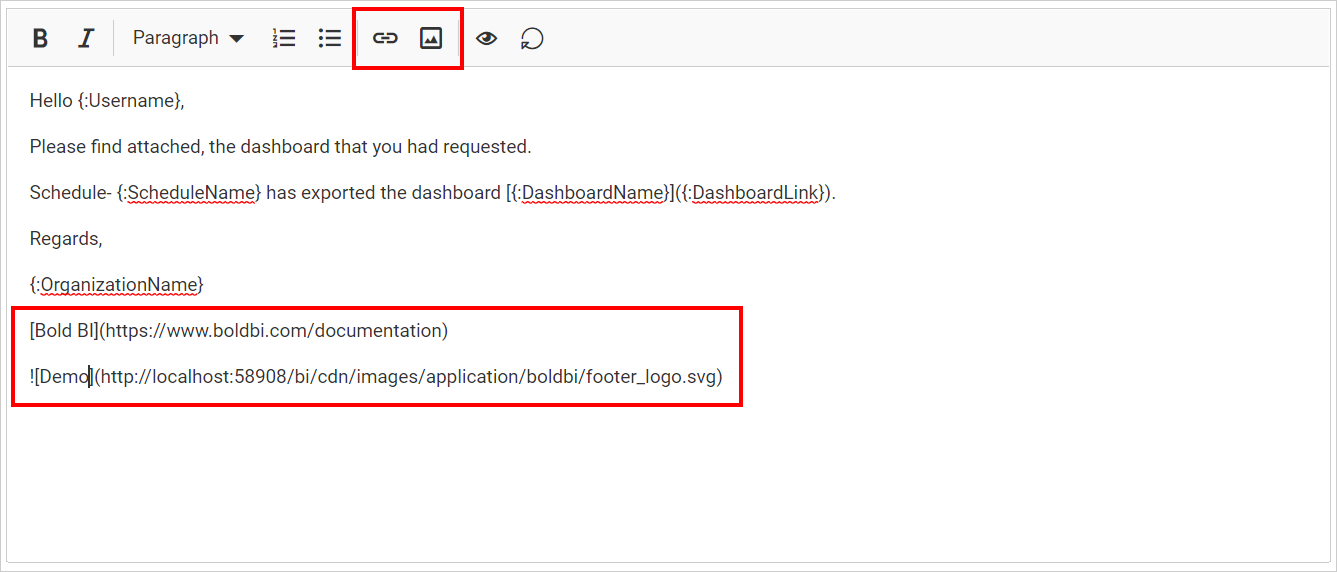
Insert images and links if needed.
-
With the help of the
Previewoption, visualize the actual email format while scheduling andresetif you need to restore to the default content.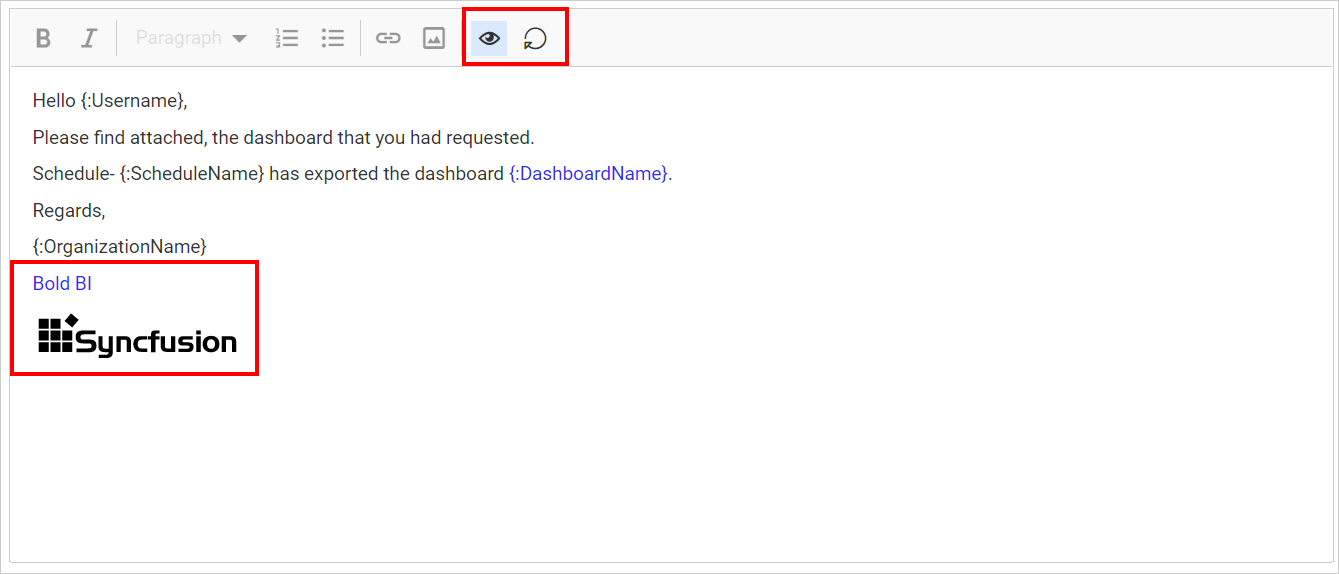
-
After customizing the email content, click
Nextin the schedule dialog.
-
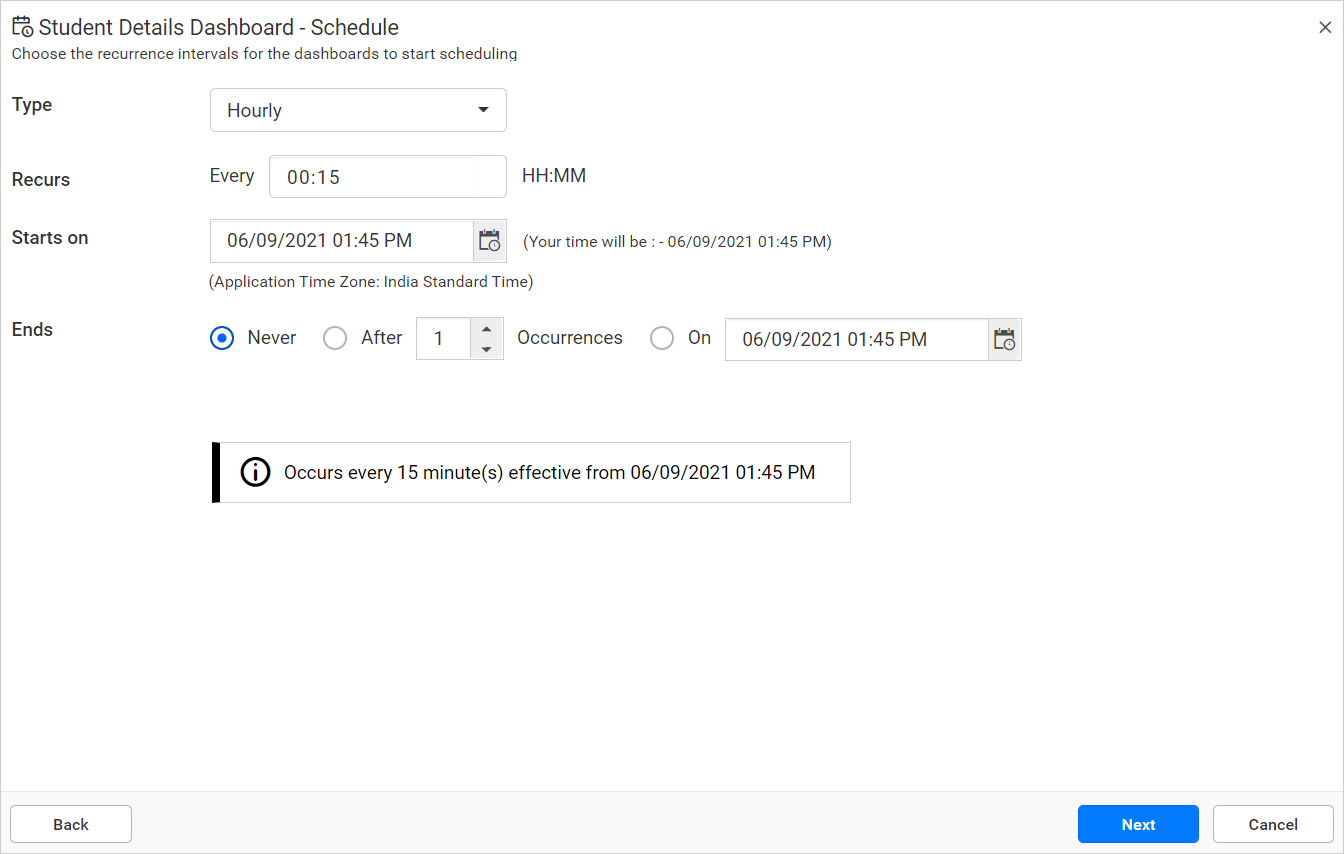
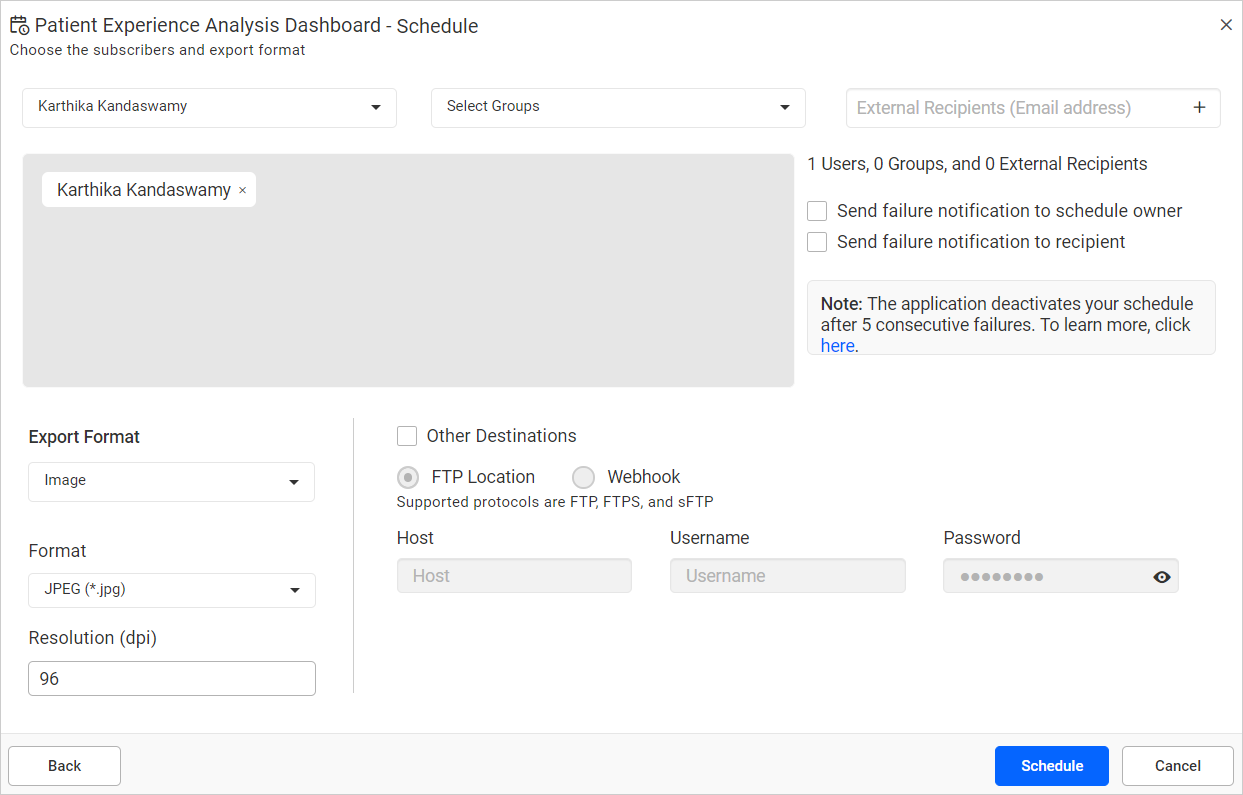
Select the recurrence type, recurrence, start and end dates, export formats, and the users to which the exported dashboards and failure notification have to be emailed in the
Add Scheduledialog box.- Dashboards can be scheduled hourly, daily, weekly, monthly, and yearly.
- Dashboards can be exported as an image, PDF, CSV, and Excel.
- The Application Time Zone is displayed below the date picker. The start time of the schedule is converted to the client Time Zone and shown on the right side for the user’s convenience.
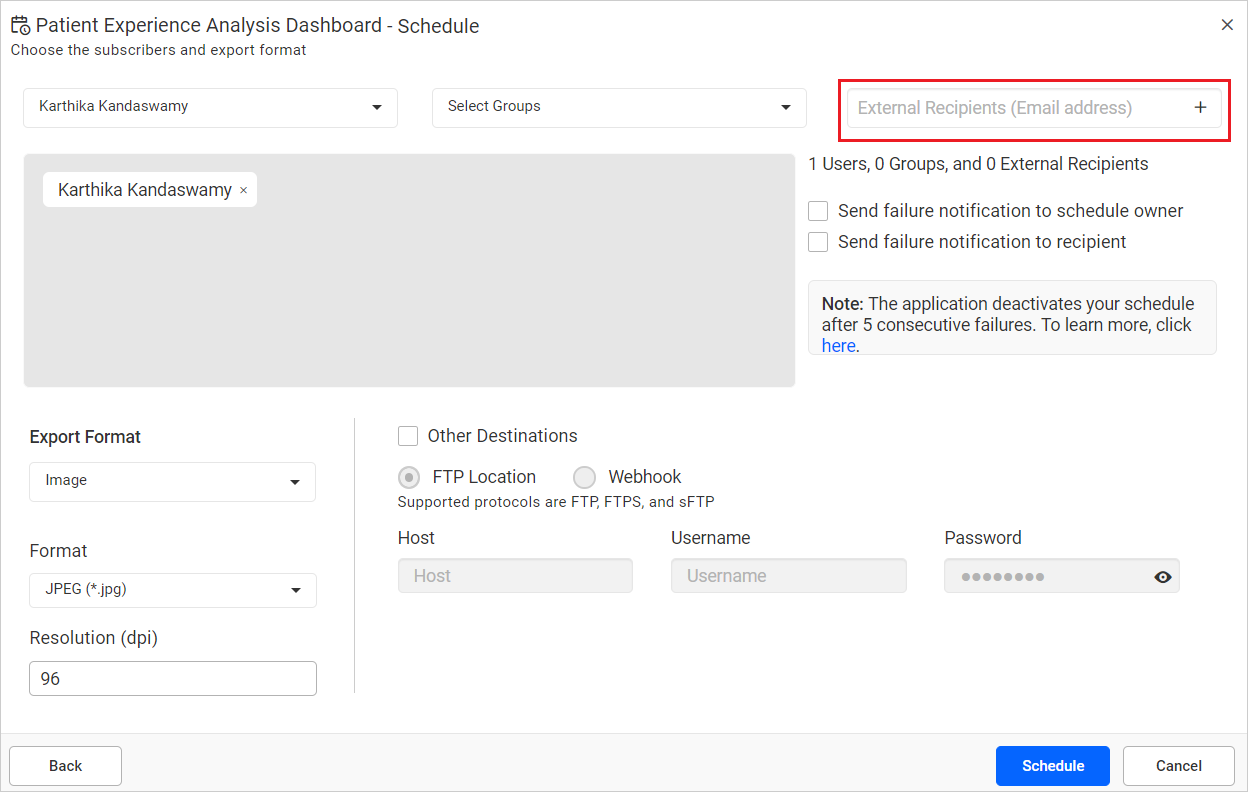
- Exported dashboards can be sent to individual users or groups or to external recipients along with the link to the dashboard in the Bold BI through emails.
-
When clicking on
Schedule, the dashboard is scheduled in the selected recurrence.
NOTE:
Read Write Deletepermission for thatSpecific Scheduleis added to the users by the person who created the schedule.
Sending Schedule emails to Distribution list
Yes, we do support sending schedule emails to a distribution list. You can configure the distribution list in the schedule recipient list in the following two ways:
- We can add the distribution email directly in the external recipient option as below.
- We can add the new user with the distribution list email and add the user as a recipient to send the emails to the users in the distribution list.
Sending Schedule failure notification to the owner and recipients
Supports sending schedule failure notifications to the schedule owner and recipients. After schedule export failure, the notification can be sent to the owner and recipients with a failure error message by email.
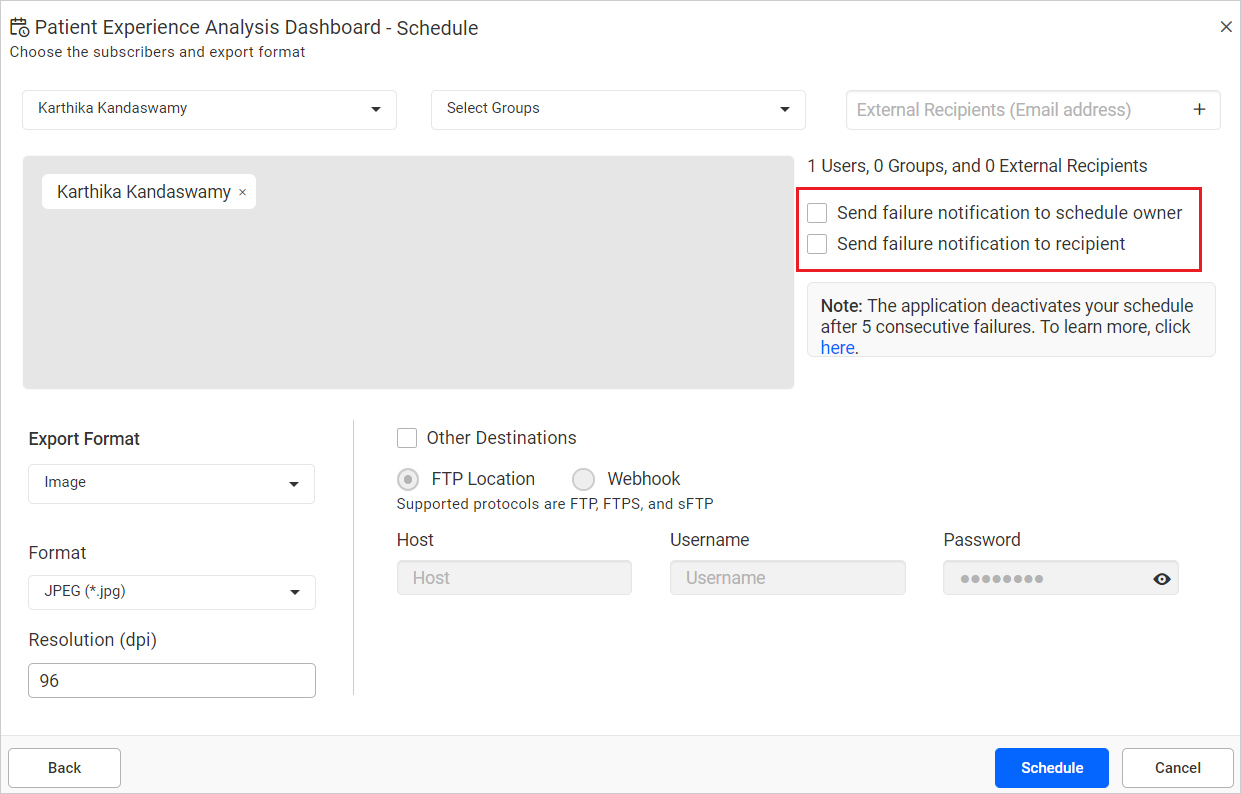
Additionally, Bold BI application deactivates the export schedule after a limited number of consecutive failures and sends a disable notification to the owner and recipients.
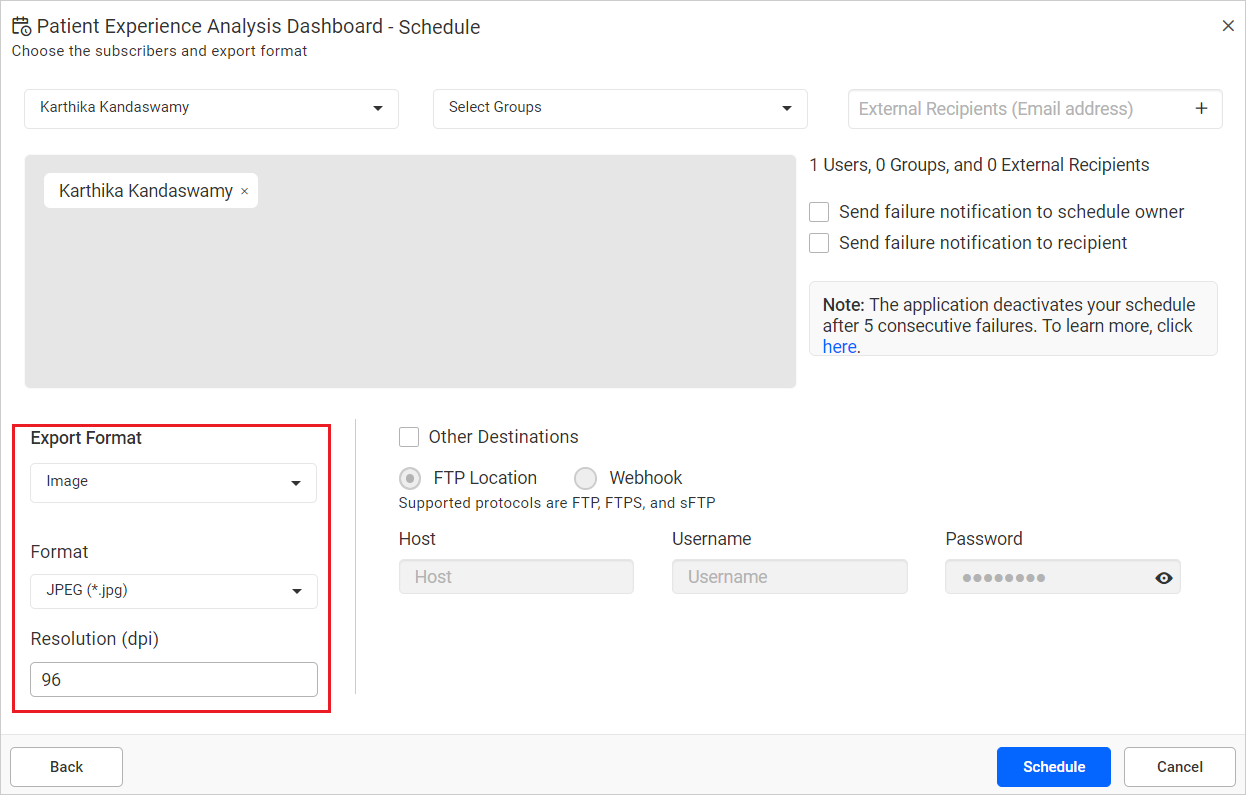
Configure Schedule with Export Format
You can configure the export formats in the schedule. Here, you have the option to select multiple export format and export the dashboard or widget in your chosen format.
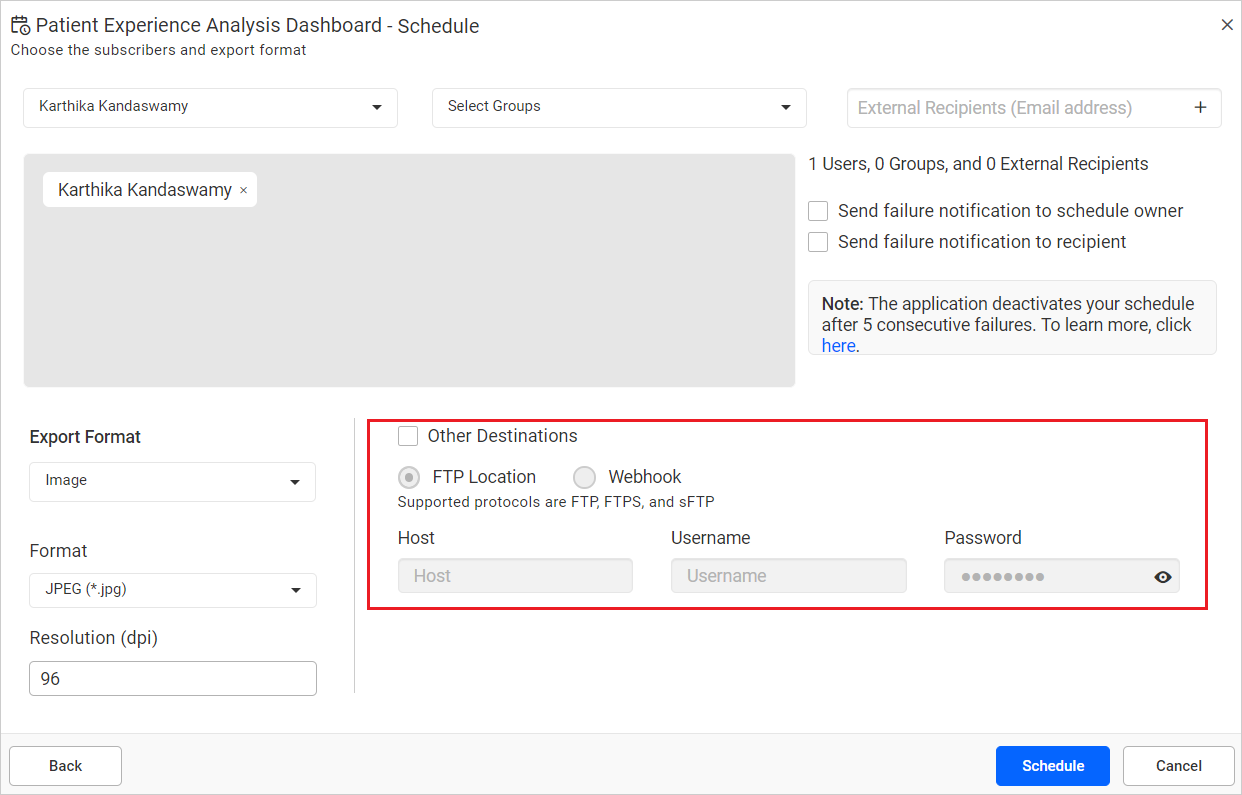
Other Destination Schedule Export
FTP location export
You can export the dashboards to an FTP, FTPS, or SFTP location by configuring the respective server credentials while scheduling the dashboard export.
Webhook Notification
You can send a webhook notification for an export schedule or data alerts by selecting the created webhook in the Other Destinations section.
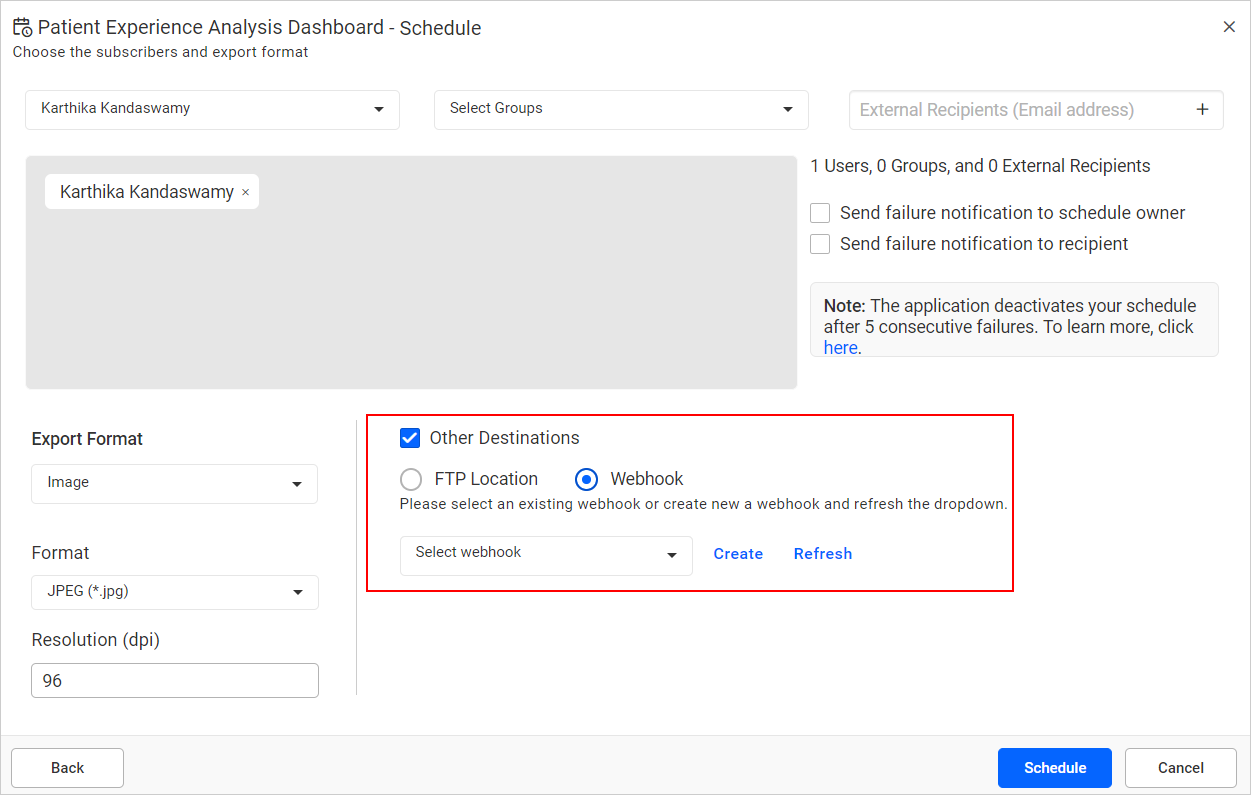
Steps to configure webhook when adding or editing schedules
-
Select a previously created webhook from the Webhook list dropdown.
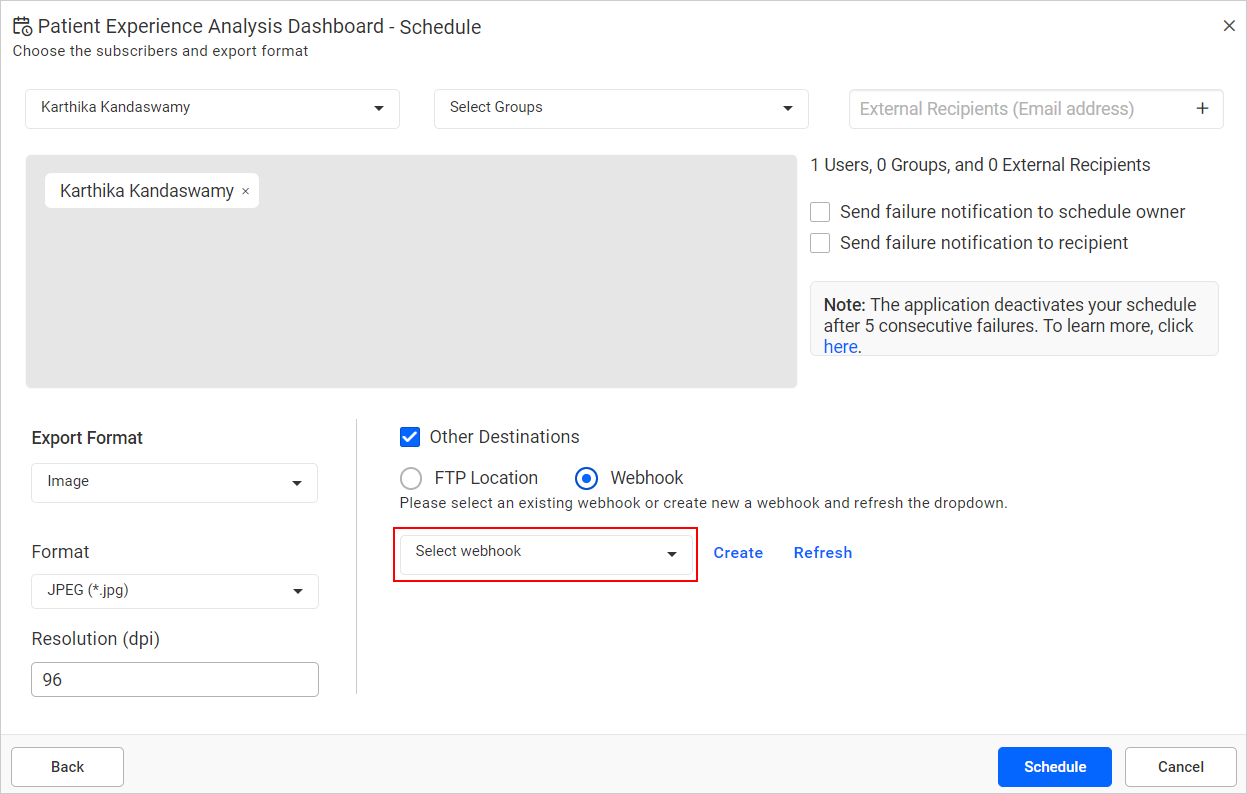
-
If you haven’t created any webhooks, you can create them by clicking the
Createoption. This will open theAdd Webhookpage in a new tab. Please visit the Manage Webhook for information on how to add a webhook.
-
After creating the webhook, you need to click the
Refreshoption for the created webhook to appear in the dropdown.
-
After selecting a webhook, you can see the selected webhook endpoint with request content type details in the info message section.
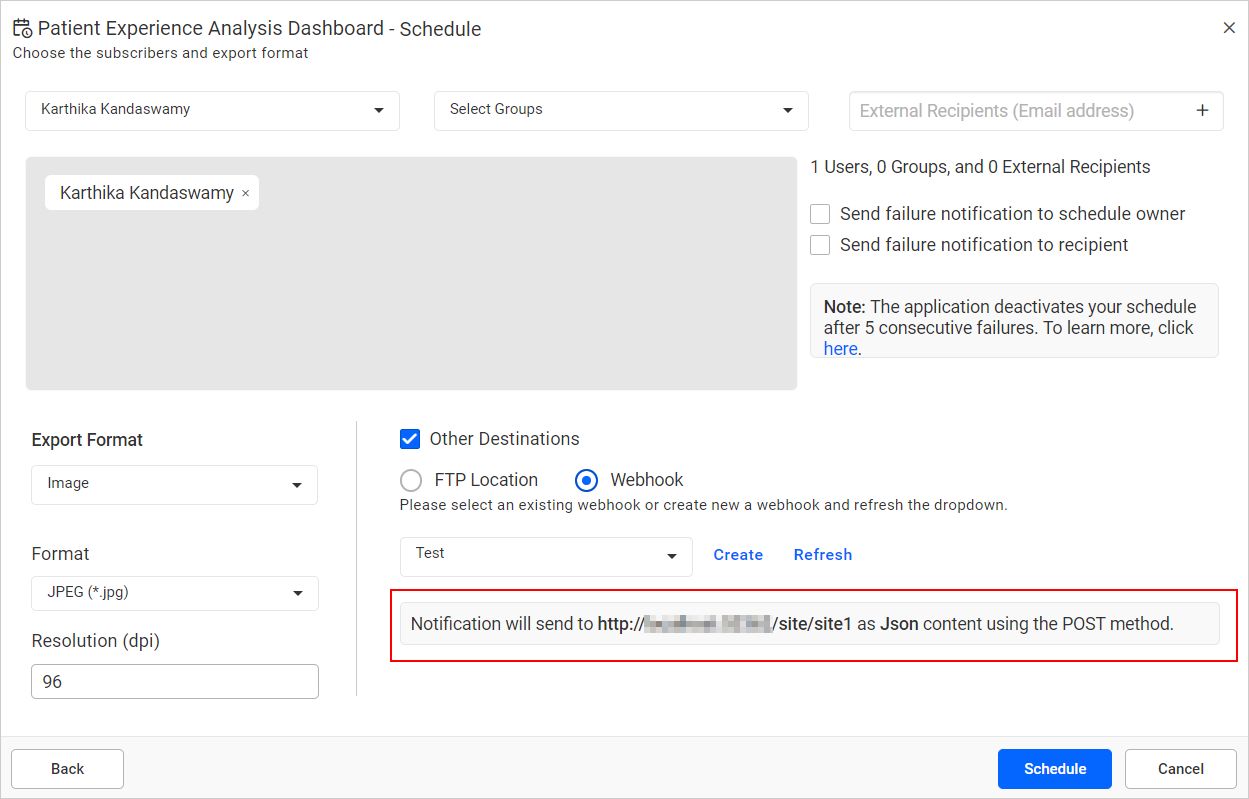
-
When running the schedule, Bold BI will call the webhook endpoint you selected with the selected or all payload data. Click on the Webhook Payload to learn more about what the payload data sent to a webhook call is.
NOTE:
Time Driven Dashboard Exportevent webhooks are listed only for normal schedules, andAlert Driven Dashboard Exportevent webhooks are listed only for data alert schedules.
Edit Schedules
Category, dashboard name, recurrence type, recurrence, start and end dates, export format, and recipients can be changed in the Edit Schedule dialog box.
Run Now
Schedules can be run on demand by using the Run Now option in the schedule grid context menu. The dashboard gets exported in the specified format and sent to the recipients along with a link to the dashboard in Bold BI through emails.

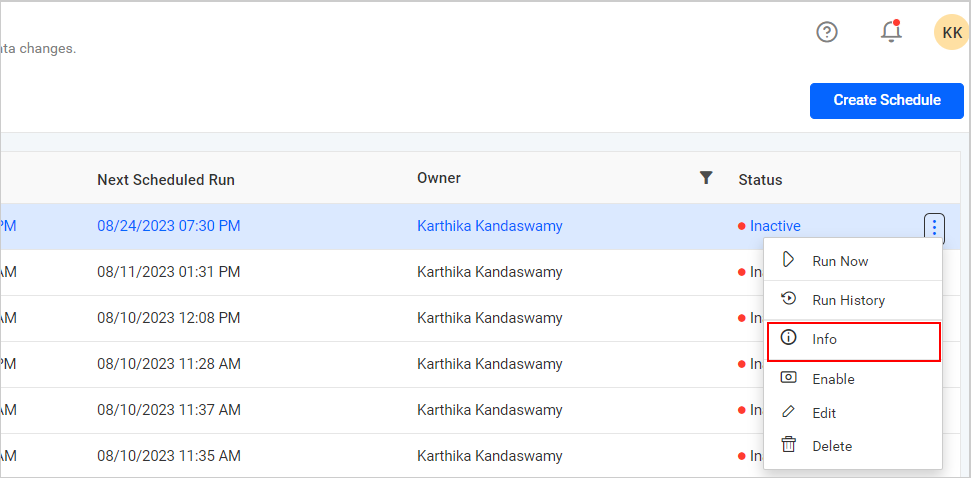
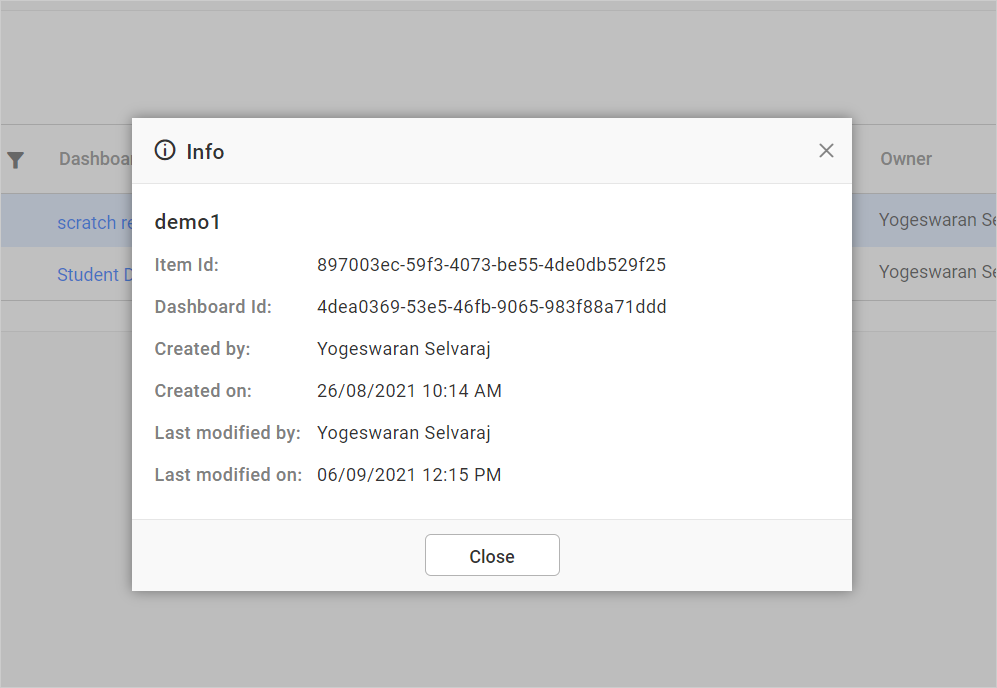
Information of Schedule
You can view the information of the respective schedule in the dialog box. Click on Actions in the grid context menu and select Info.
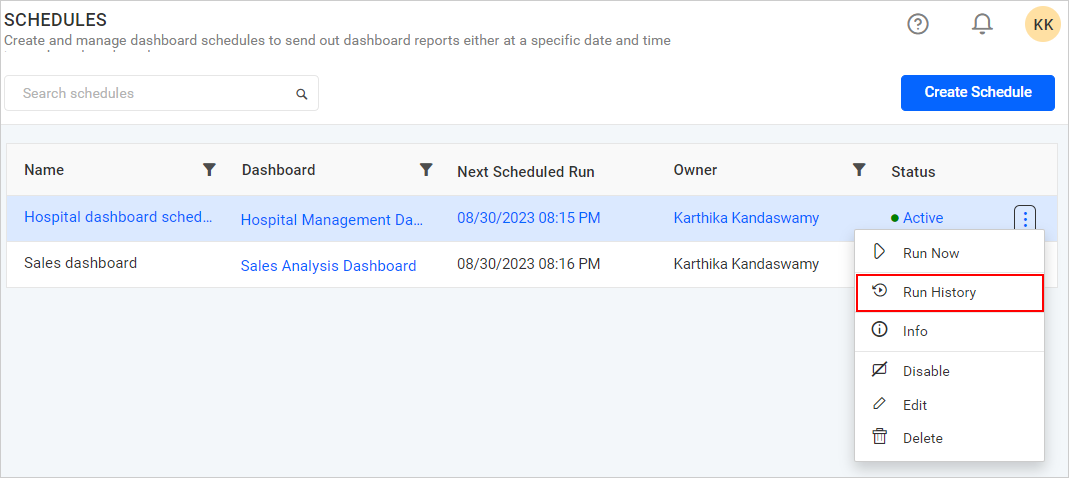
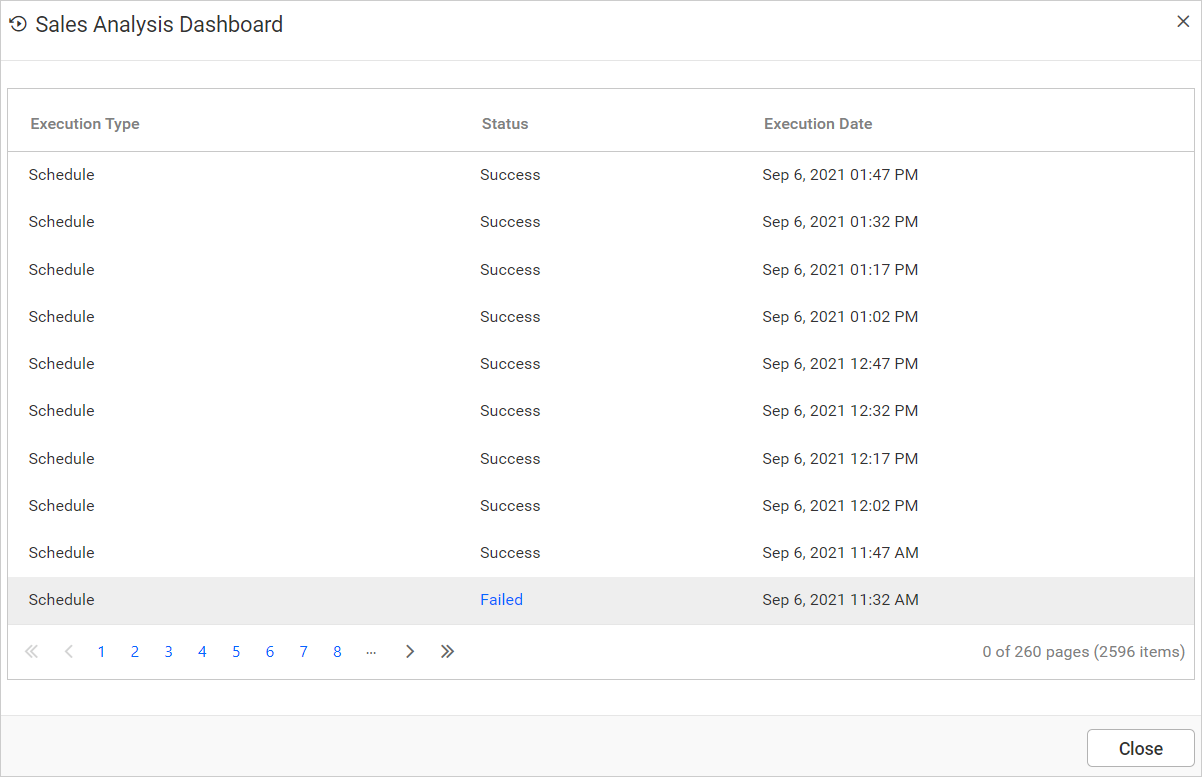
Run History
You can view the schedule run history information of the corresponding schedule in the Run History option in the schedule grid context menu.
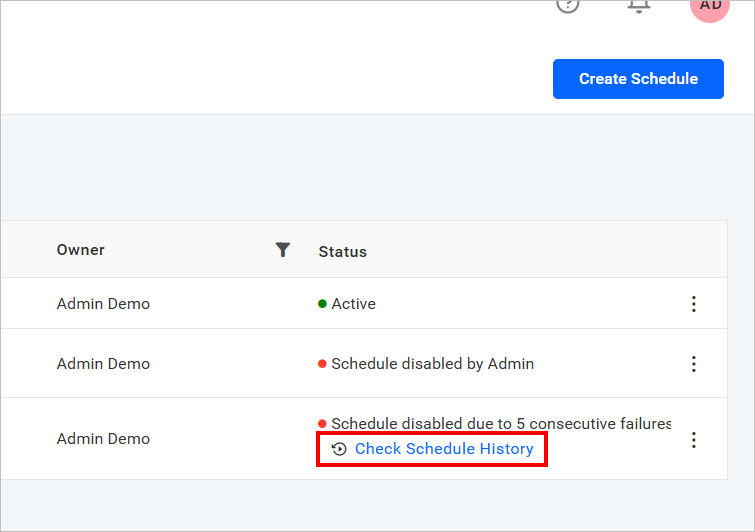
If the schedule fails due to consecutive failures, a disabled status will be displayed on the listing page. You can check the history using the option below the status.
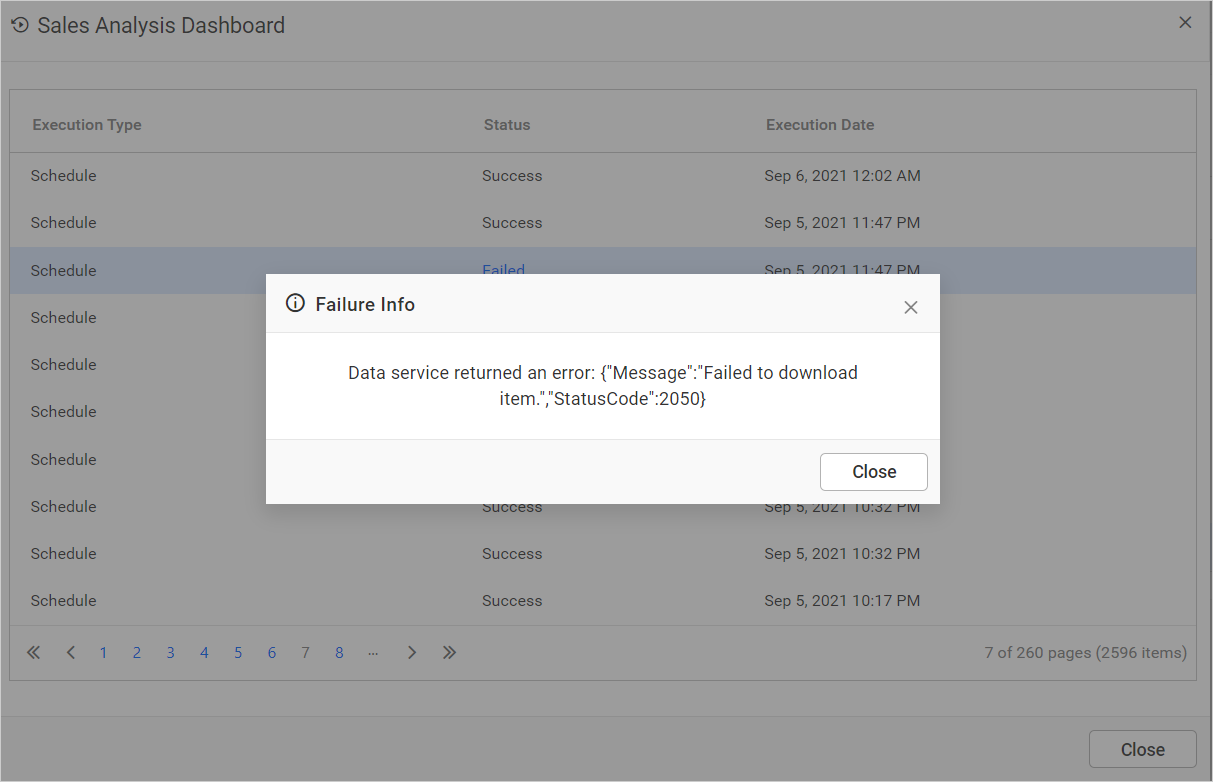
You can also view failure information by clicking on the failed link in the run history dialog.
Enable or Disable Schedule
Schedules can be disabled at any time, which will ignore any upcoming occurrences. When enabled, it will find the next occurrence and run accordingly.

Delete Schedules
Schedules can be deleted from Bold BI when they are no longer needed.
Click on the Actions button in the schedules grid context menu and select Delete to delete the schedule.

Data Alerts
Data Alert provides users with the ability to track specific conditions and helps them respond to specified recipients via email when a predefined threshold is met. For more details on Data alerts, please refer to the information provided.