Data Cache in Dashboard
The Data Cache allows you to enhance dashboard performance by caching the results of each widget and retaining the cached data in a dashboard for a specific amount of time. When the Data Cache is turned ON, it saves widget data during the initial dashboard rendering, and it will retrieve the data from the cache without accessing the actual data server for subsequent dashboard loads. This helps to reduce loading time for widgets and lessen the impact on the data server’s performance.
How to configure Data Cache
You can use the Data Cache Settings dialog which can be accessed by clicking on the Data Cache icon in the toolbar.
![]()
By clicking on the Data Cache icon, the Data Cache Settings dialog will open as follows:
Click the Apply button to save the data cache configuration. data cache configuration.
The Data Cache Settings dialog has two states as follows:
- OFF
- ON
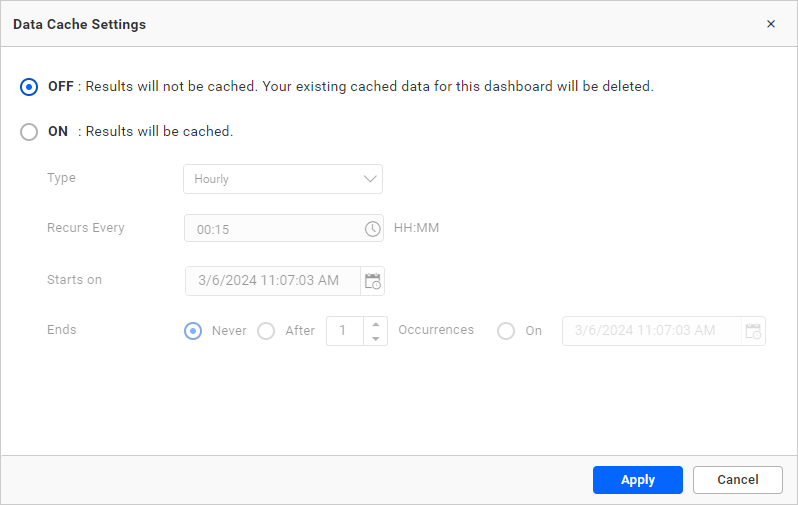
OFF state
The OFF state cannot store the data of a widget. You can enable it when there is no need for caching data.
ON state
The ON state caching widget data and the cached result will be applied to the dashboard rendering. Additionally, configure Scheduling options to update the live data in the cache for each occurrence.
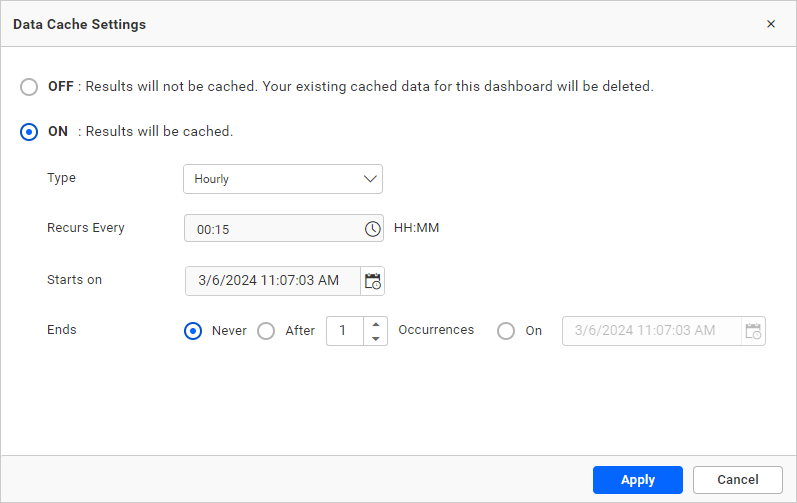
Schedule configuration
Configure four types of schedules: hourly, daily, weekly, and monthly. With each scheduled occurrence, it retrieves live data from the data server and updates the cache accordingly. This ensures that the data comes from the cache with the latest live data whenever a dashboard is rendered.
By default, the recurrence interval is set to 15 minutes. During these scheduled runs, the Dashboard views and default filter data are also cached.

NOTE:
While scheduling, it doesn’t consider the user-based filter. The schedule runs with the user permission who created it. When publishing, live data is updated into the cache if the cache is enabled.
After Data Cache is enabled, when opening the dashboard in view mode, the Data Cache refresh time will be shown in the nearby dashboard theme, which indicates that the Data Cache is in the ON state.
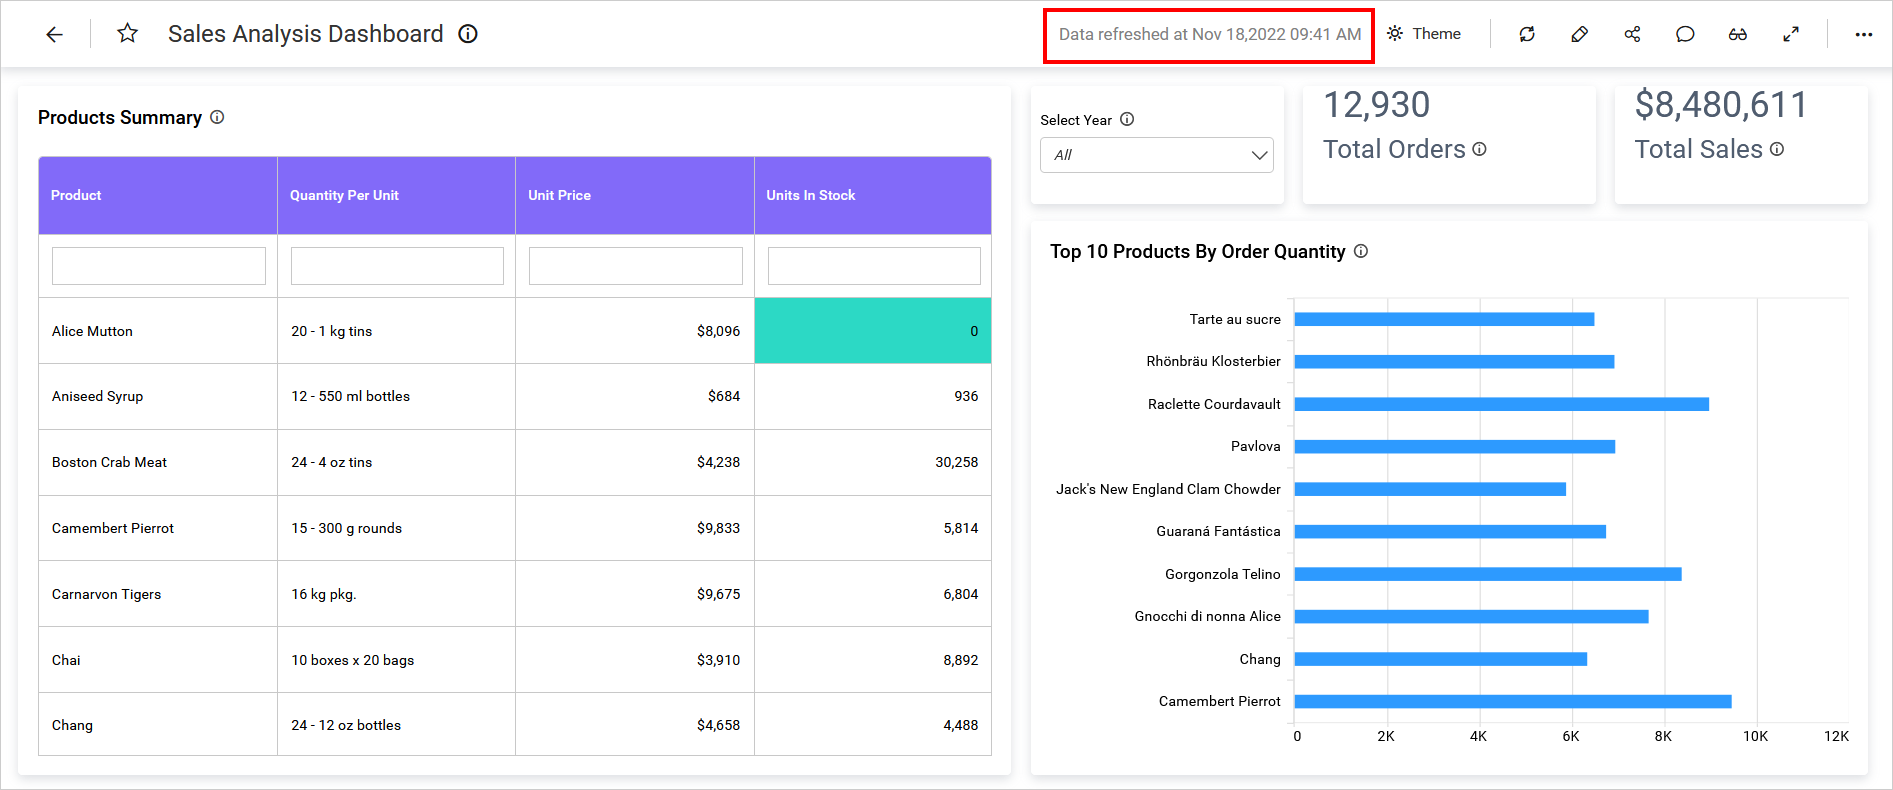
Data Cache refresh time
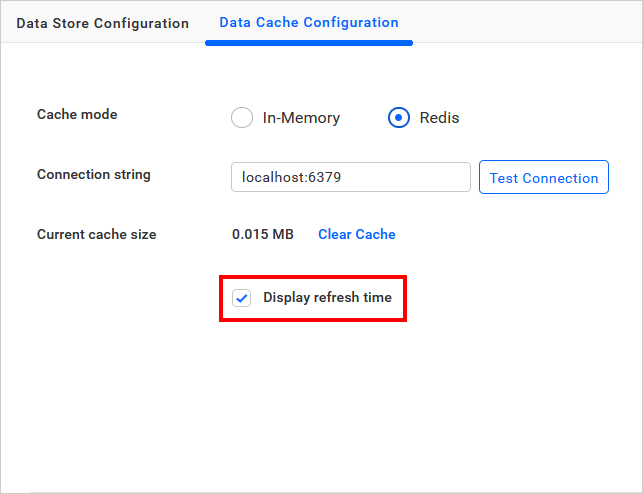
The data cache refresh time represents when the data fetch live data from the data server. It will be displayed based on the user’s browser time zone. The refresh time can be disabled by unchecking the Display refresh time option in Cache configuration.
NOTE: By default, the Display refresh time option is enabled.
Dashboard views
When the schedule is configured, saved dashboard views and default filters data are fetched from the live server and updated into the cache for every occurrence. This ensures that the dashboard views remains consistently updated with the latest information. Please find more details about adding dashboard views here.
For example, if the dashboard has views as follows:

NOTE: The dashboard views and default filters data will still fetch live data from the server even if the
Clear cache and refreshoption is selected from the toolbar.
How to fetch Live data when Data Cache is enabled
When Data Cache is enabled, data will be retrieved from the cache. If you want to get live data from the data server, use the Clear cache and refresh option from the toolbar in view mode. When refreshing the dashboard from the Clear cache and refresh option from the toolbar, it will get the data from the data server and store them in a cache. You can find the Clear cache and refresh option as shown in the following image:
When selecting the Clear cache and refresh option from the toolbar, a toast message will promptly appear, indicating that the refreshing process has commenced. Find the clear cache and refresh option as shown in the following image:

A toast message will be displayed after the refresh request fetches the live data and updates it in the cache. This notification confirms the completion of the refresh process. Click Click here within the toast message to refresh the dashboard widgets and retrieve the updated cached data.

Cache Mode Configuration
Data cache can be achieved through two modes:
- In-Memory
- Redis
In-Memory
The In-Memory mode is the default cache memory for dashboards. It stores the data in the internal cache storage. You should configure the CacheMode property for the in-memory mode selection. Please find more details about Mode Selection.
Redis
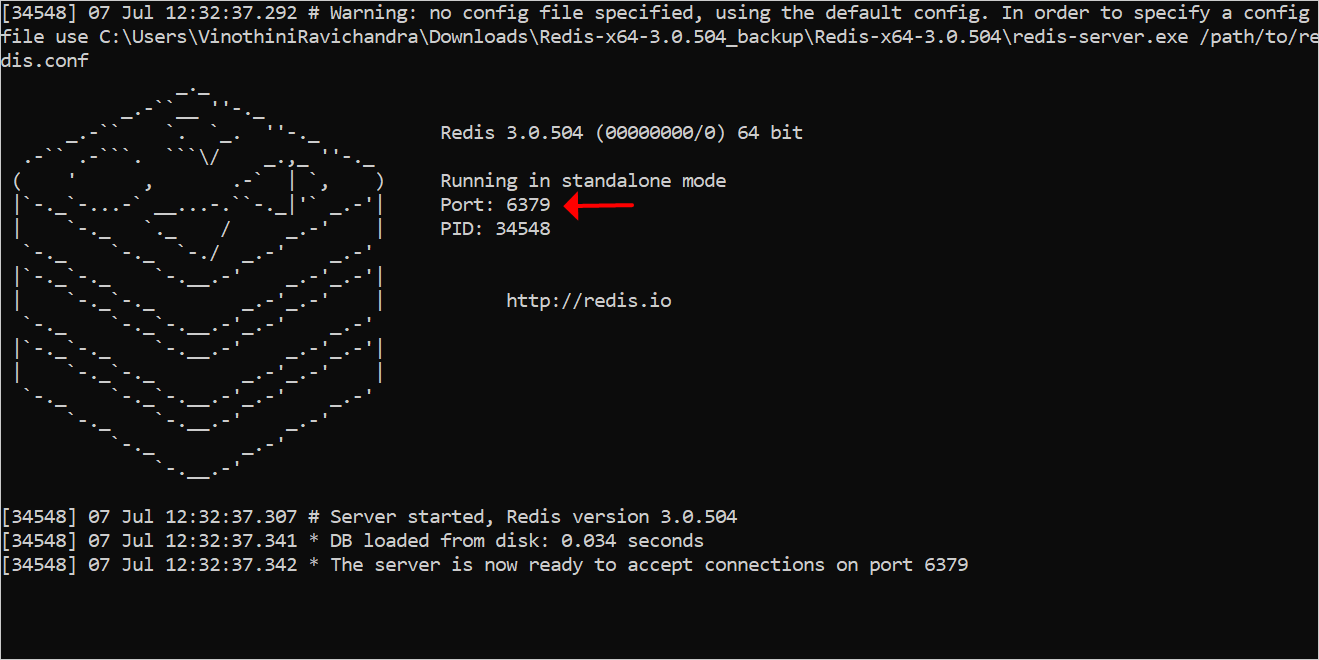
Data is cached in an external server named Redis. Redis is an open source (BSD licensed), in-memory data structure store used as a database, cache, message broker, and streaming engine. Learn more about Redis and its installation of Redis.
After installation, you should start the Redis server as shown in the following image:
How to Choose a Specific Database on Redis
Redis allows you to connect to a specific database by using a connection string. You can specify various parameters, including the database index, through this connection string. To choose a specific database when connecting, you can add the defaultDatabase parameter in the connection string.
Connection String Format:
<Servername>:<Port>,password=<Password>,ssl=<True or False>,abortConnect=False,defaultDatabase=<Specific_db(Optional)>
Default Database
The defaultDatabase parameter is optional. If you don’t include it in your connection string, Redis will default to database 0 for caching. By default, Redis provides 16 databases, indexed from 0 to 15. You can choose a different database by specifying the defaultDatabase parameter.
Mode selection
The mode should be either in-memory or Redis; the widget data will be cached based on the selected mode.
Cache configuration
-
Go to the
Data Processsettings on the server page and select theData Cache Configurationtab.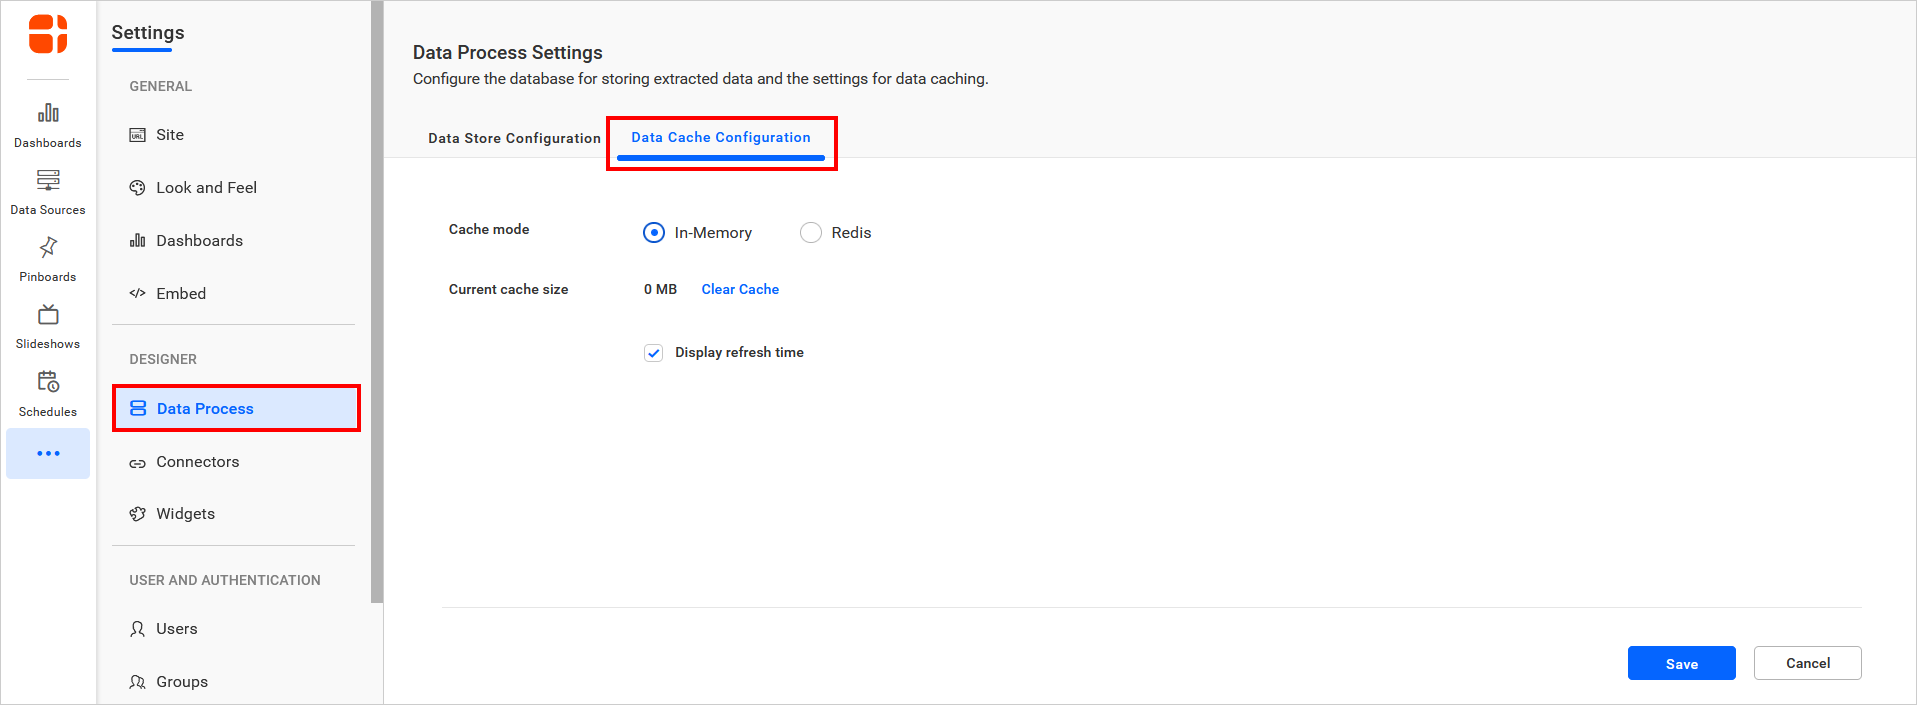
-
In
Redismode, you can find the connection string and test connection options. This will help to check whether it is a valid connection string or not.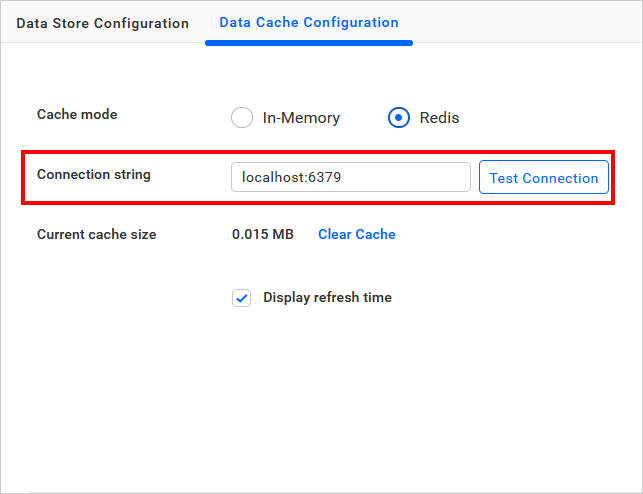
-
We have provided the data refreshed time on the dashboard view page, and you can also disable the data refreshed time by clicking the checkbox.
-
By clicking the clear cache option, all dashboard cached memory should be cleared when the data cache is in the ON state.
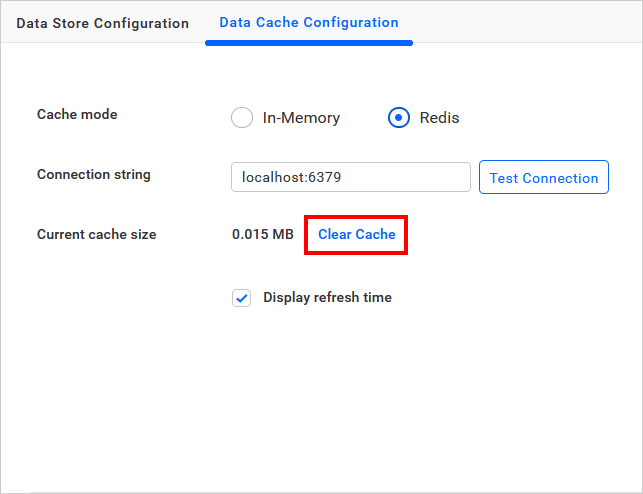
NOTE: The
Clear cacheoption is visible only when data is available in the cache.