Connecting Bold BI to MongoDB data source
The Bold BI dashboard designer supports connecting to MongoDB database through MongoDB client.
Choose MongoDB data source
To configure the MongoDB data source, follow the below steps:
-
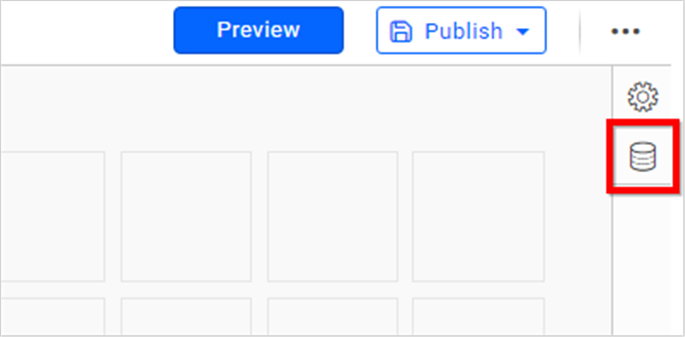
Click on the Data Sources button in the configuration panel to add a new data connection.
-
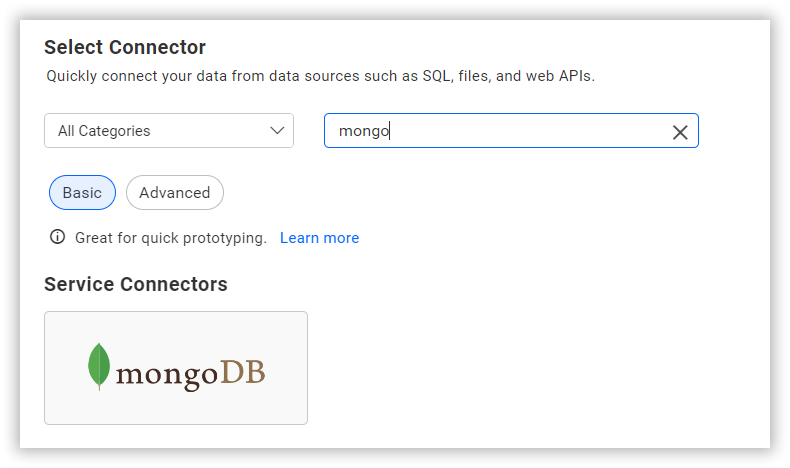
Click CREATE NEW to launch a new connection from the connection panel.
-
Select the MongoDB connection in the connection panel.
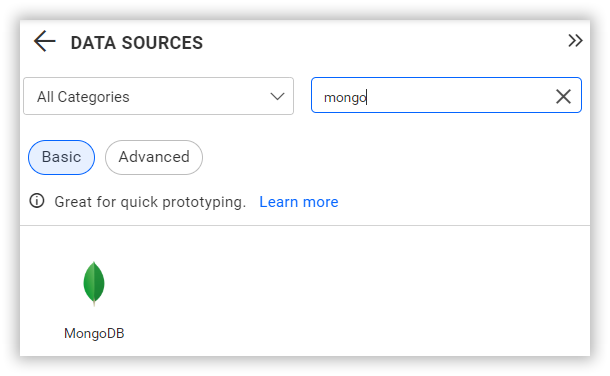
NOTE: You can also create a data source from the home page by clicking on the Data Sources menu on the left menu panel and selecting Create Data Source from the data sources page.
Create MongoDB data source
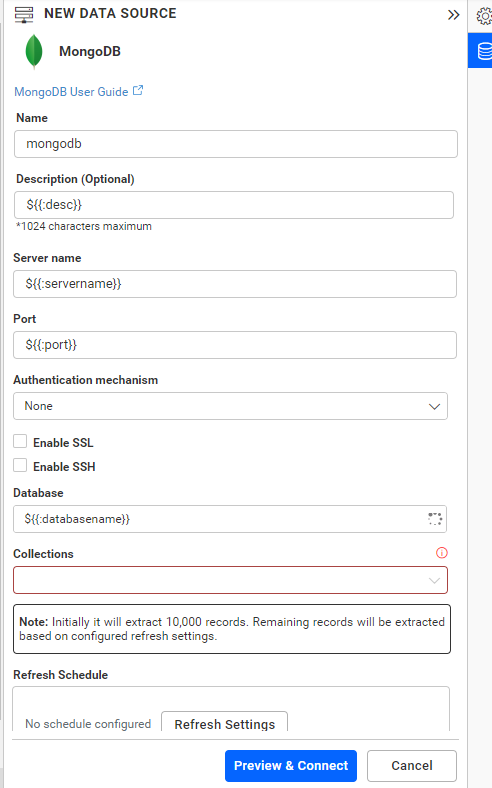
Once you click the data source, the NEW DATA SOURCE configuration panel will open. Follow the below steps to create MongoDB data source.
-
Enter a name and description (optional) for the data source.
-
Enter a valid MongoDB server/host name in the Server Name text box.
-
Enter its corresponding port in the Port text box.
-
Choose Enable SSL, if the given MongoDB server is configured with SSL Encryption.
NOTE: Enable Allow Self-Signed Certificates if the MongoDB server configured to accept self signed certificates.
-
Choose None or SCRAM authentication in the Authentication Mechanism combo box.
-
If you choose SCRAM Authentication Mechanism, enter valid SCRAM credentials in the Username and Password text boxes.
-
Choose the Extract Engine.
You can connect to the data source using one of the following extract methods:
-
Bold BI Extract: Data will be extracted and managed directly within Bold BI.
-
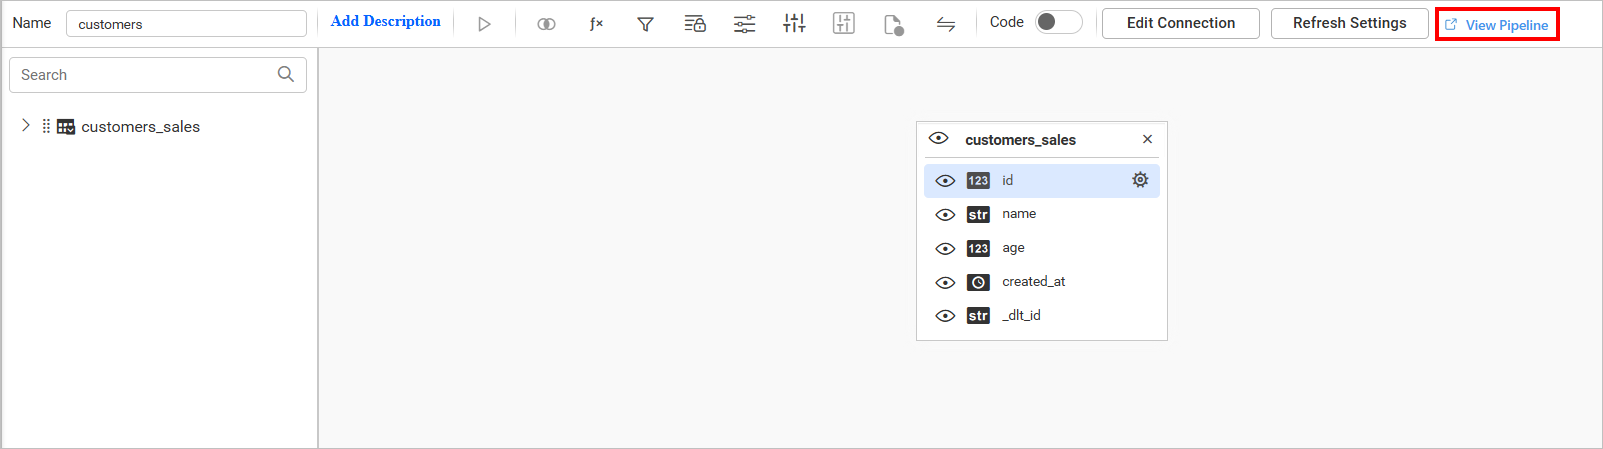
Data Hub: Data extraction is handled through the Data Hub. An equivalent pipeline is created, utilizing the Data Hub’s Extract, Transform, Load (ETL) capabilities to filter, optimize, or transform the data, and to generate new tables.
-
To view the equivalent pipeline created for data extraction, navigate to the Query Designer page and click on View Pipeline.
-
When the data refresh is configured for data sources that uses the Data Hub Extract Engine, the refresh will be managed within the Data Hub.
-
Select the database you want to query in the listed databases associated with the given MongoDB Server in the Database combo box.
NOTE: If your MongoDB server reside inside a firewall, contact Bold BI support to get the list of IP addresses to be white-listed.
-
Choose a time interval for Refresh Settings using the combo box, to trigger a request to MongoDB server periodically to keep the data in sync with our dashboard.
You can also edit the connection information set here using the Edit Connection option.
Preview and Data Import
-
Click Preview & Connect to connect with the configurations that have been set.
-
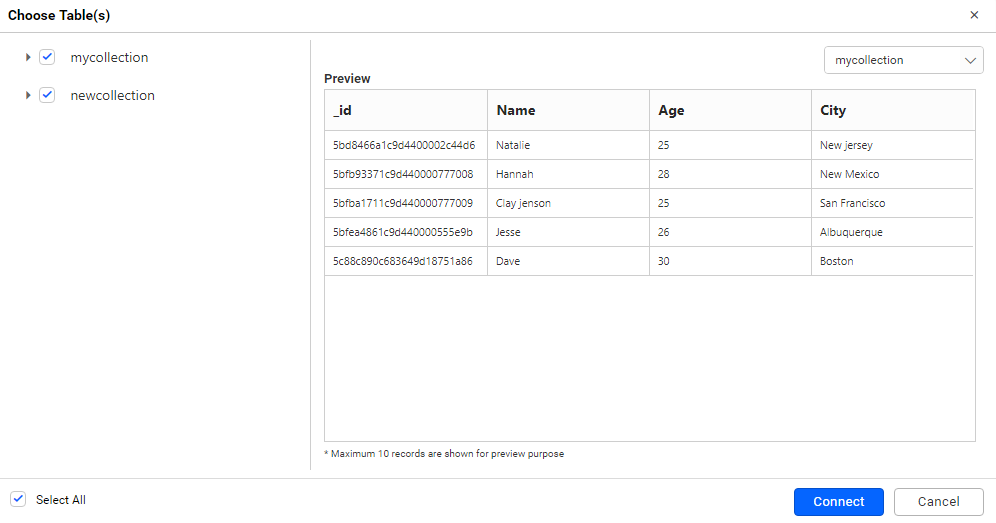
The Choose Schema(s) dialog opens. The schema represents the collection list that are retrieved from the MongoDB server. This dialog displays a list of schemas in a treeview and its corresponding values in grid for preview. Select required schema(s) from treeview to use in designer and click Connect.
-
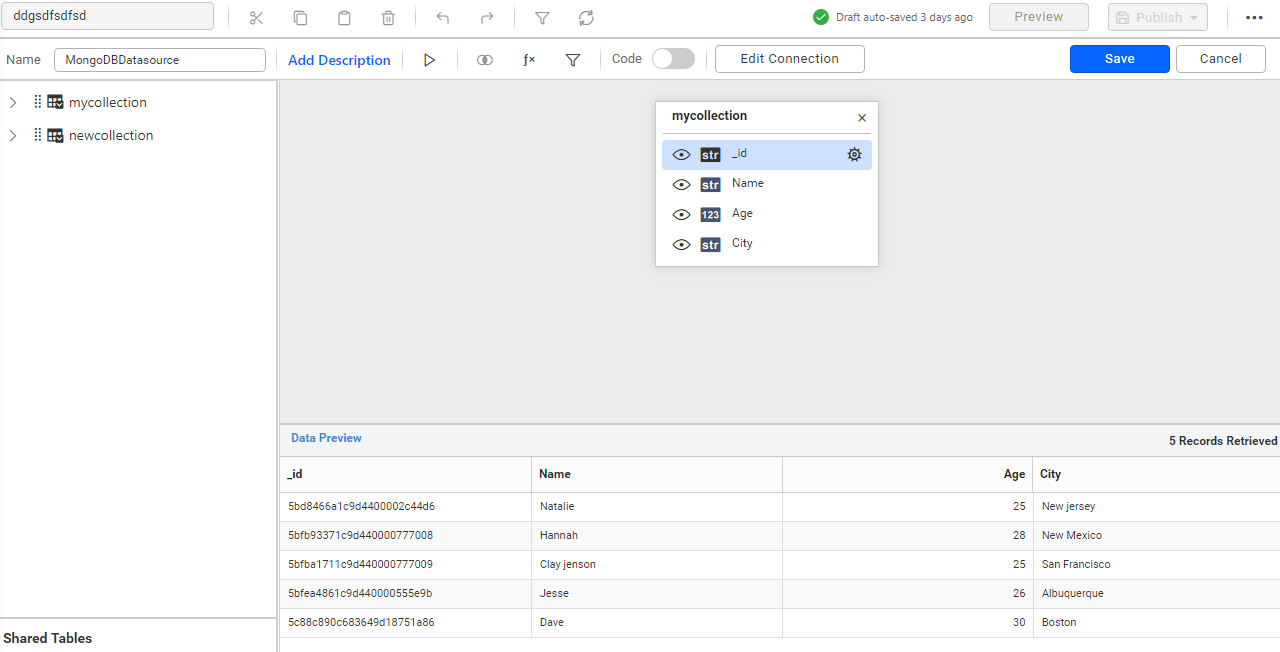
Now, the data design view page with the selected table schema opens. Drag and drop the table.
-
Click Save to save the data source with a relevant name.
Connect using custom attribute and dashboard parameter
We have added support for custom attributes and dashboard parameters in the data source connection. You can now connect to the data source using custom attributes or dashboard parameters.
Custom Attribute
Dashboard Parameter
Note: Refer to the Dashboard Parameter Documentation and Custom Attributes Documentation for more details.
Connecting Bold BI to Mongodb Data Source via REST API
Prerequisites
Type while creating the data source needs to be MongoDB.
Modes
Only the Extract mode MongoDB data source can be created through the REST API.
Parameters for creating Data Source
| Parameters | Details |
|---|---|
| Name required | string
Name of the data source |
| Type required | string
This is used to specify the Type of the data source. |
| AuthenticationDatabase required | string
This is used to specify Authentication Database |
| AuthenticationType required | string
This is used to specify Authentication mechanism, Provide None or SCRAM authentication in the Authentication Mechanism . |
| Database required | string
Database which needs to be connected |
| CollectionName required | Array
schema of the database |
| Provider required | string
Type of the data source |
IsSelfSigned optional | `boolean` Enable or disable SSH. By default, it is false. |
| IsSslEnabled required | `boolean` Enable SSL |
| Password required | string
A valid Password for the connection |
| Port required | string
Enter a valid Port number |
| RefreshInterval optional | string
By default, it is never |
| Username required | string
Enter a valid Username |
| ServerName required | string
Server name or Host name of the connection |
| IsSshConnection optional | `boolean` Enable or disable SSH. By default, it is false. |
| IsSshConnection optional | `boolean` Enable or disable SSH. By default, it is false. |
| SshServerName optional | string
Enter a valid Ssh Server name. By default, it is empty. |
| SshPort optional | string
Enter a valid Ssh Port number. |
| SshUserName optional | string
Enter a valid Ssh Username. By default, it is empty. |
| SshPassword optional | string
Enter a valid Ssh Password. By default, it is empty. |
| SslCertificateData optional | object
By default, it is Null. |
| SslCertificatePassword optional | string
Enter a valid SslCertificatePassword Password. By default, it is empty. |
| DataProvider required | string
Enter a DataProvider as MongoDB. |
For creating connection:
{
  "Name": "string",
  "Type": "MongoDB",
  "Connection": {
    "authenticationDatabase": "string",
    "authenticationType": "scram",
    "database": "string",
    "collectionName": [
      "string",
      "string",
      "string"
    ],
    "provider": "MongoDB",
    "isSelfSigned": false,
    "isSslEnabled": true,
    "password": "string",
    "port": 27017,
    "refreshInterval": "string",
    "username": "string",
    "serverName": "string",
    "IsSshConnection": false,
    "SshServerName": "",
    "SshPort": "string",
    "SshUsername": "",
    "SshPassword": "",
    "sslCertificateData": null,
    "sslCertificatePassword": "",
    "dataprovider": "MongoDB"
  }
}
For schedule data source with Hourly refresh:
To create a MongoDB data source through the REST API using an hourly refresh schedule.
{
  "Name": "string",
  "Type": "MongoDB",
  "Connection": {
    "authenticationDatabase": "string",
    "authenticationType": "scram",
    "database": "string",
    "collectionName": [
      "string",
      "string",
      "string"
    ],
    "provider": "MongoDB",
    "isSelfSigned": false,
    "isSslEnabled": true,
    "password": "string",
    "port": 27017,
    "refreshInterval": "string",
    "username": "string",
    "serverName": "string",
    "IsSshConnection": false,
    "SshServerName": "",
    "SshPort": "string",
    "SshUsername": "",
    "SshPassword": "",
    "sslCertificateData": null,
    "sslCertificatePassword": "",
    "dataprovider": "MongoDB"
  },
  "RefreshSettings": {
    "StartTime": "2024-06-06T06:08:00Z",
    "NeverEnd": true,
    "EndAfterOccurrence": 1,
    "ScheduleType": "Hourly",
    "HourlySchedule": {
    "ScheduleInterval": "00:05"
},
    "IsEnabled": true,
    "FailureNotificationToOwner": true
  }
}
For schedule data source with Daily refresh:
To create a MongoDB data source through the REST API using an Daily refresh schedule.
"RefreshSettings": {
    "StartTime": "2024-06-06T06:08:00Z",
    "NeverEnd": true,
    "EndAfterOccurrence": 1,
    "ScheduleType": "DailySchedule",
    "DailySchedule": {
      "RecurrenceType": "string",
      "EveryNdays": 0,
      "EveryWeekday": true
    },
    "IsEnabled": true,
    "FailureNotificationToOwner": true
  }
For schedule data source with Weekly refresh:
To create a MongoDB data source through the REST API using an Weekly refresh schedule.
{
  "Name": "string",
  "Type": "MongoDB",
  "Connection": {
    "authenticationDatabase": "string",
    "authenticationType": "scram",
    "database": "string",
    "collectionName": [
      "string",
      "string",
      "string"
    ],
    "provider": "MongoDB",
    "isSelfSigned": false,
    "isSslEnabled": true,
    "password": "string",
    "port": 27017,
    "refreshInterval": "string",
    "username": "string",
    "serverName": "string",
    "IsSshConnection": false,
    "SshServerName": "",
    "SshPort": "string",
    "SshUsername": "",
    "SshPassword": "",
    "sslCertificateData": null,
    "sslCertificatePassword": "",
    "dataprovider": "MongoDB"
  },
  "RefreshSettings": {
    "StartTime": "2024-09-21T09:40:00Z",
    "NeverEnd": true,
    "EndAfterOccurrence": 1,
    "ScheduleType": "Weekly",
    "WeeklySchedule": {
      "RecurrenceWeeks": 1,
      "RecurrenceDays": [
        "Monday",
        "Tuesday",
        "Wednesday",
        "Thursday",
        "Friday"
      ]
    },
    "IsEnabled": true,
    "FailureNotificationToOwner": true
  }
}
For schedule data source with Monthly refresh:
To create a MongoDB data source through the REST API using an Monthly refresh schedule.
"RefreshSettings": {
    "StartTime": "2024-06-06T06:08:00Z",
    "NeverEnd": true,
    "EndAfterOccurrence": 1,
    "ScheduleType": "MonthlySchedule",
    "MonthlySchedule": {
      "RecurrenceType": "string",
      "DayRecurrence": {
        "DayInterval": 0,
        "MonthInterval": 0
      },
      "CustomRecurrence": {
        "WeekOfMonth": "string",
        "DayOfWeek": "string",
        "MonthInterval": 0
      }
    },
    "IsEnabled": true,
    "FailureNotificationToOwner": true
  }
Additional Information
| Refresh Settings | The period of time before the next refresh call is triggered. This will automatically trigger a call for the API configured in the data source to keep the data up to date. If you do not want to sync your new data, choose 'Never'. |
| Pagination | Upon initial connection, MongoDB will extract a maximum of 10,000 records. By configuring the Refresh option, it will extract all tables and data for the selected database with each refresh call. |
NOTE: MongoDB provides a BI connector tool that allows you to connect MongoDB servers directly through an ODBC connector or MySQL connector, without the need for any intermediate database. Please refer to this KB article for more information. How to connect MongoDB by direct query mode in Bold BI.