User Profile in the Bold BI
This section explains how to view the profile, edit the profile details, edit the profile settings, set user notification preferences, view my permissions, connect sites, connect accounts, generate the access token for the logged-in user, and change the password for the user profile in Bold BI.
Profile details
You can view the profile, edit the profile details, and change the password.
View profile
You can view the profile details in this page.

Edit profile
You can edit the profile details in Bold BI account. Click Edit Account in profile page, it will be redirected to IDP profile page where you can edit your profile.
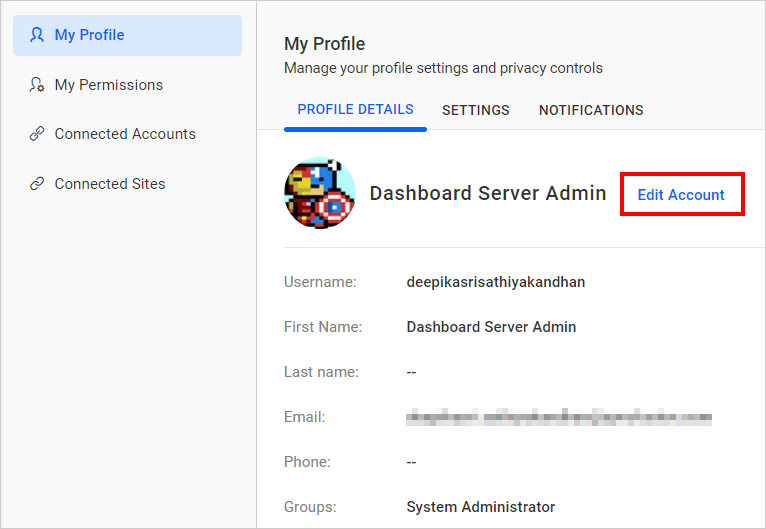
Username, first name, last name, phone number, and profile picture can be changed on the Bold BI profile page.
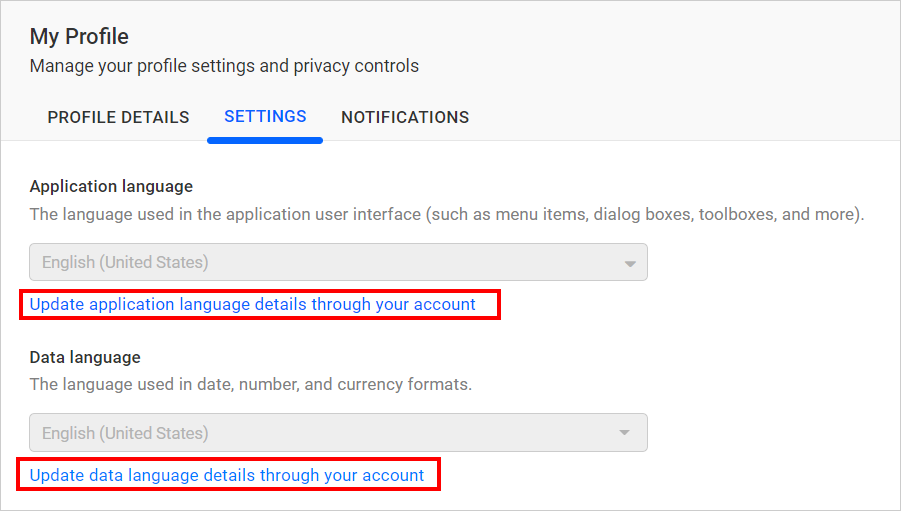
Settings
The Application language, Data language, Default pinboard, and Autosave filter settings can be edited in Profile settings.

Language settings
This section explains how to configure the language settings for the application language and data language.
Application language
This language is used in the user interface of an application, such as menu items, dialog boxes, toolboxes, and so on.
You can update the application language preference by clicking Update application language details through your account. It will redirect you to the IDP profile page where you can set your own language preference.
Data language
This language is used in date, number, and currency formats.
You can update the data language preference by clicking Update data language details through your account.
It will redirect you to the IDP profile page where you can set your own language preference.
You can configure the settings as shown in the following images.

NOTE: Make sure the
Disable user language preferenceoption is disabled in the site settings to apply the user preference language on your site. For more details, please visit here.
Default pinboard
Users can select a default pinboard by choosing one of the added pinboards from the drop-down.
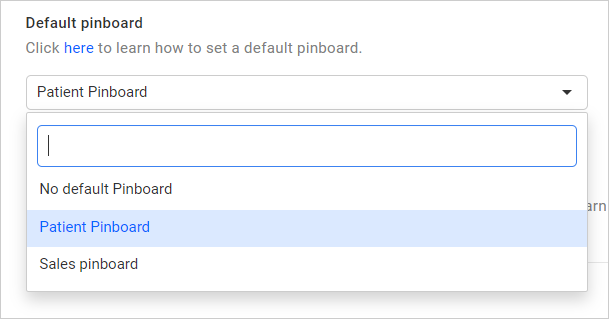
The default pinboard will be loaded when the user navigates to the Pinboard page. Click on the Manage Pinboards to learn more about pinboards.
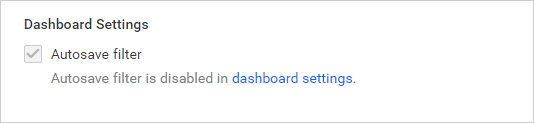
Dashboard settings
AutoSave filter
The user can control auto-save filters of the dashboards using the Dashboard Settings on this page.
The dashboards will be rendered with the last applied filters by the users.

If the administrator has restricted the AutoSave filter option in site settings, then the user cannot control the action of saving the filters applied to the dashboard.
NOTE: If a dashboard has default views, it will not be rendered with the last applied filter in the dashboard. Hence,
Default Viewsmust be disabled on the Dashboard Settings page of the site settings.
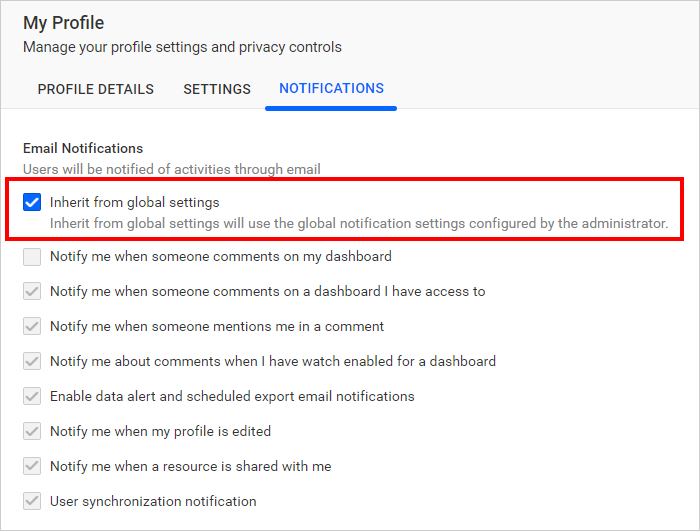
Notifications
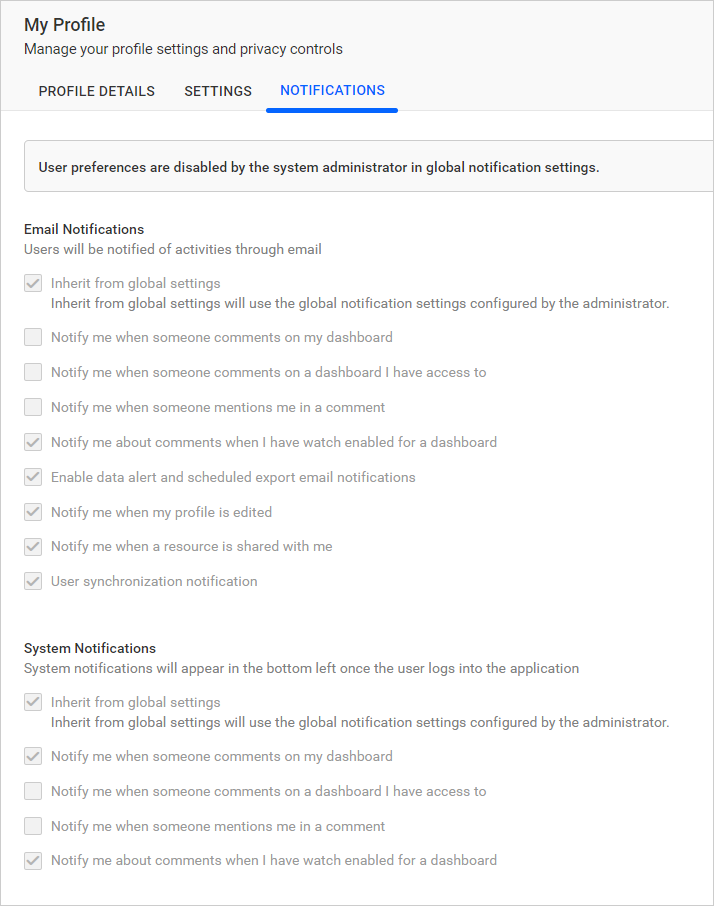
The user can configure their own notification preferences, but they can only enable or disable the options that have been enabled in the site notification settings.
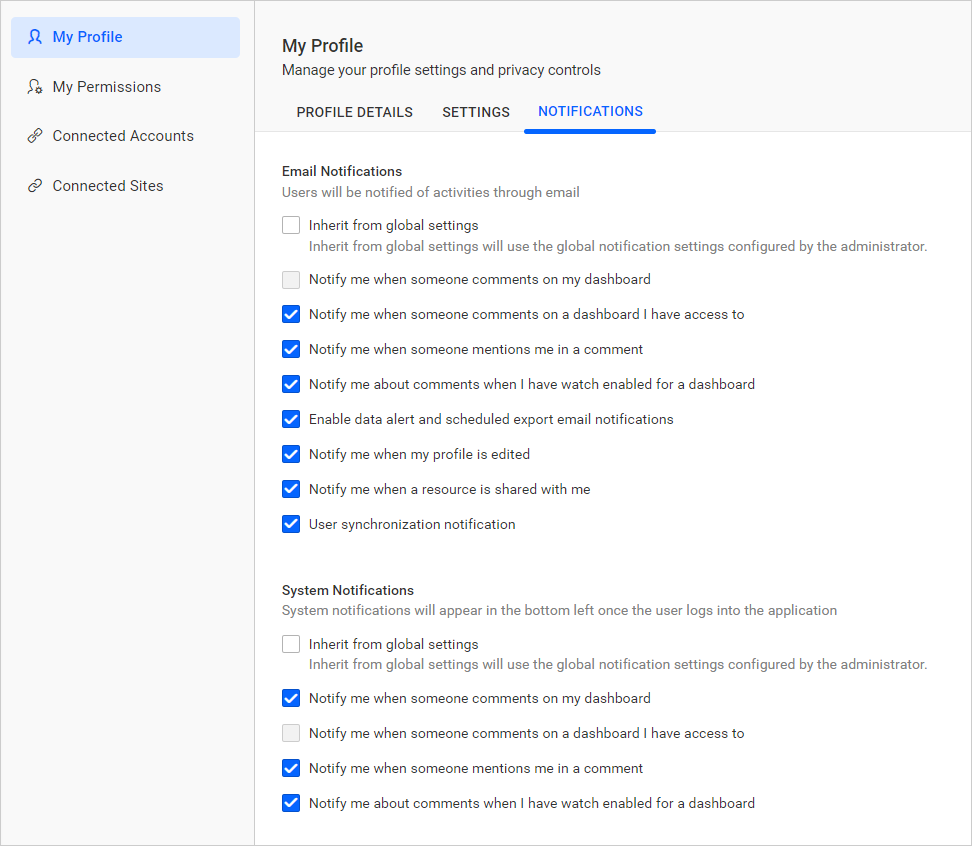
There are two different types of notifications:
- Email Notifications
- System Notifications
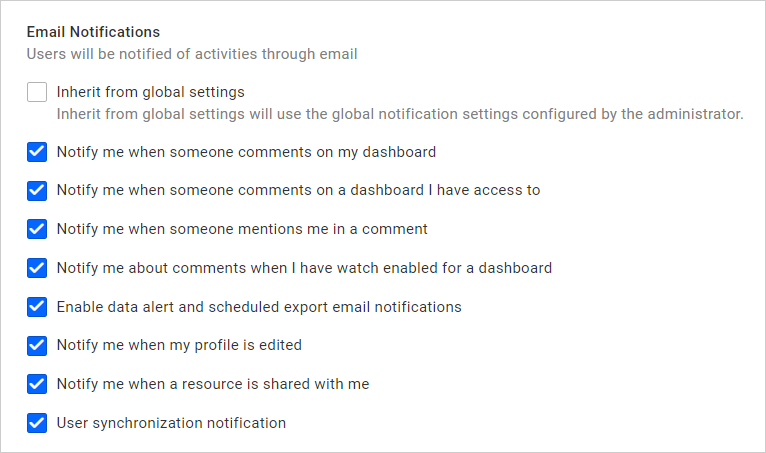
Email notifications
Users will be notified of activities by email based on the settings configured here.
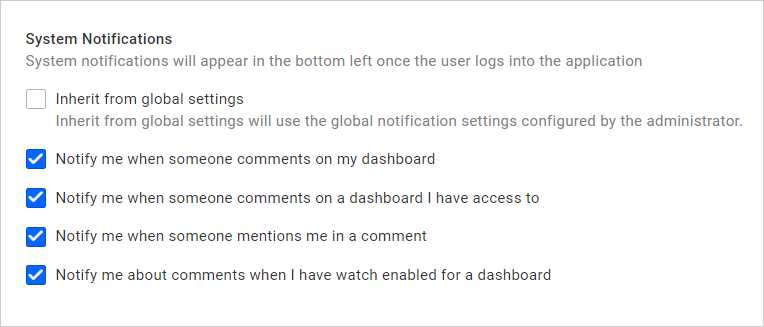
System notifications
System notifications will notify users of activity on comments based on the settings configured here.
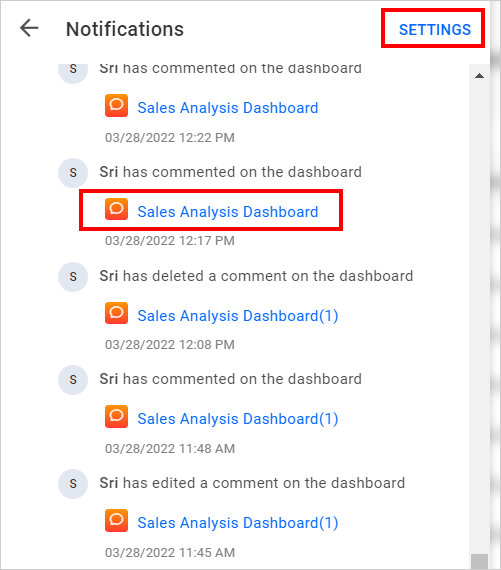
System notifications will appear in the top right corner near the user’s profile picture, as shown in the following image.
![]()
Users can navigate to the particular comment by clicking the dashboard name in the notification section. To configure the user notification settings, users can navigate to the profile page by clicking settings.
List of notifications
Notify me when someone comments on my dashboard
Enabling this option will notify you via email or system notification when someone comments on the dashboard you have created.
Notify me when someone comments on a dashboard I have access to
Enabling this option will notify you via email or system notification when someone comments on the dashboard you have access to.
Notify me when someone mentions me in a comment
Enabling this option will notify you via email or system notification when someone mentions your name while commenting on a dashboard.
Notify me about comments when I have watch enabled for a dashboard
Autowatch will be enabled for a comment on dashboards whenever you add comments to a dashboard you created or to which you have access. This setting is useful if you want to receive notifications for specific dashboards rather than all dashboards that you have created or have access to. You can disable the “Notify me when someone comments on a dashboard I have access to” and “Notify me when someone comments on my dashboard” options and watch a specific dashboard comment.
Specific watch
Apart from autowatch on created and accessible items, you can also watch a specific item.
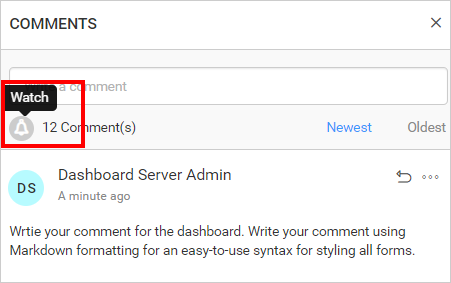
You can toggle between watch and unwatch for a dashboard comment at any time.
Enable data alert and scheduled export email notifications
Enabling this option will notify you via email for data alert and schedule export.
Notify me when my profile is edited
Enabling this option will notify you via email if your profile is edited.
Notify me when a resource is shared with me
Enabling this option will notify you via email whenever you are granted permissions for resources, users, groups, or settings.
User synchronization notification
Enabling this option will notify you via email about user synchronization schedule.
Enable notification for API key expiration
Enabling this option will notify you via email and system notification when the token validity for the API key has expired or is about to expire.
Inherit from global settings
If a user wants to inherit the same settings as in the site notification settings, he or she can do so by checking the “Inherit from global settings” option in Email Notifications and System Notifications.
Disabled user notification preference
If the Disable User Preference is enabled in site notification settings, the user cannot modify the user notification preference settings.
Personal Access Token
Personal access token serves the same purpose as an OAuth access token. It enables secure embedding of the dashboard viewer and designer within your application. Additionally, this token grants access to all of our REST API endpoints.
Steps to generate the access token from the dashboard server UI
- In the Profile page, Click the
Personal Access Tokentab.

- Select the required duration from the dropdown for token expiration.
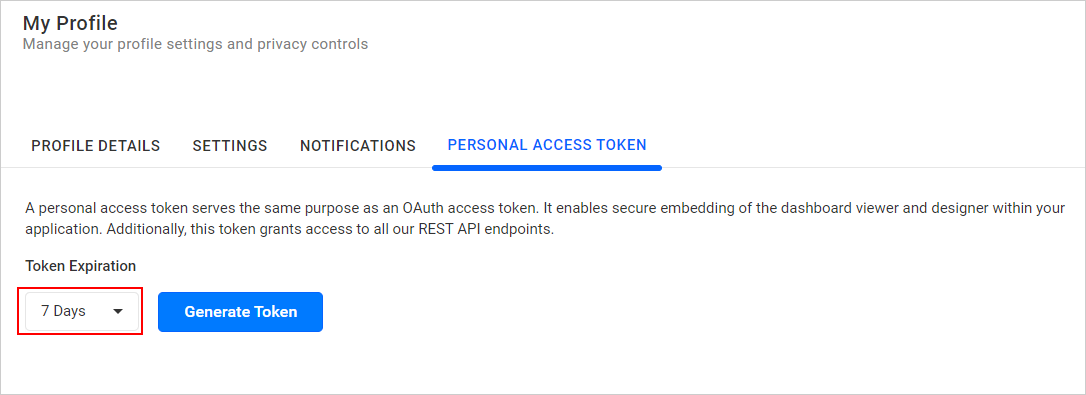
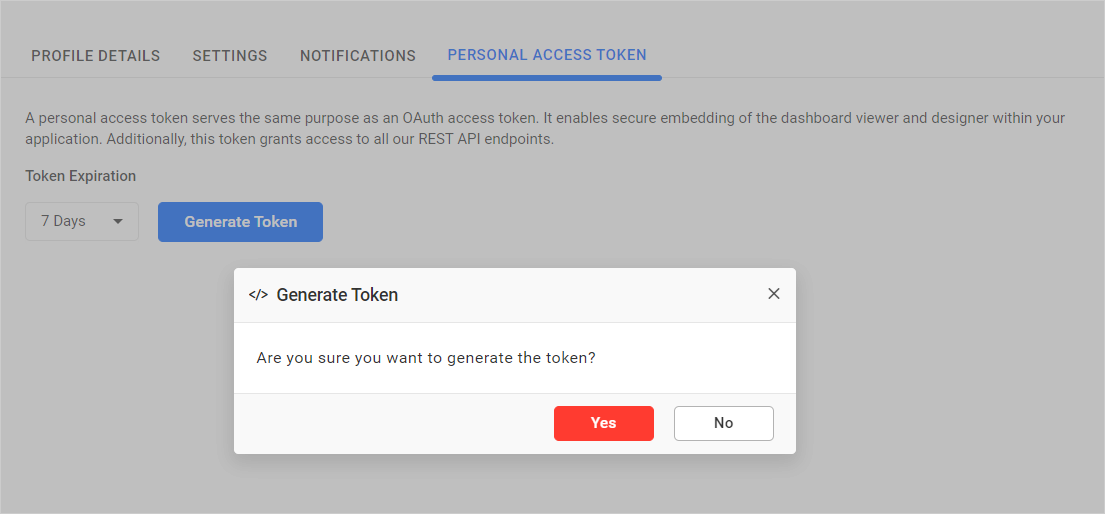
- Click the
Generate Tokenbutton, and in the confirmation dialog, chooseYes.
- An access token will be generated. Now, you can copy and use the token for embedding and REST APIs.
![]()
NOTE: The logged-in user’s credentials are utilized to produce the access token.
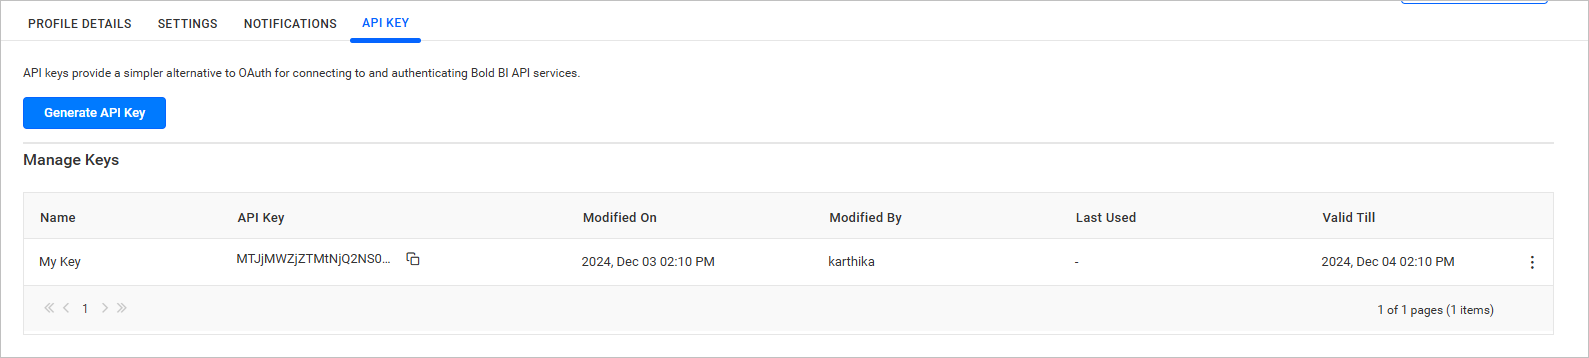
API Key
API key authentication is a basic authentication mechanism. It is straightforward and can serve as an alternative to OAuth for connecting to and authenticating the Bold BI API service, as well as for securely embedding the dashboard viewer and designer within your application.
Steps to generate the API key from the dashboard server UI
-
On the Profile page, click the
API Keytab.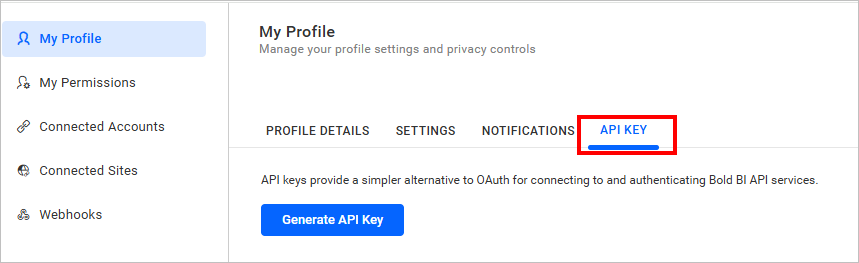
-
Click on
Generate API Key. You will need to provide a name for the key and specify its validity period if expiration is required.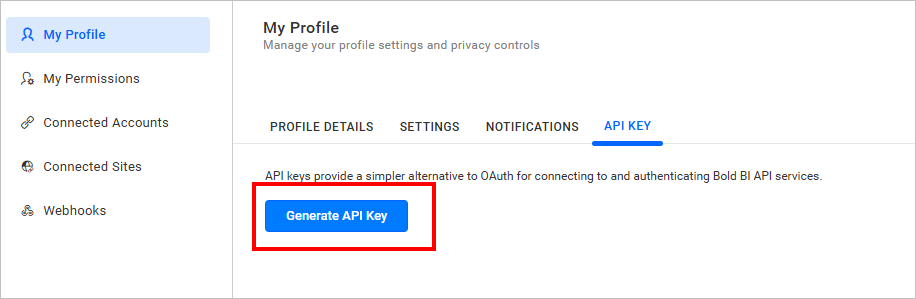
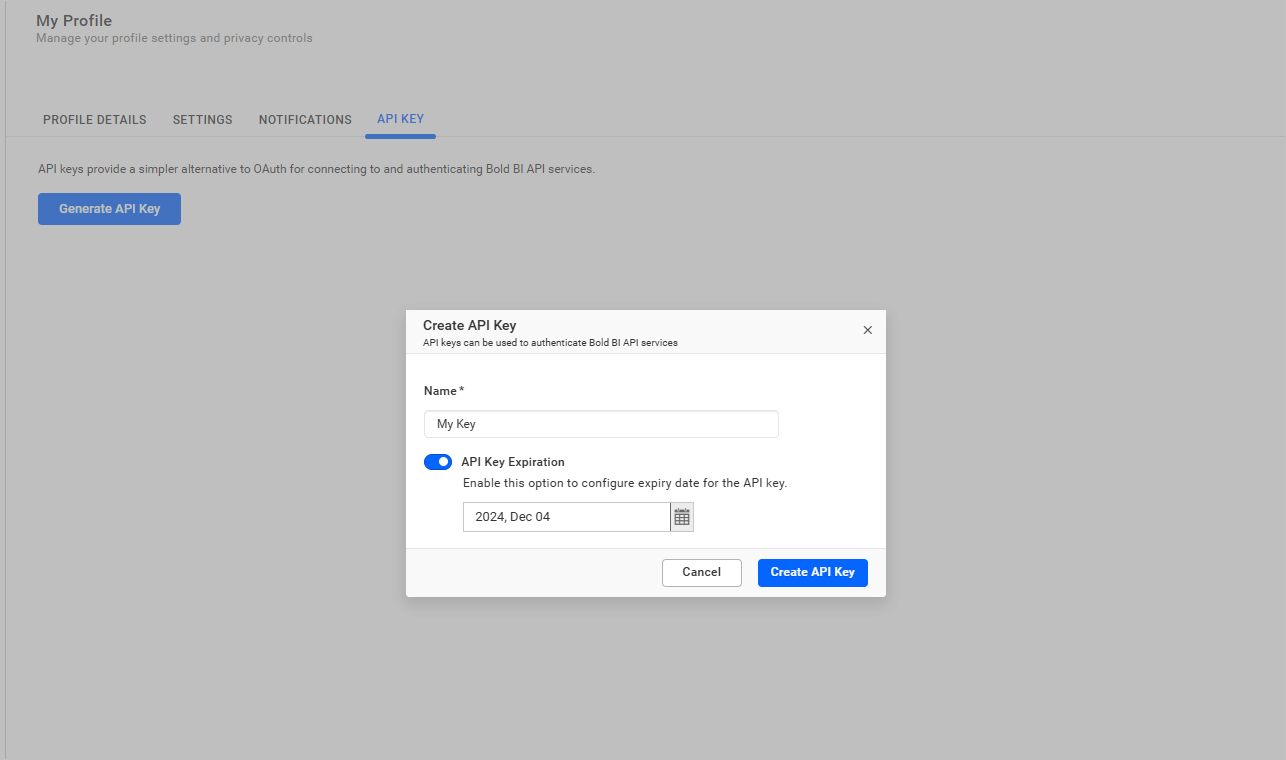
-
Click the
Create APIKey button. The API key will be generated, and you can then copy it for use in the HTTP request header from your application.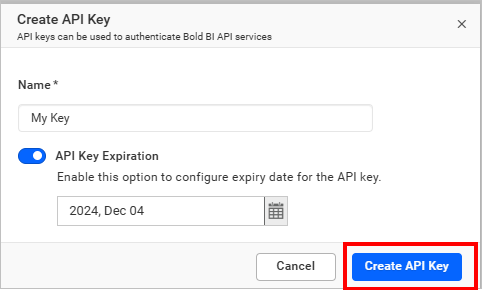
NOTE:
- The credentials of the logged-in user are used to generate the access token.
- Each user is allowed to add a maximum of two API keys per site.
Edit API Key
You can edit the name of the generated API key in both the API Key section of your profile page and the API Key section of the admin page.
-
Click the
Actionsbutton in the API key grid context menu and selectEditto modify the API key.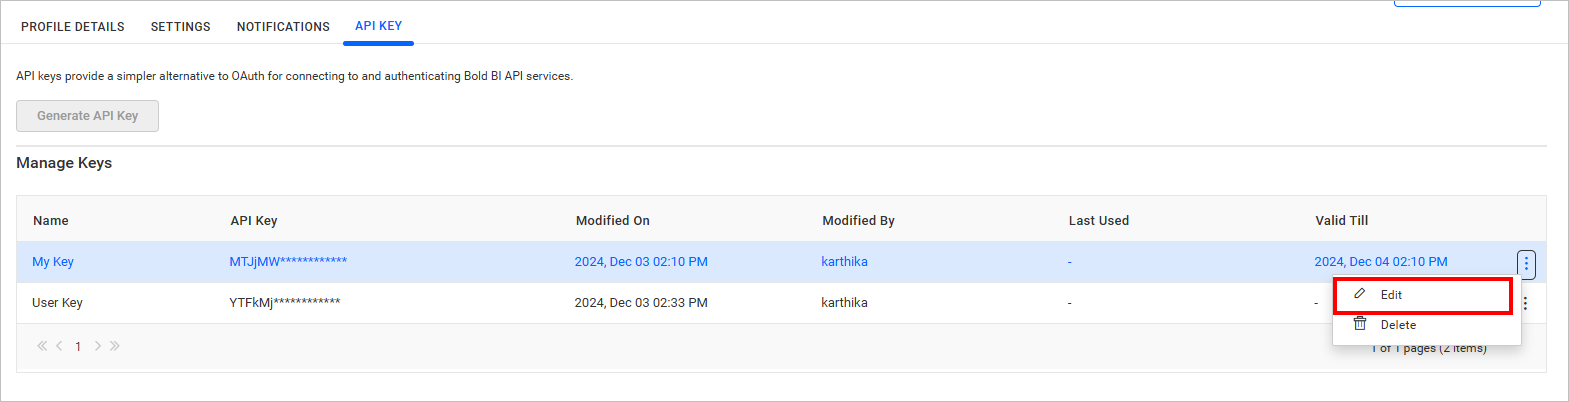
-
After editing the name,
Savethe modified changes.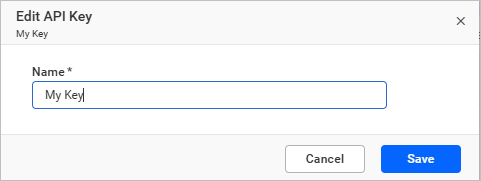
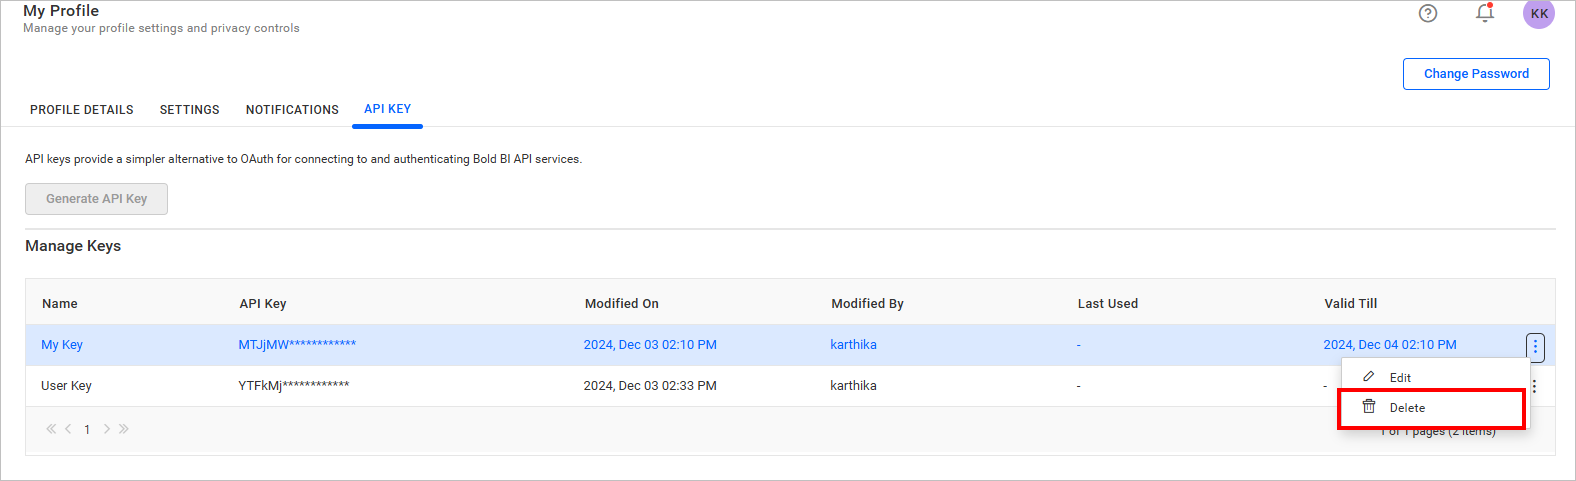
Delete API Key
-
An API key can be deleted from Bold BI when it is no longer required.
-
Click the
Actionsbutton in the API key grid context menu and selectDeleteto API key the Webhook.
API Key Usage
To make an HTTP request with API Key, the request header must include the API key. Use the generated API key in the following format.

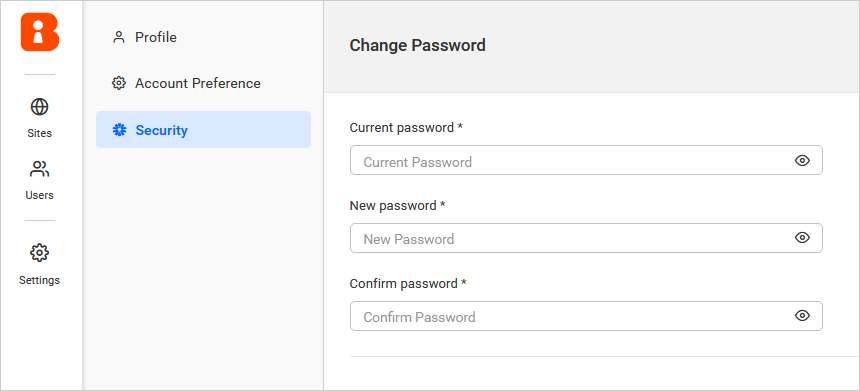
Change Password
The password to log in to Bold BI can be changed on the Bold BI change password page.

Clicking on Change Password will redirect you to the IDP profile page where you can change your password.
NOTE: Administrator privileged users can change the password from the UMS Site. For more details, please visit here
Forgot Password
If you forgot your password, you can reset it by following the steps below:
-
Click on the cannot access your account option on the login page.

-
Enter your email to receive the reset password link. After entering your email, click on
Send recovery link.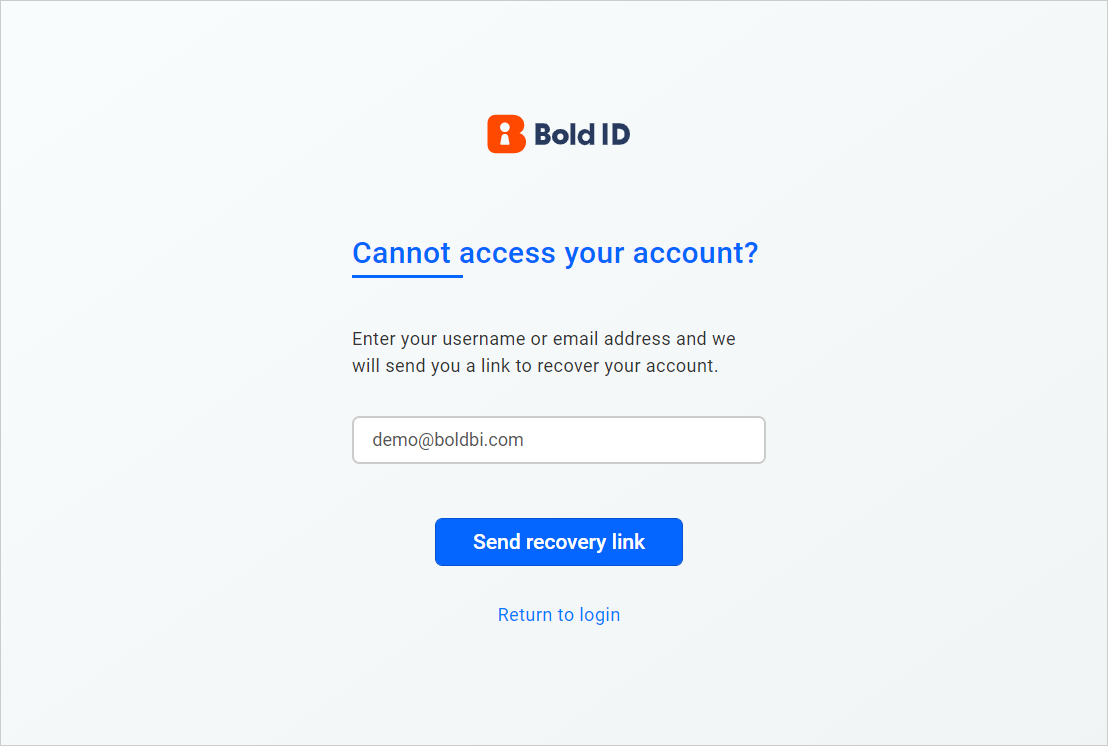
-
After the confirmation page, you will receive an email to reset your password.
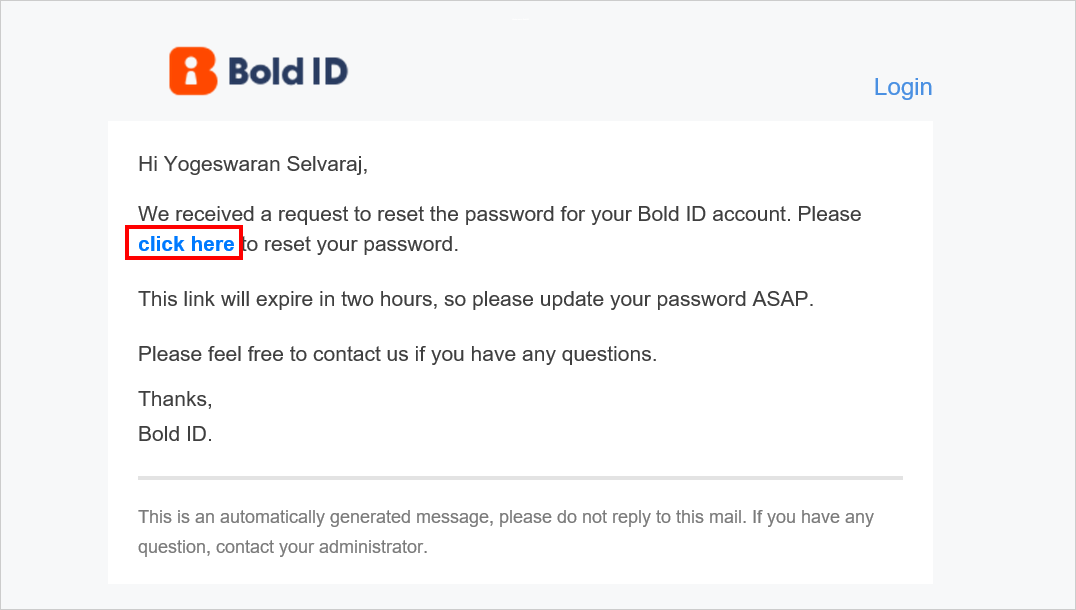
-
You can reset your password by clicking on the link in the email you received.

NOTE: The forgot password option is restricted for third-party user directories.
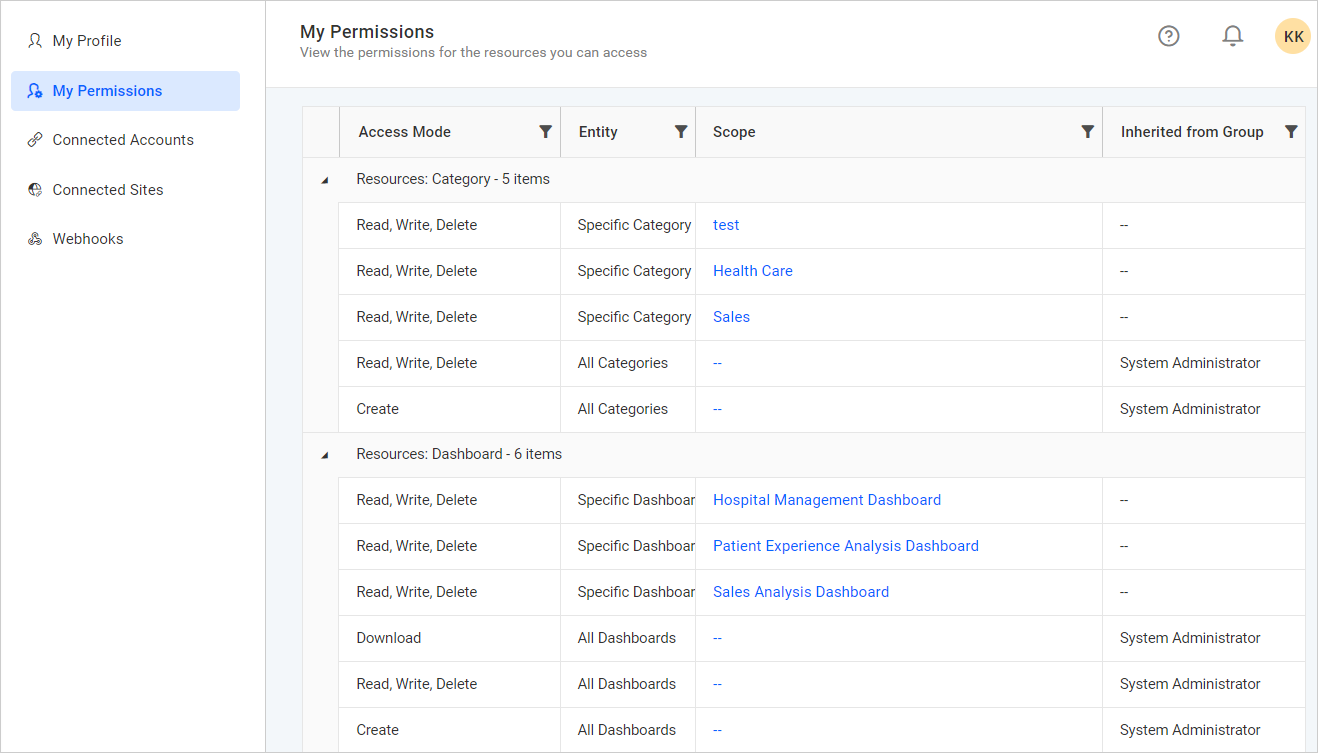
My Permissions
Users can view their access permission list for each resource such as Dashboards, Data Sources, Widgets, and Schedules in Bold BI.
Connected Accounts
You can manage the external OAuth accounts that you have granted access to in Bold BI. Please find more details on the Connected accounts page.
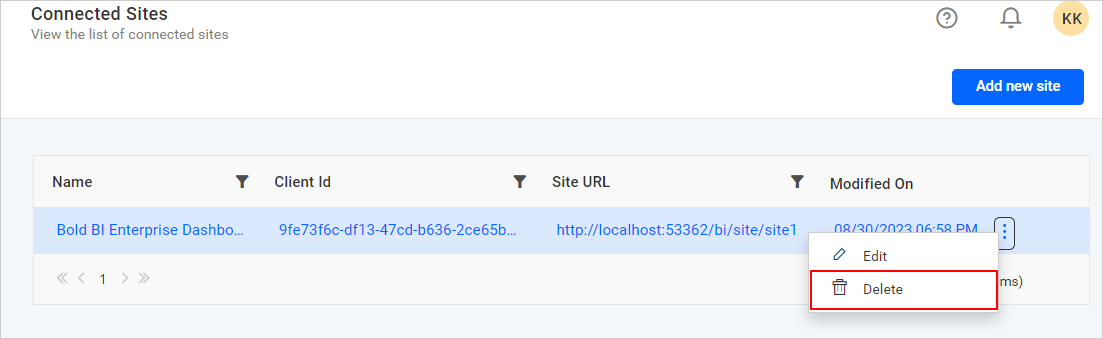
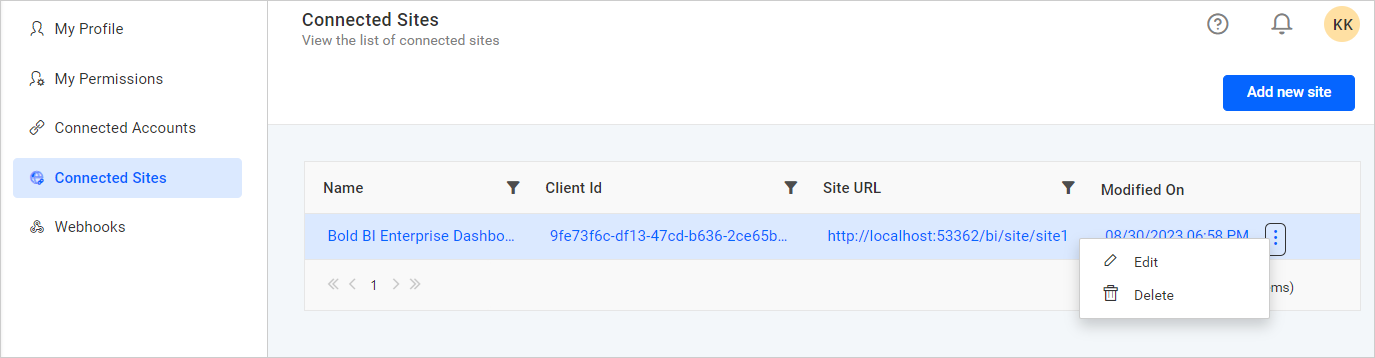
Connected sites
You can add, edit, delete, and view the list of external sites on the connected sites page.
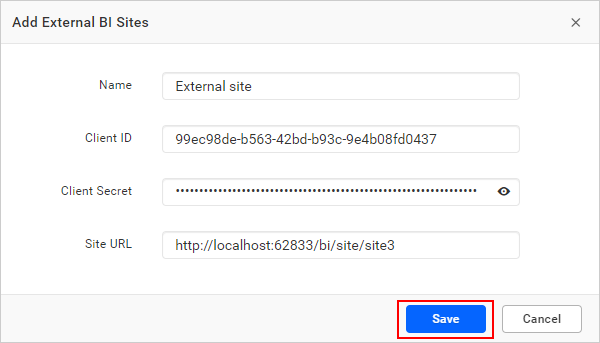
Add External BI Sites
Add a site created in Bold BI servers as an external site on the Connected Sites page.
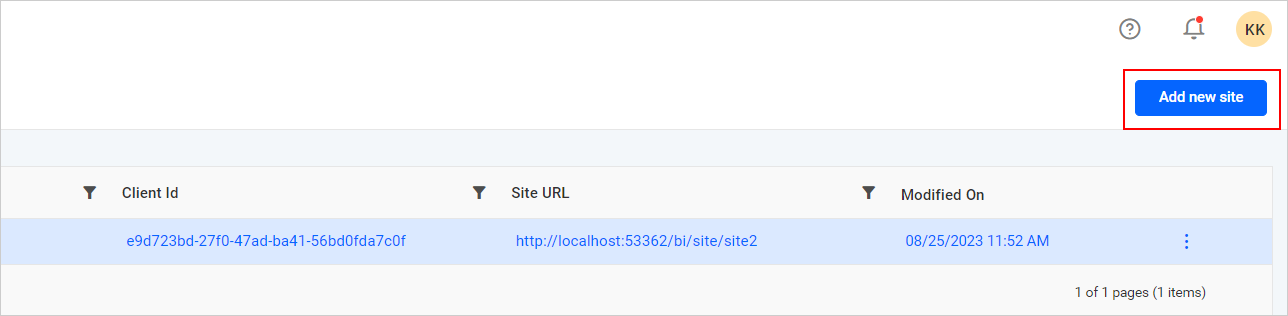
To add an external BI site, click on Add new site, fill in the required details as shown in the image, then click Save.
- Name - Enter the name that you want for external site.
- Client ID - Enter the Client Id of the site.
- Client Secret - Enter the Client Secret of the site.
- Site URL - Enter the URL of the site.
Edit External Site
To edit an external site, click on Actions and then select Edit from the site listing grid.
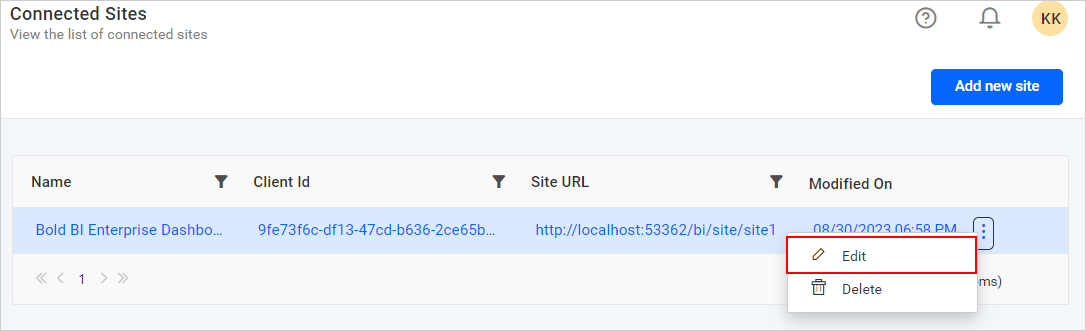
Edit the site details, then click Save. You will need to re-enter the site’s Client Secret to edit the connected site.

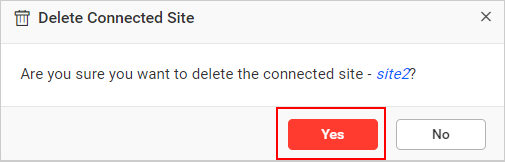
Delete External Site
To delete an external site, click on Actions, select Delete from the site listing grid, then click Yes in the Delete Connected Site dialog.