Connecting Bold BI to Amazon Aurora data source
The Bold BI Dashboard Designer supports connecting to multiple databases through Amazon Aurora using SQL Live Query.
Choose Amazon Aurora data source
To select Amazon Aurora as a data source, follow these steps:
-
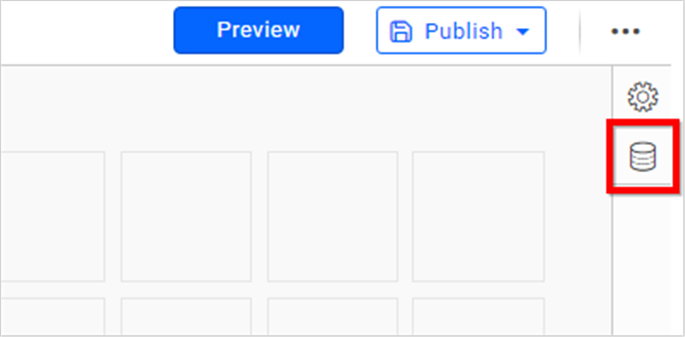
Click on Data Sources in the configuration panel to add a new data connection.
-
Click on CREATE NEW to launch a new connection from the connection panel.
-
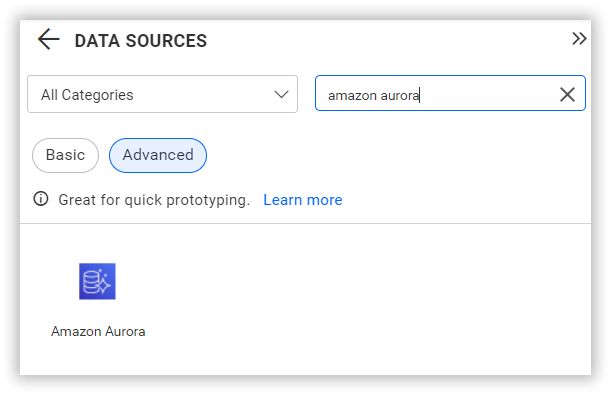
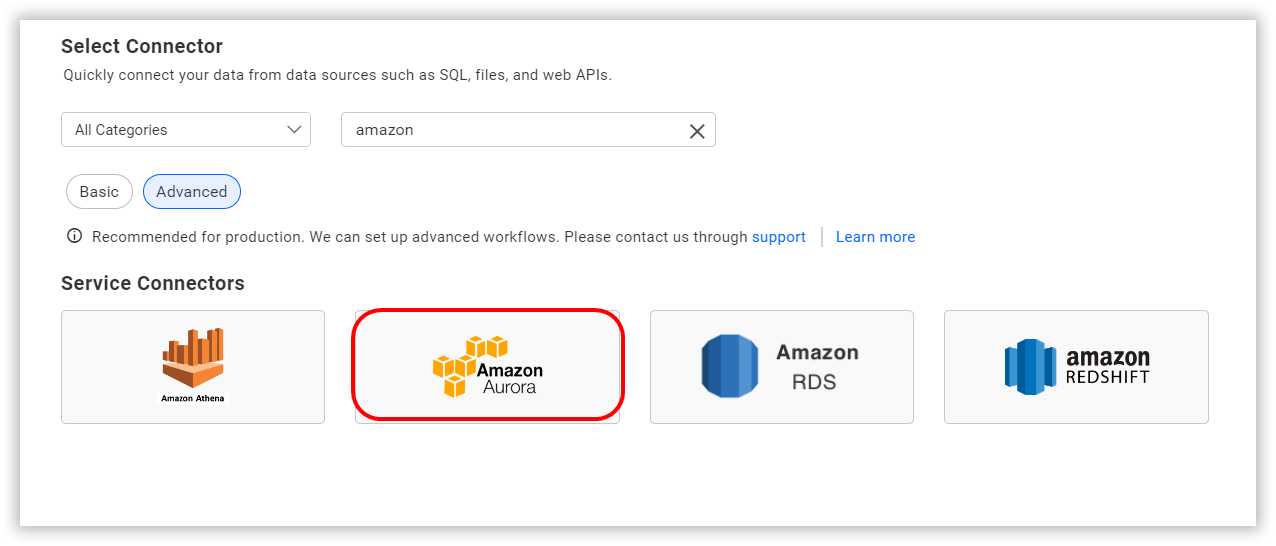
Select the Amazon Aurora connection in the connection panel.
NOTE: Alternatively, you can create a data source from the home page by clicking on the Data Sources menu in the left menu panel and selecting Create Data Source from the data sources page.
Connect to Amazon Aurora
Create Amazon Aurora data source
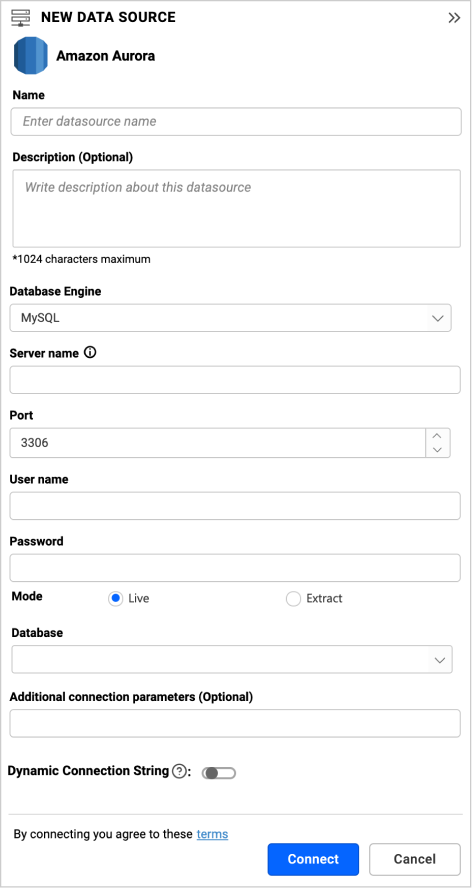
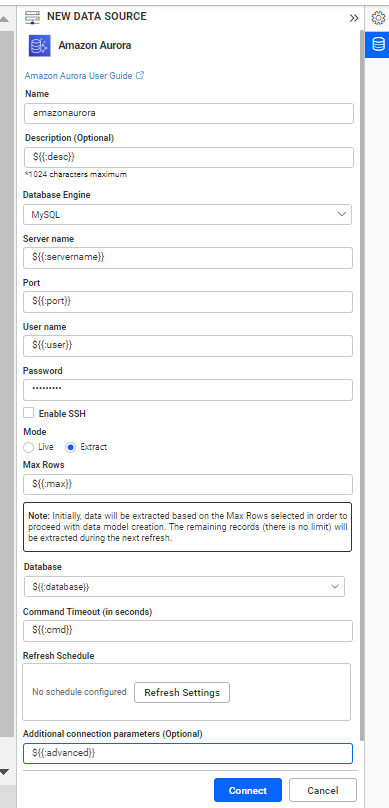
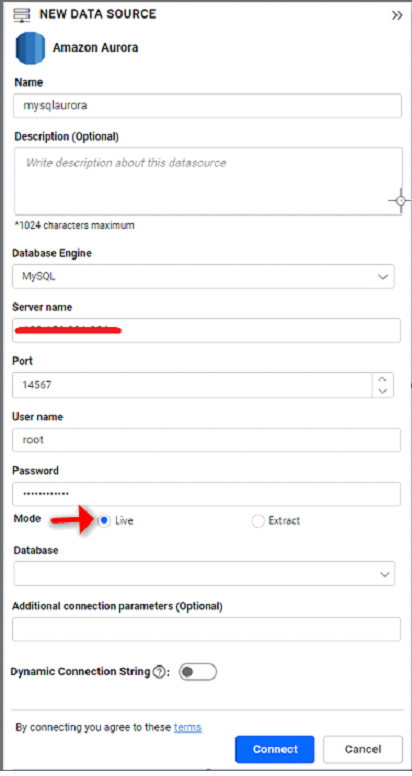
After clicking a data source, the NEW DATA SOURCE configuration panel opens. Follow the given steps to create a Amazon Aurora data source:
-
Enter a name and description (optional) for the data source.
-
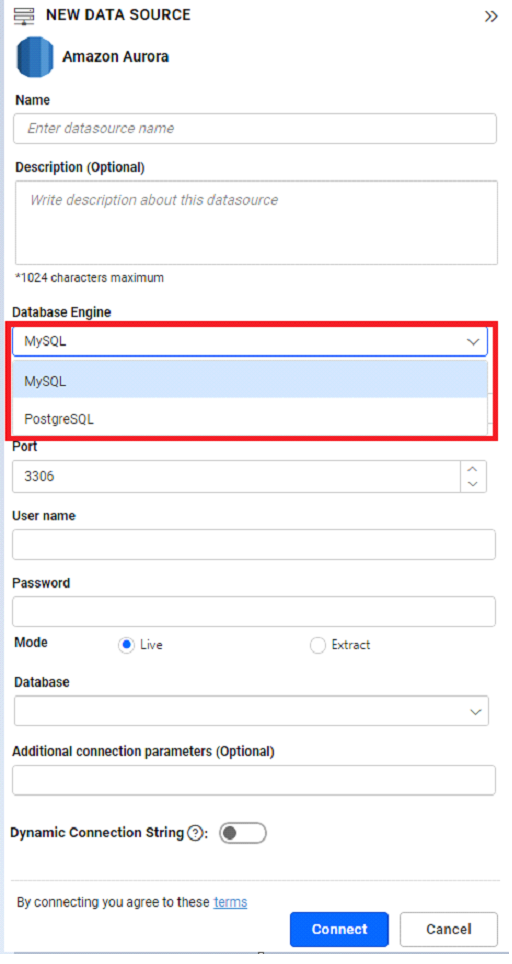
Select the database engine you want to use with the Amazon Aurora Server from the Database Engine dropdown menu.
-
Enter the valid Amazon Aurora server or host name in the ServerName text box.
-
Enter the valid Amazon Aurora username in the UserName text box.
-
Enter the valid Amazon Aurora password in the Password text box.
-
Enter the valid Amazon Aurora Database in the Database text box or select it from the dropdown menu.
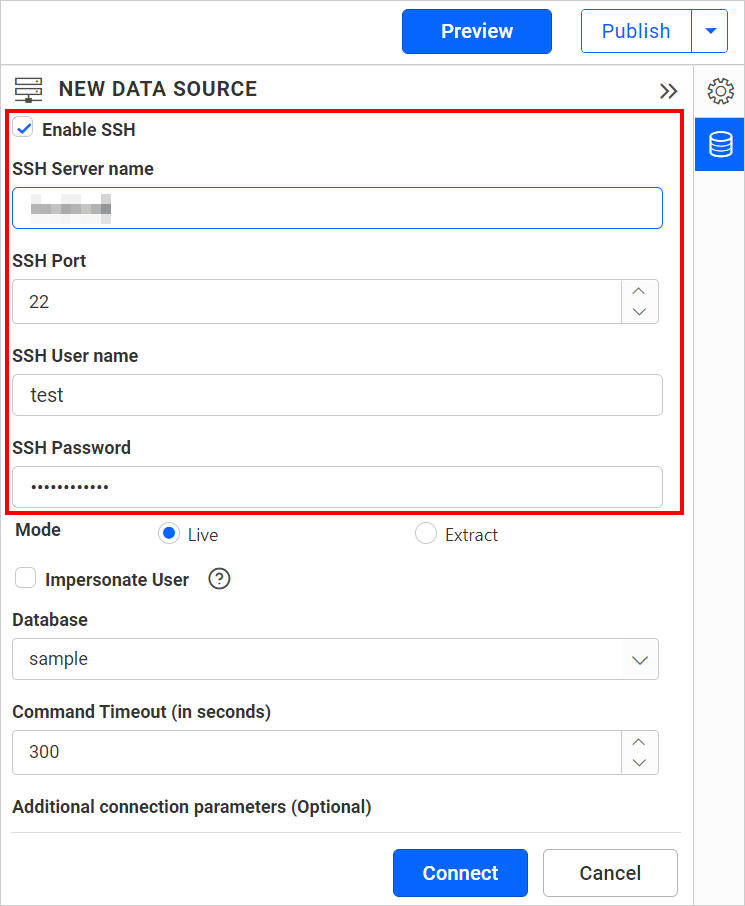
NOTE: If you need to connect to the data source with SSH, check the SSH box in the NEW DATA SOURCE configuration panel and enter the required credentials.
Connect using custom attribute and dashboard parameter
We have added support for custom attributes and dashboard parameters to the data source connection. You can connect to the data source using custom attributes or dashboard parameters.
Custom Attribute
Dashboard Parameter
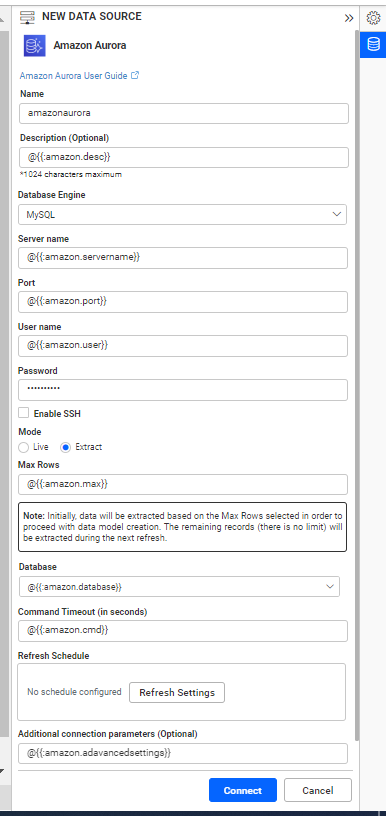
Note: Refer to the Dashboard Parameter Documentation and Custom Attributes Documentation for more details.
Amazon Aurora supported database engine in Bold bi
- MySQL
- PostgreSQL
Database Engine
There are two connection types available in a data source:
* Live mode
* Extract mode
Live mode connection
In this connection type, data is directly fetched from the source. Choose the Live mode option for this connection.
Data Preview
- Click Connect to connect to the Amazon Aurora server with configured details.
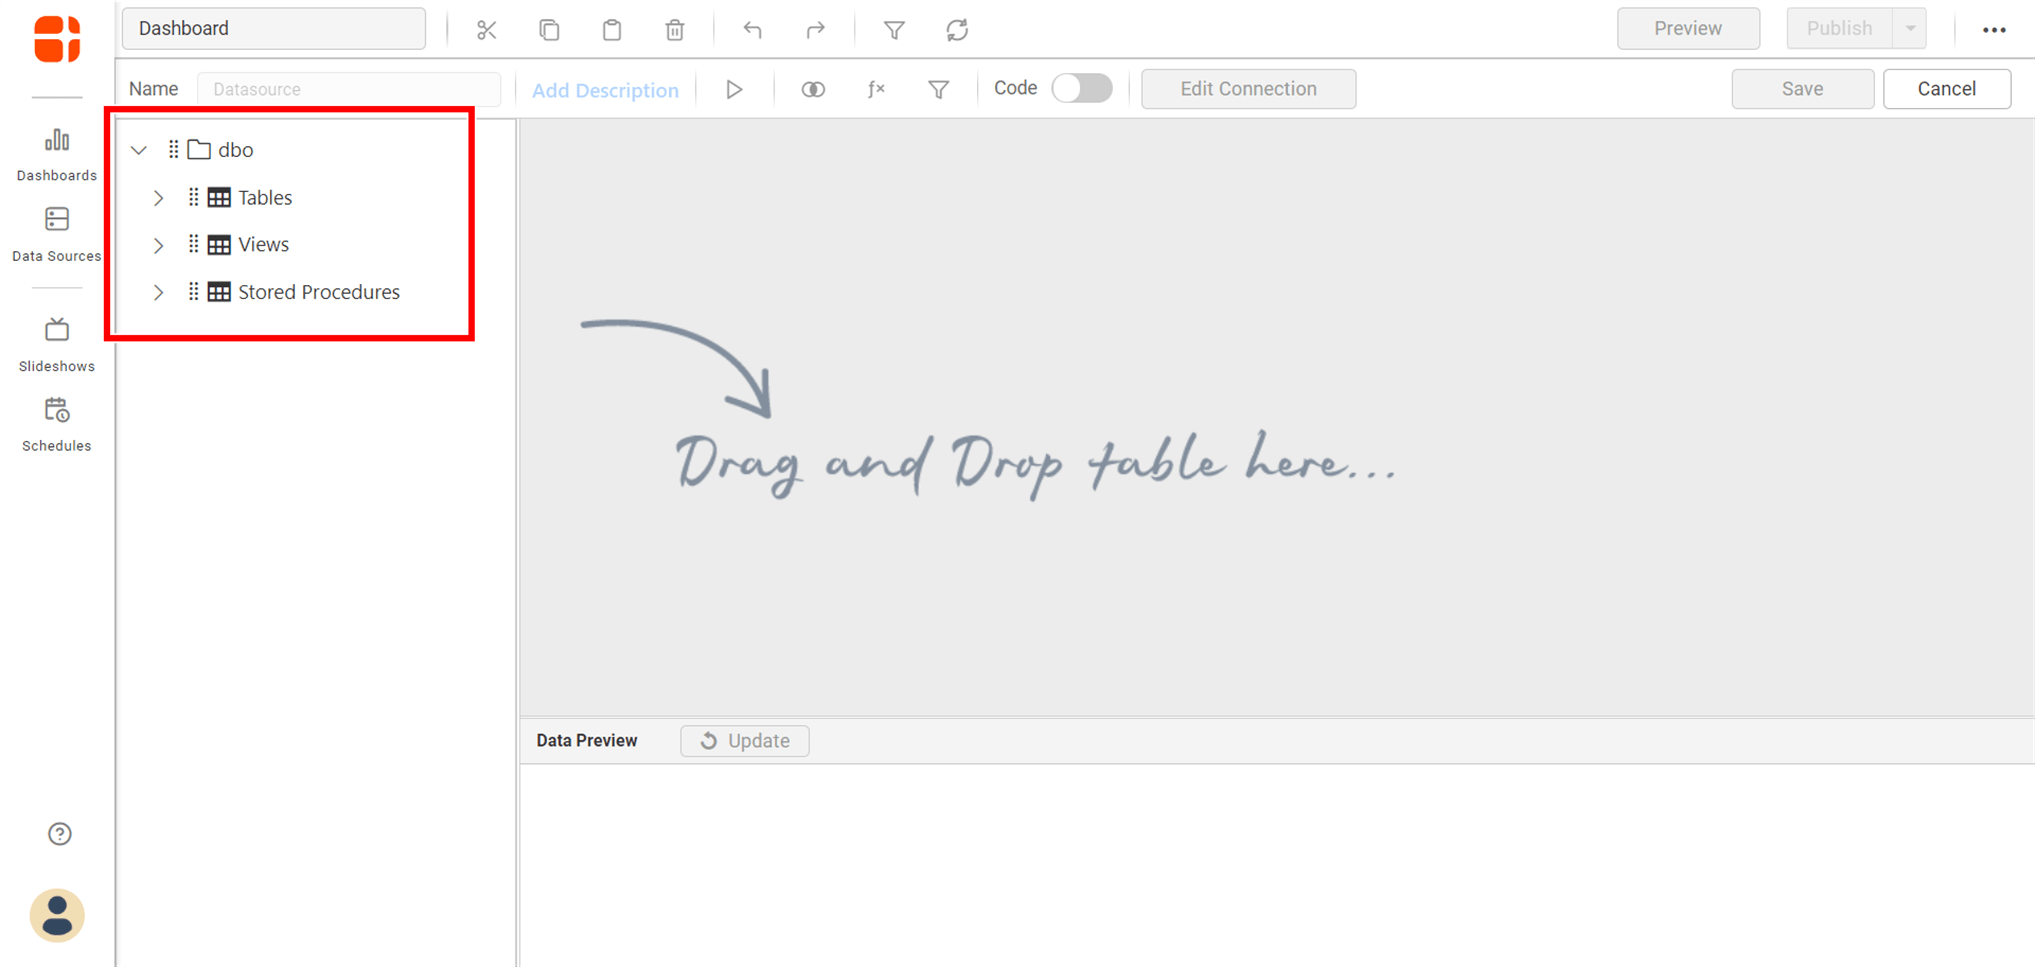
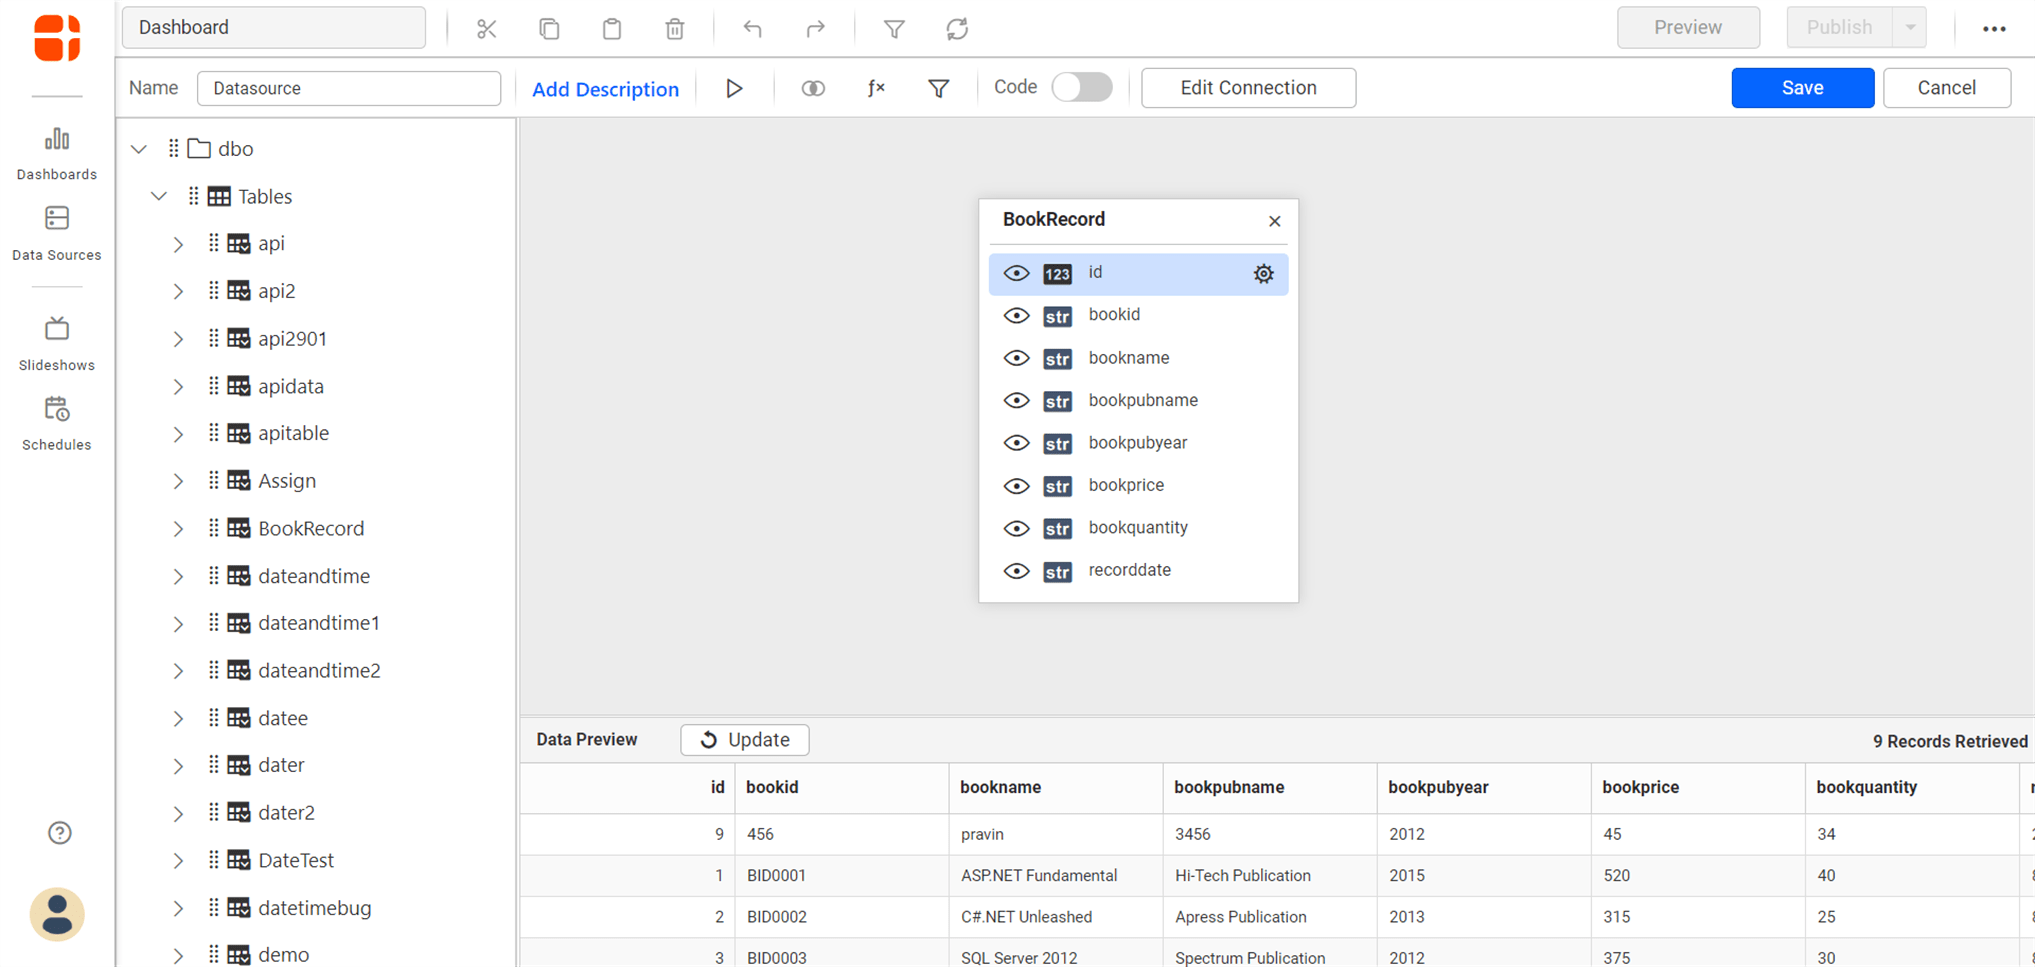
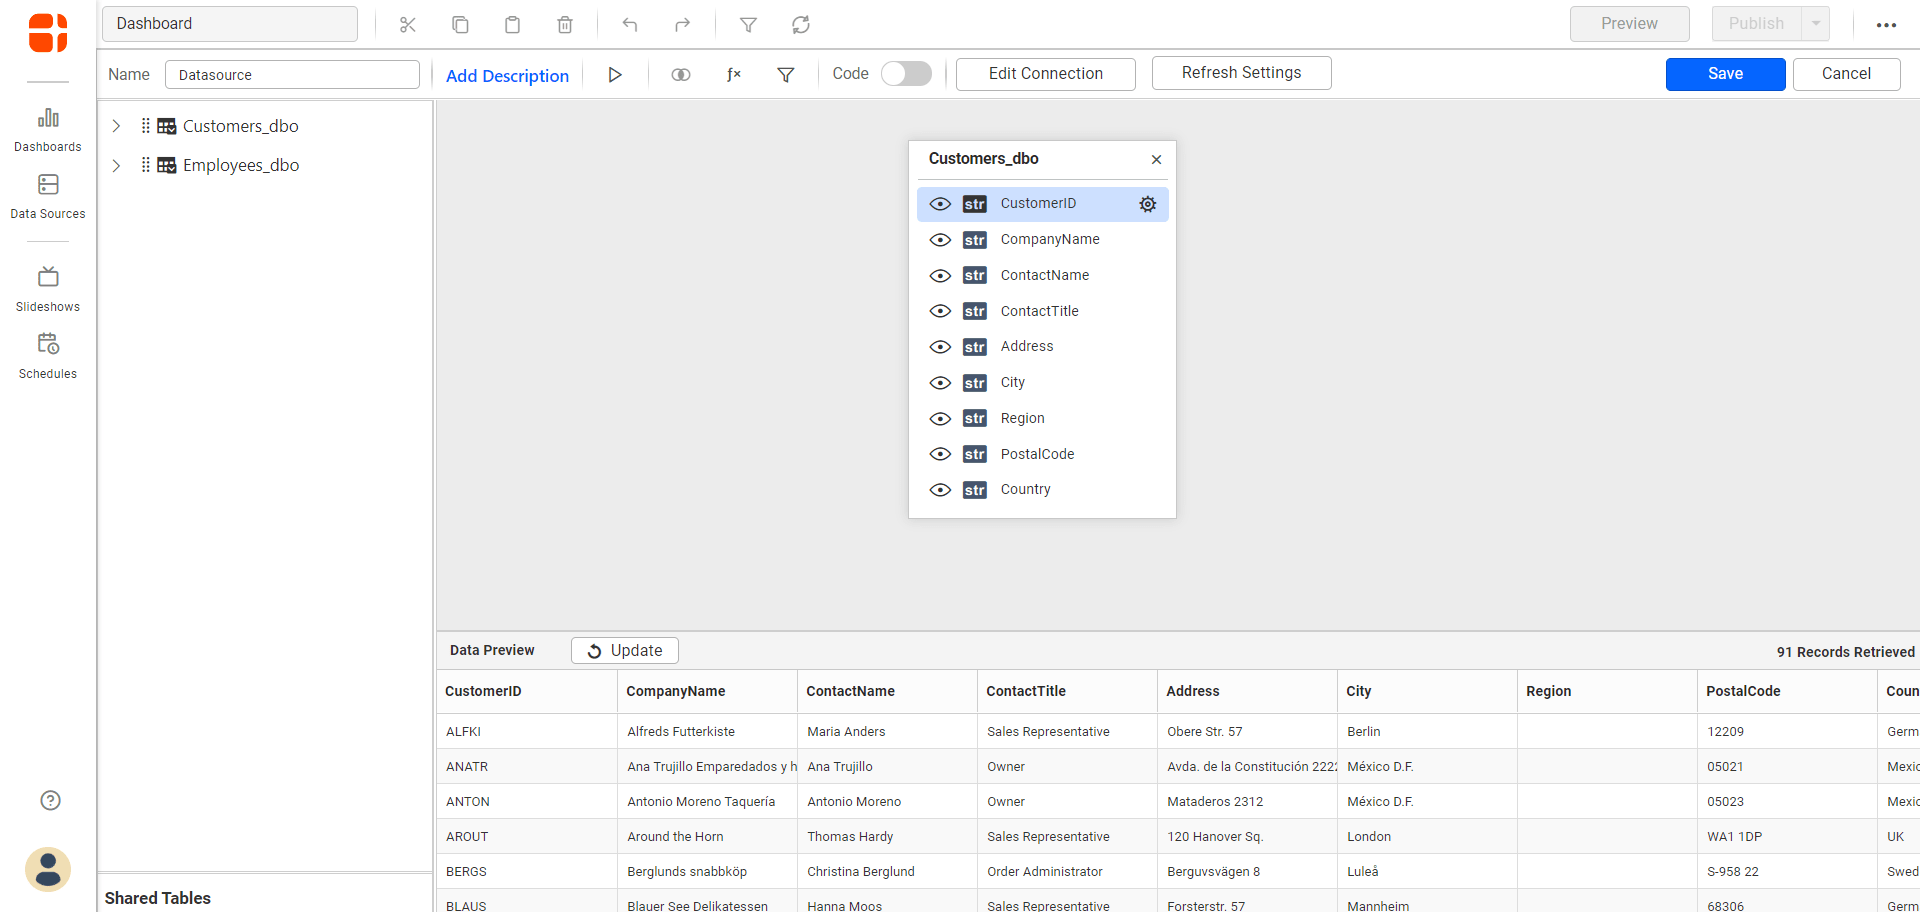
The schema represents the collection list retrieved from the Amazon Aurora server. This dialog displays a list of schemas in treeview and their corresponding values.
-
Now, the data design view page with the selected table schema opens. Drag and drop the table.
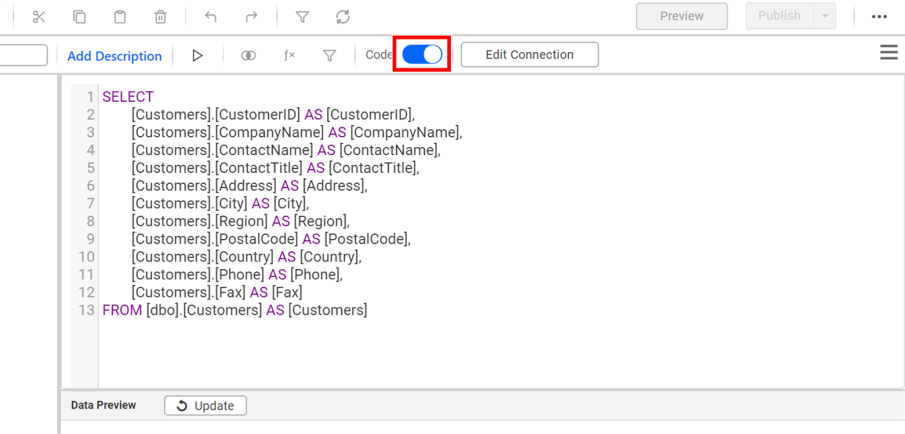
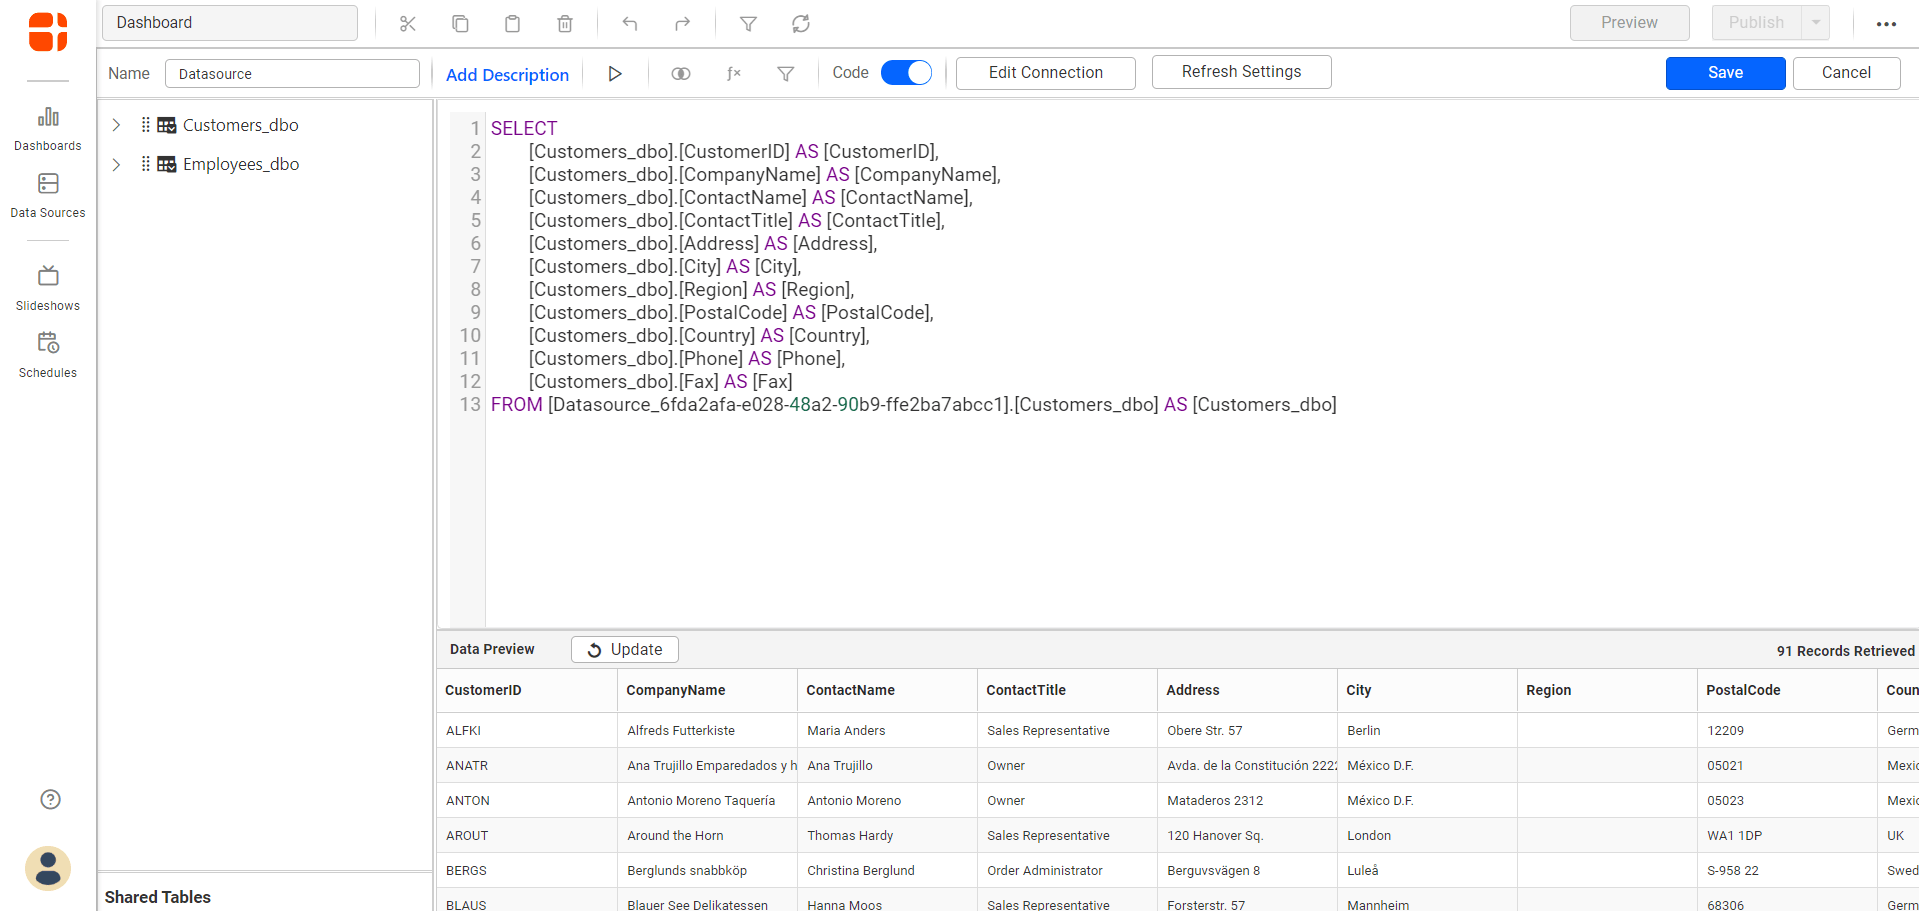
You can use the Code View options to pass a query to display data.
-
Click Save to save the data source with a relevant name.
Extract mode connection
In this connection type, a data source is fetched from the source periodically. Choose the Extract mode option for this connection.
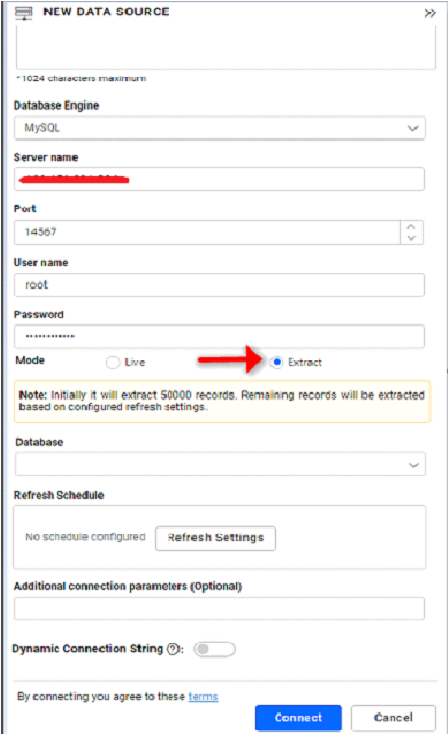
NOTE: Initially, data will be extracted based on the Max Rows selected in order to proceed with data model creation. The remaining records (there is no limit) will be extracted during the next refresh.

Refresh Settings
Steps to configure the data source refresh settings:
-
Click Refresh Settings in the configuration panel.

-
Select the recurrence type, recurrence start and end dates in the Refresh Setting dialog box.
- Data refresh can be scheduled hourly, daily, weekly, or monthly.
- The Application Time Zone is displayed below the date picker. The start time of the schedule is converted to the client Time Zone and shown on the right side for user convenience. After selecting, click Schedule.

Preview and import data.
- Click Connect to the Amazon Aurora server with configured details.
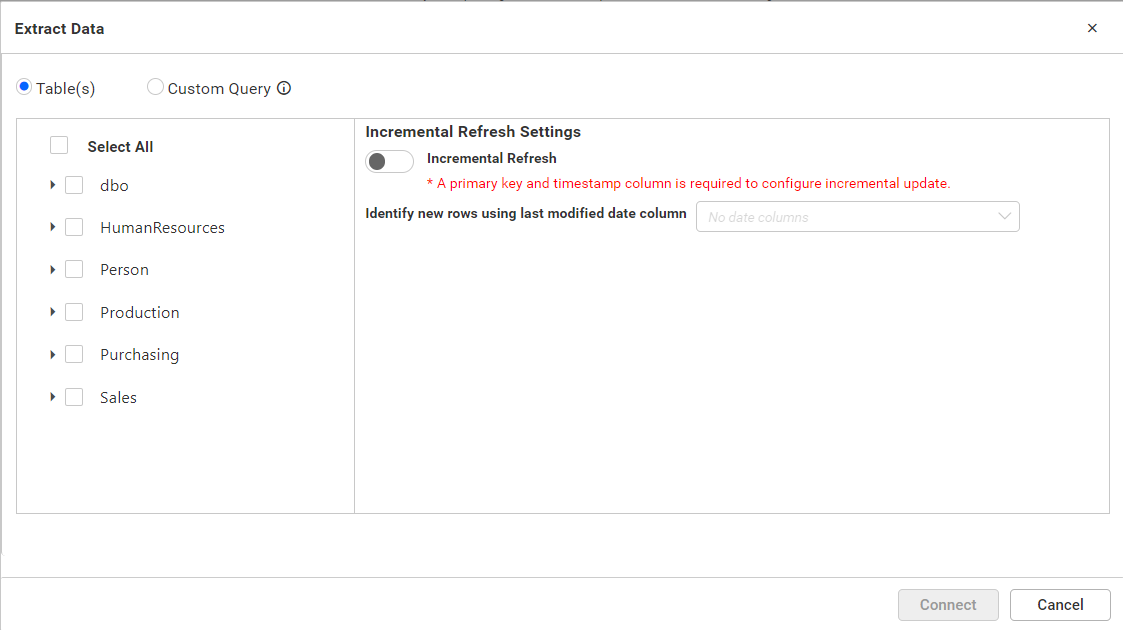
- The Extract Data dialog opens. This dialog has two modes of connection either via Table or Custom query. Under custom query option, write the required query and click Connect.
Under the Table option, This dialog displays list of tables and views in treeview. Select the required table(s) or view(s) from treeview to use in the designer. The option is available for configuring incremental refresh column (The table must have a primary key column and date column to configure this option) for the selected items in the right side panel. If you configured it, then the data source will work on Incremental update, otherwise works on Full load concept. And finally click Connect.
-
Now, the data design view page with the selected table schema opens. Drag and drop the table.
You can use the Code View options for passing a query to display data.
-
Click Save to save the data source with a relevant name.
NOTE: In the future, you can edit the connection information for both Live and Extract mode connections using the Edit Connection option.
Connecting Bold BI to Amazon Aurora Data Source via REST API
Prerequisites
The type while creating the data source needs to be amazonauroramysql or amazonaurorapostgresql
Modes
Through the REST API, only the live mode data source can be created and edited.
Parameters for creating Data Source
NOTE: The ability to provide join support is available only during the creation of a new data source. Join in edit connection mode is not supported.
| Parameters | Details |
|---|---|
| Servername required | string
Server name or Host name of the connection |
| Port required | string
Port number used to connect to amazonaurora
|
| Username required | string
A valid user name for the connection |
| Password required | string
A valid Password for the connection |
| Database required | string
database which needs to be connected |
| Schemaname required for table mode | string
Enter a valid Schemaname |
| Tablename required for table mode | string
Enter a valid Tablename |
JoinType Required For Join Info | string
Enter a valid JoinType For Example (Inner,Outer) |
| LeftTable Required For Join Info | string
Enter a valid Left Table name |
| RightTable Required For Join Info | string
Enter a valid Right Table name |
| LeftField Required For Join Info | string
Enter a valid Left Table Column Name |
| RightField Required For Join Info | string
Enter a valid Right Table Column Name |
| Condition Required For Join Info | string
Enter a valid Condition For Example (AND,OR) |
| LeftField Required For Join Info | string
Enter a valid Left Table Column Name |
| Operator Required For Join Info | string
Enter a Valid Operator For Example (=,>=) |
| Value Optional For only Join Info | string
Specifically choose the column values. |
| Query required for code view mode | string
Enter a valid Query |
| AdvancedSettings optional | string
Additional optional connection parameters can be provided. By default, it is empty. |
| CommandTimeout optional | string
Enter a valid Timeout for connection. By default, it is 300. |
| IsSshConnection optional | `boolean` Enable or disable SSH. By default, it is false. |
| SshServerName optional | string
Enter a valid Ssh Server name. By default, it is empty. |
| SshPort optional | `integer` Enter a valid Ssh Port number. |
| SshUserName optional | string
Enter a valid Ssh Username. By default, it is empty. |
| SshPassword optional | string
Enter a valid Ssh Password. By default, it is empty. |
| Expressions optional | `Array of Objects` |
Parameters for edit the connection while upload the dashboard via API
| Parameters | Details |
|---|---|
| ServerName required | string
Server name or Host name of the connection |
| Port required | string
Port number used to connect to amazonaurora
|
| UserName required | string
A valid user name for the connection |
| Password required | string
A valid Password for the connection |
| Database required | string
database which needs to be connected |
| Schema required for table mode | string
Enter a valid Schema |
| AdvancedSettings optional | string
Additional optional connection parameters can be provided. By default, it is empty. |
| CommandTimeout optional | string
Enter a valid Timeout for connection. By default, it is 300. |
| TrustServerCertificate optional | `boolean` To enable trusting the server's certificate without validation, set it to true. To perform standard SSL certificate validation, set it to false. By default, it is false. |
| IsSshConnection optional | `boolean` Enable or disable SSH. By default, it is false. |
| SshServerName optional | string
Enter a valid Ssh Server name. By default, it is empty. |
| SshPort optional | `integer` Enter a valid Ssh Port number. |
| SshUserName optional | string
Enter a valid Ssh Username. By default, it is empty. |
| SshPassword optional | string
Enter a valid Ssh Password. By default, it is empty. |
Parameters for adding expressions when creating Data Source
| Parameters | Details |
|---|---|
| Name required | string
Name of the Expression
|
| Expression required | string
Expression
|
Parameters for editing Data Source
NOTE: Please note that for editing the Data Source via API, all parameters are optional. You only need to provide the parameter that needs to be changed.
Parameters for modifying expressions when editing Data Source
| Parameters | Details |
|---|---|
| Name required | string
Name of the Expression
|
| Expression required | string
Expression
|
| Action optional | string
add/delete/edit
By default, it is add.
|
| NewName optional | string
For renaming the expression. This is applicable only if the Action is edit
|
Connection Sample for Table Mode
For creating connection:
"Connection":
{
"Servername": "string",
"Port": "string",
"Username": "string",
"Password": "string",
"Database": "string",
"Schemaname": "string",
"Tablename": "string",
"AdvancedSettings": "string",
"CommandTimeout": "string",
"IsSshConnection": "false",
"SshServerName": "string",
"SshPort": 0,
"SshUsername": "string",
"SshPassword": "string",
"Expressions" : [{
"Name": "Expression1",
"Expression" : "SUM(numeric expression)"
    },
    {
"Name": "Expression2",
"Expression" :  "UPPER(string expression)"
}]
}
For creating connection with multiple tables :
"Connection":
{
"Servername": "string",
"Port": "string",
"Username": "string",
"Password": "string",
"Database": "string",
"Tables": [
            {
                "Tablename": "string",
                "Schemaname": "string"
            },
            {
                "Tablename": "string",
                "Schemaname": "string"
            }
        ],
"JoinInfo": [
            {
                "JoinType": "string",
                "LeftTable": "string",
                "RightTable": "string",
                "JoinFieldInfos": [
                    {
                        "Condition": "string",
                        "LeftField": "string",
                        "Operator": "string",
                        "RightField": "string",
                        "Value": "string"
                    },
                    {
                        "Condition": "string",
                        "LeftField": "string",
                        "Operator": "string",
                        "RightField": "string",
                        "Value": "string"
                    }
                ]
            }
        ],
"AdvancedSettings": "string",
"CommandTimeout": "string",
"IsSshConnection": "false",
"SshServerName": "string",
"SshPort": 0,
"SshUsername": "string",
"SshPassword": "string",
"Expressions" : [{
"Name": "Expression1",
"Expression" : "SUM(numeric expression)"
    },
    {
"Name": "Expression2",
"Expression" :  "UPPER(string expression)"
}]
}
For editing connection:
"Connection":
{
"Servername": "string",
"Port": "string",
"Username": "string",
"Password": "string",
"Database": "string",
"Schemaname": "string",
"Tablename": "string",
"AdvancedSettings": "string",
"CommandTimeout": "string",
"IsSshConnection": "false",
"SshServerName": "string",
"SshPort": 0,
"SshUsername": "string",
"SshPassword": "string",
"Expressions" : [{
"Name": "Expression1",
"Expression" : "SUM(numeric expression)",
"NewName" : "Sum",
"Action": "edit"
    },
    {
"Name": "Expression2",
"Expression" :  "UPPER(string expression)"
"Action": "delete"
}]
}
NOTE: Through the REST API, the data source can be created or edited using only one table. If a different table is provided when editing the data source, the table will be replaced. The widgets will be retained only if the schema is the same as the previous table.
Connection Sample for Code View Mode
"Connection":
{
"Servername": "string",
"Port": "string",
"Username": "string",
"Password": "string",
"Database": "string",
"Query": "string",
"AdvancedSettings": "string",
"CommandTimeout": "string",
"IsSshConnection": "false",
"SshServerName": "string",
"SshPort": 0,
"SshUsername": "string",
"SshPassword": "string",
"Expression" : "SUM(numeric expression)"
    },
    {
"Name": "Expression2",
"Expression" :  "UPPER(string expression)"
}]
}
Sample connection for editing the connection while uploading the dashboard via API.
"Connection":  {
"ServerName": "string",
"Database": "string",
"UserName": "string",
"Password": "string",
"Port": "string",
"SslMode": "string",
"TrustServerCertificate": "false",
"AdvancedSettings": "string",
"CommandTimeout": "string",
"Schema": "string"
}