Connecting Bold BI to Google BigQuery data source
The Bold BI dashboard designer supports connecting to Google BigQuery server using the Live mode.
Authentication Types:
-
OAuth
-
Service Account
Connecting with Service Authentication:
Create a service account:
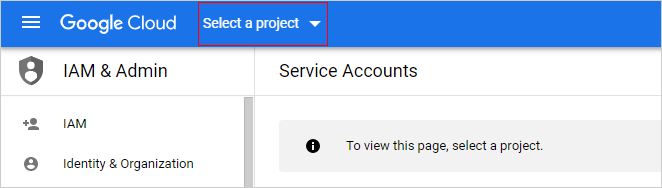
- Go to the Create service account page in the Google Cloud console.
https://console.cloud.google.com/projectselector2/iam-admin/serviceaccounts
- Select your project from the dropdown.
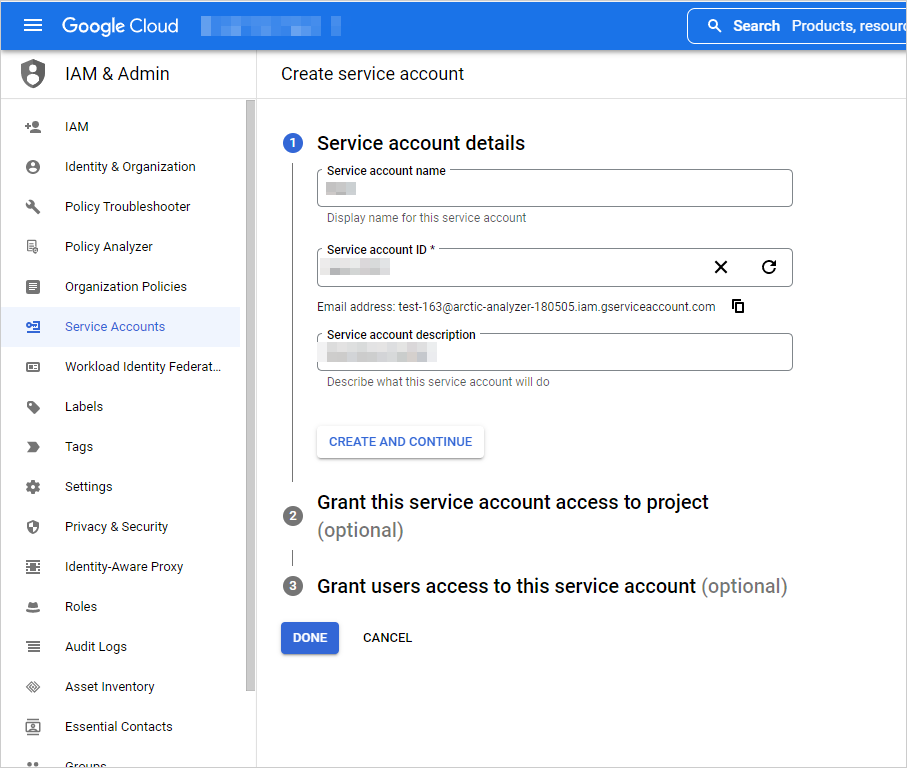
- Click Create Service Account

- In the Service account name field, enter a name. The Google Cloud console will automatically populate the Service account ID field based on this name.
-
In the Service account description field, enter a description. For example, Service account for quickstart.
-
Click Create and continue.
-
To provide access to your project, grant the following role(s) to your service account: Project > Owner.
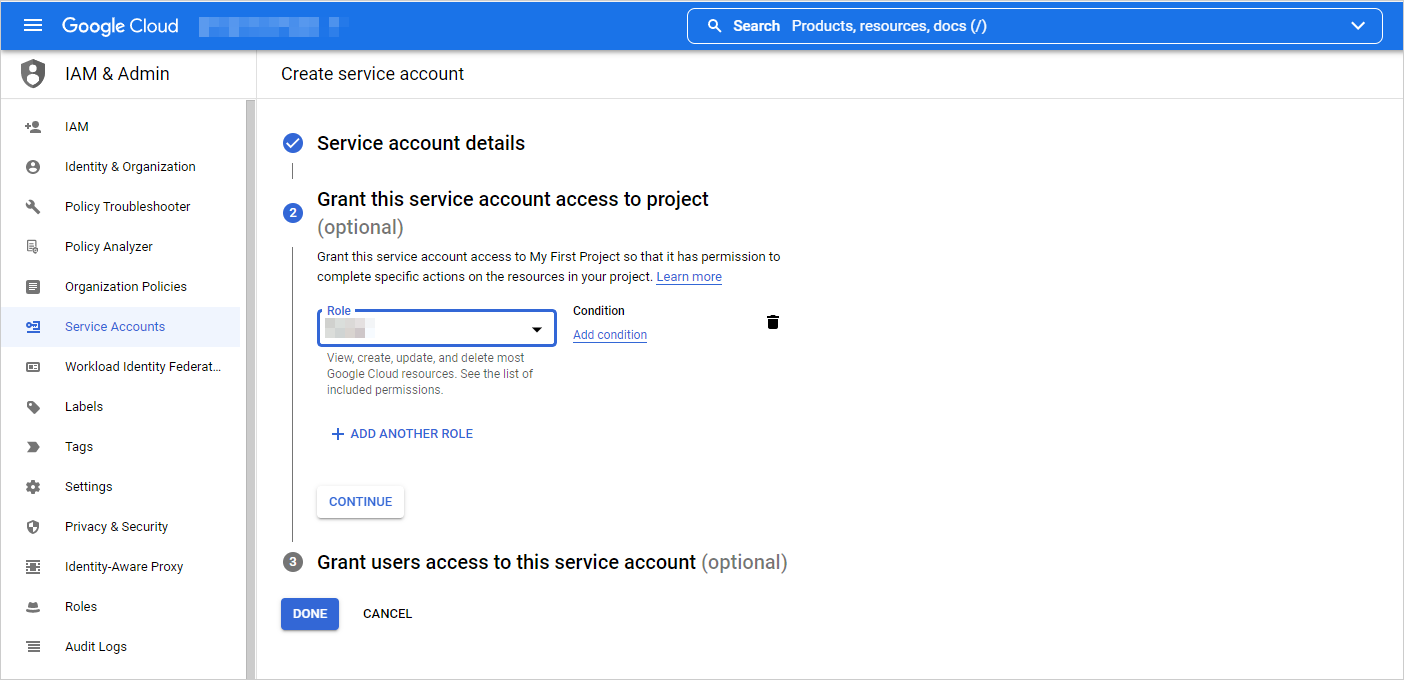
- In the Select a role list, select a role and Click Continue.
To add additional roles, click on Add another role and add each role individually.
NOTE: The Role field determines which resources your service account can access in your project. You can revoke or grant additional roles later. In production environments, avoid granting the Owner, Editor, or Viewer roles. Instead, assign a predefined or custom role that suits your requirements.
- Click Done to finish creating the service account. Do not close your browser window. You will use it in the next step.
Create a service account key:
-
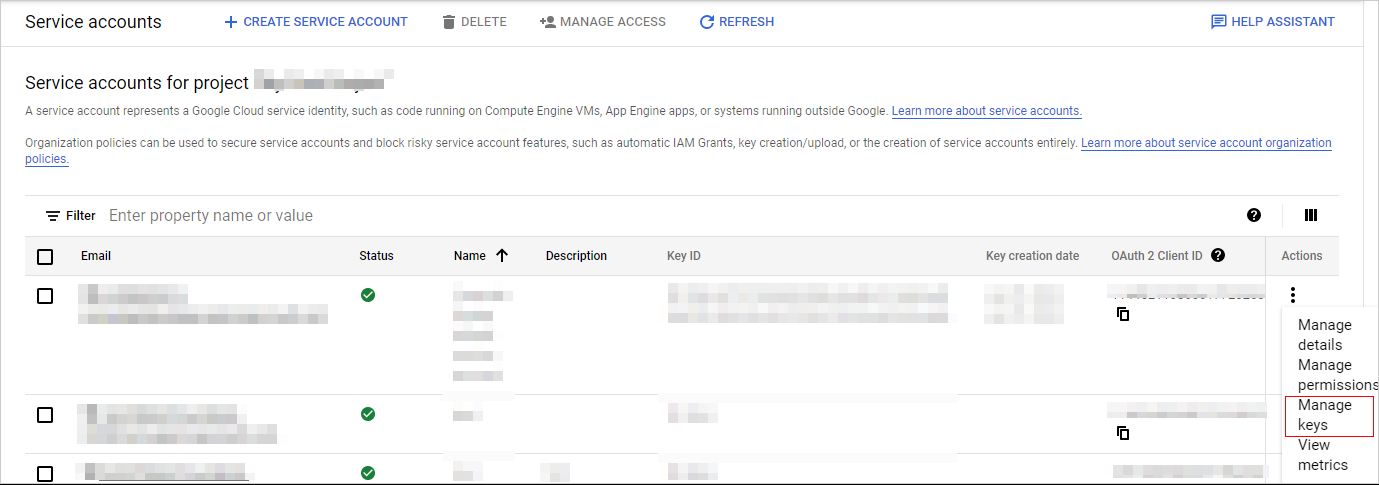
In the Google Cloud console, click on the email address for the service account that you created.
-
Click on the context menu and select Manage Keys.
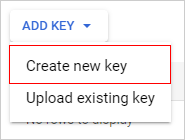
- Click Add key, and then click Create new key.
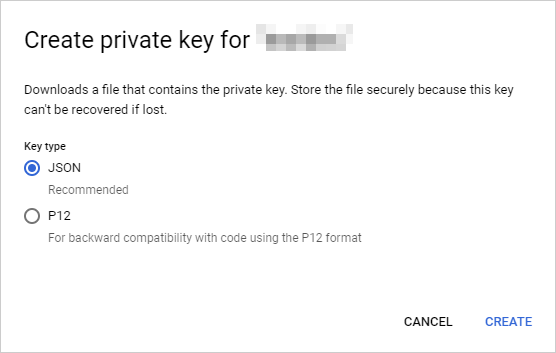
- Click Create. A JSON key file is downloaded to your computer.
Optimizing database performance in Google BigQuery using Materialized views
In BigQuery, materialized views are precomputed views that periodically cache the results of a query for increased performance and efficiency. BigQuery leverages precomputed results from materialized views and whenever possible reads only changes from the base tables to compute up-to-date results. Materialized views can be queried directly or can be used by the BigQuery optimizer to process queries to the base tables.
Refer to the KB here for further information.
Connecting with OAuth:
1. Go to your personal or organization accounts for Google developer console and create a project or application
Google BigQuery console link: https://console.cloud.google.com/bigquery
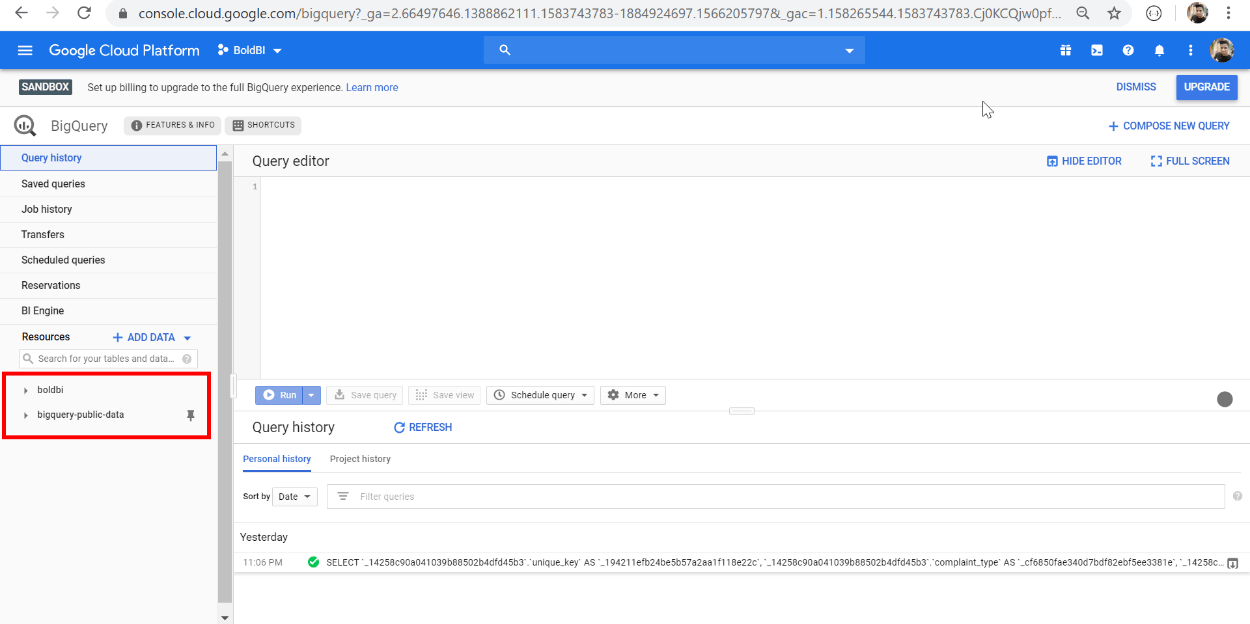
You can see the projects list as follows.
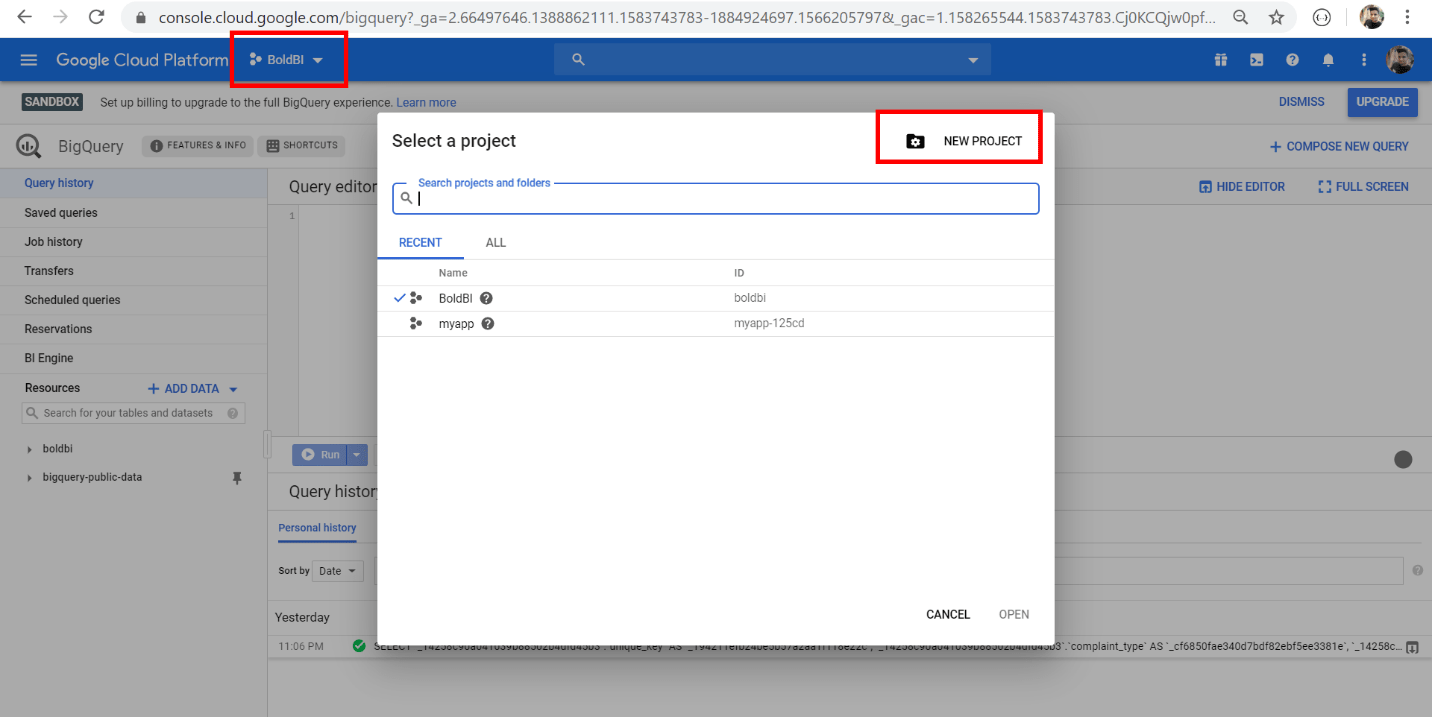
Create a new project as follows.
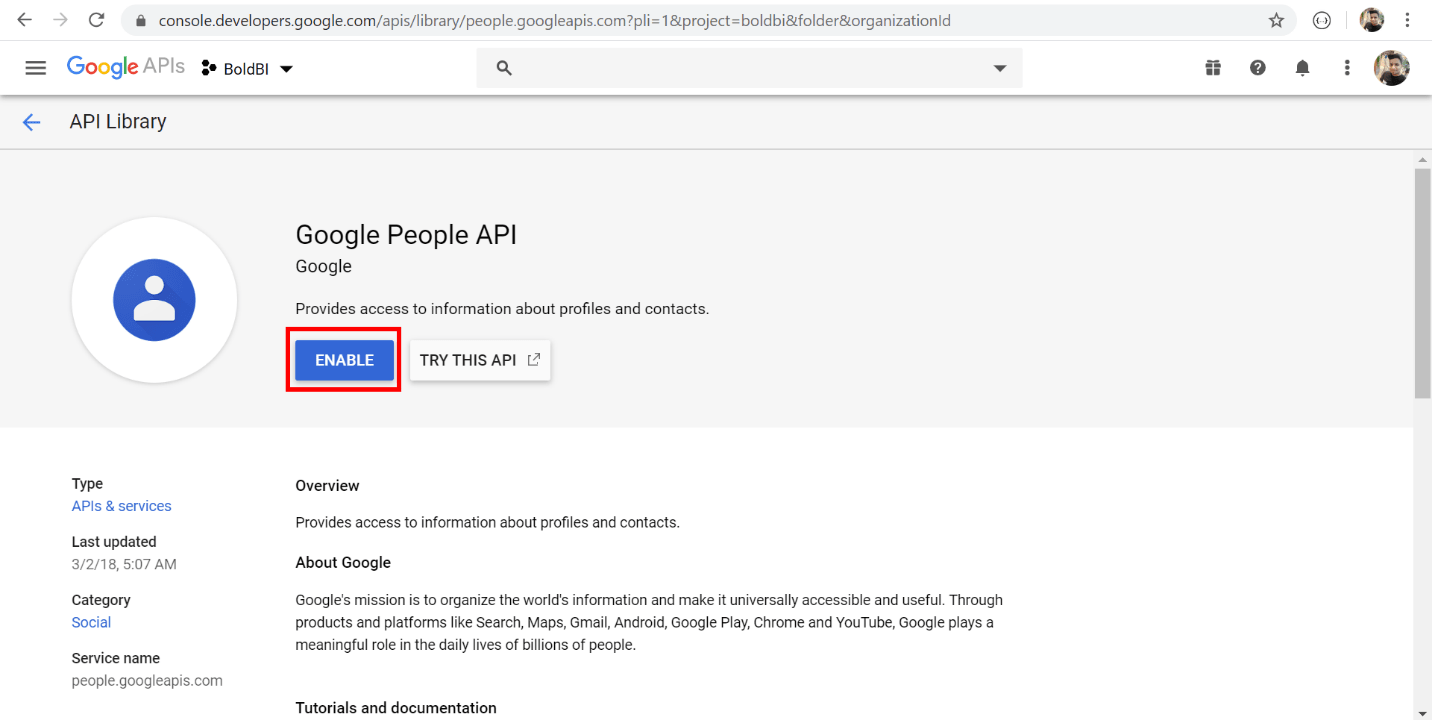
2. Enable a Google BigQuery API
Go to the following link and enable the Google developers console API.
https://console.developers.google.com/apis/library/people.googleapis.com
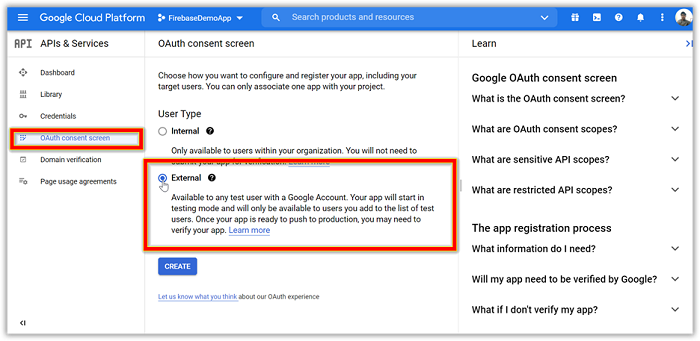
You can edit or view your OAuth grant limit, redirect URI, scope, authorized domains, and more using the following link.
https://console.cloud.google.com/apis/credentials/consent
Select OAuth Consent screen tab and choose external user type as shown in the following image.
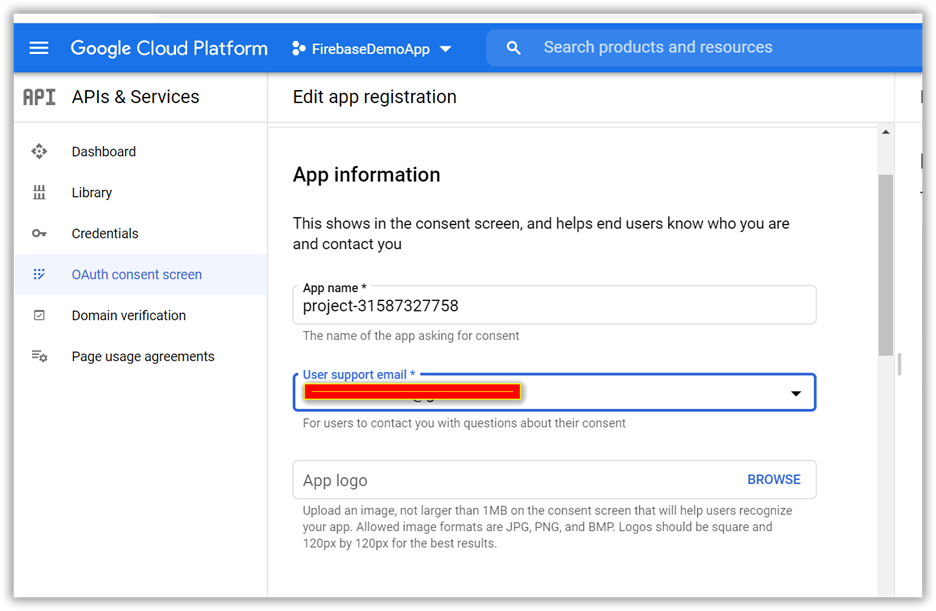
Enter the app’s name and user’s email address, as shown in the following image.
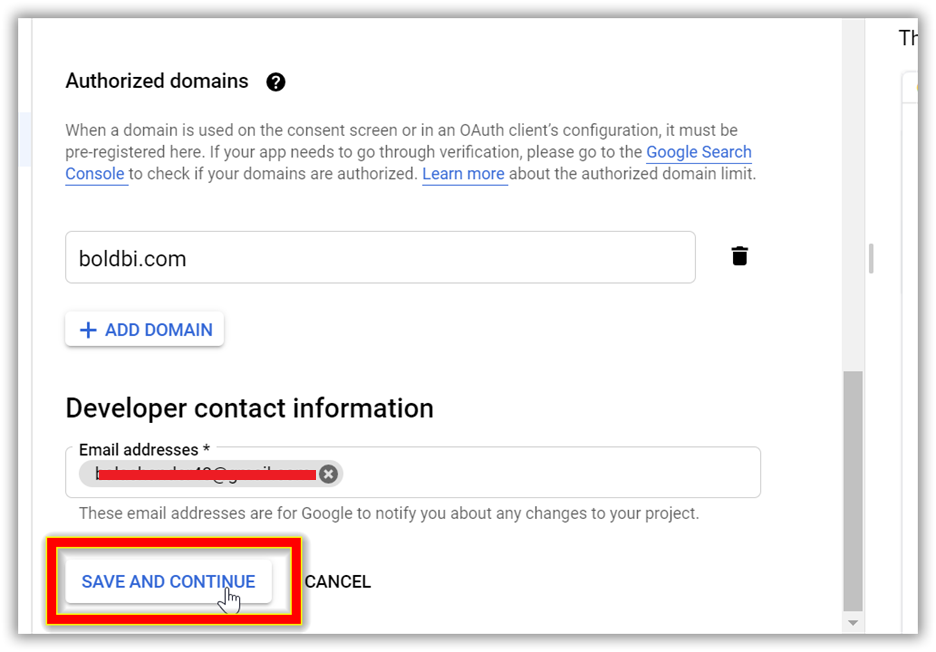
Please enter the app domain information in order to register the application with Bold BI as follows.
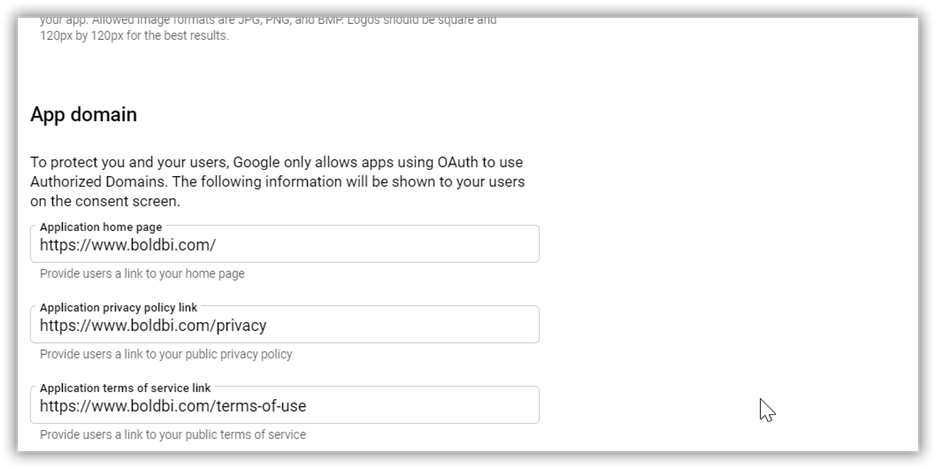
Set the authorized domain as boldbi.com and enter the user’s email address in the mail field for development contact information, as shown in the following image.
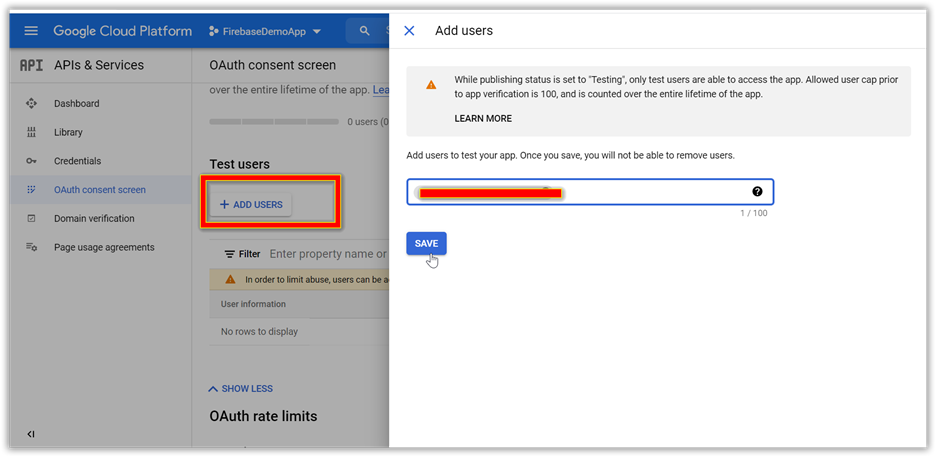
Add Test Users
Click Add Users and enter the user’s email address and click Save, as shown in the following image.
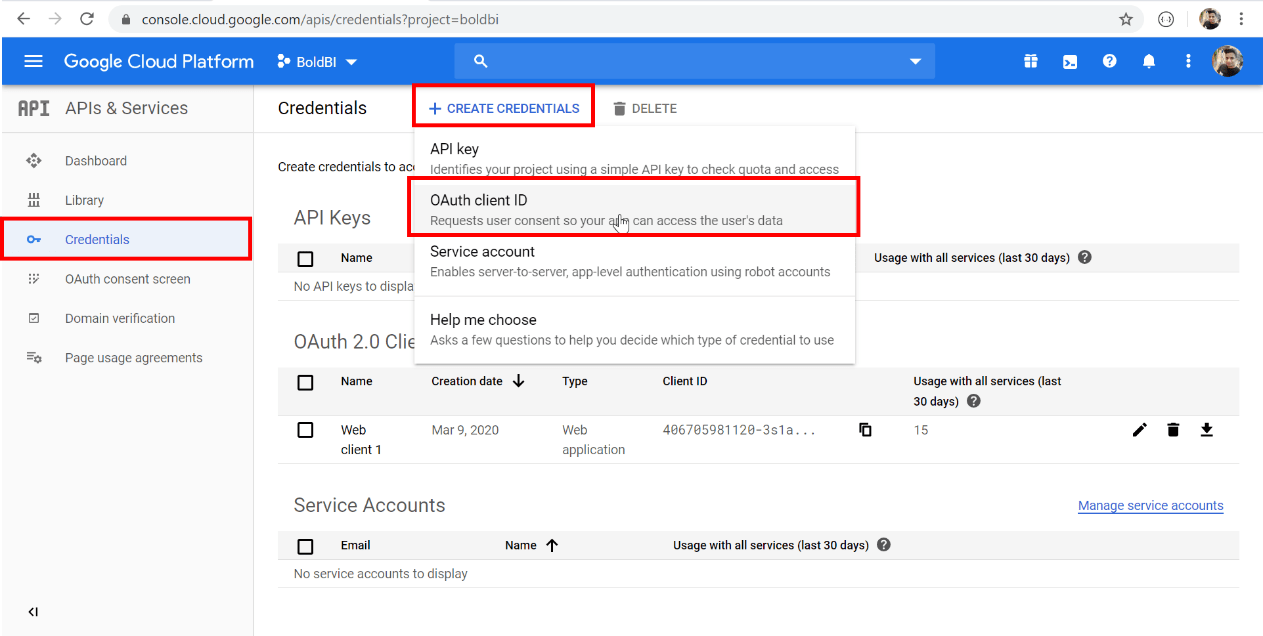
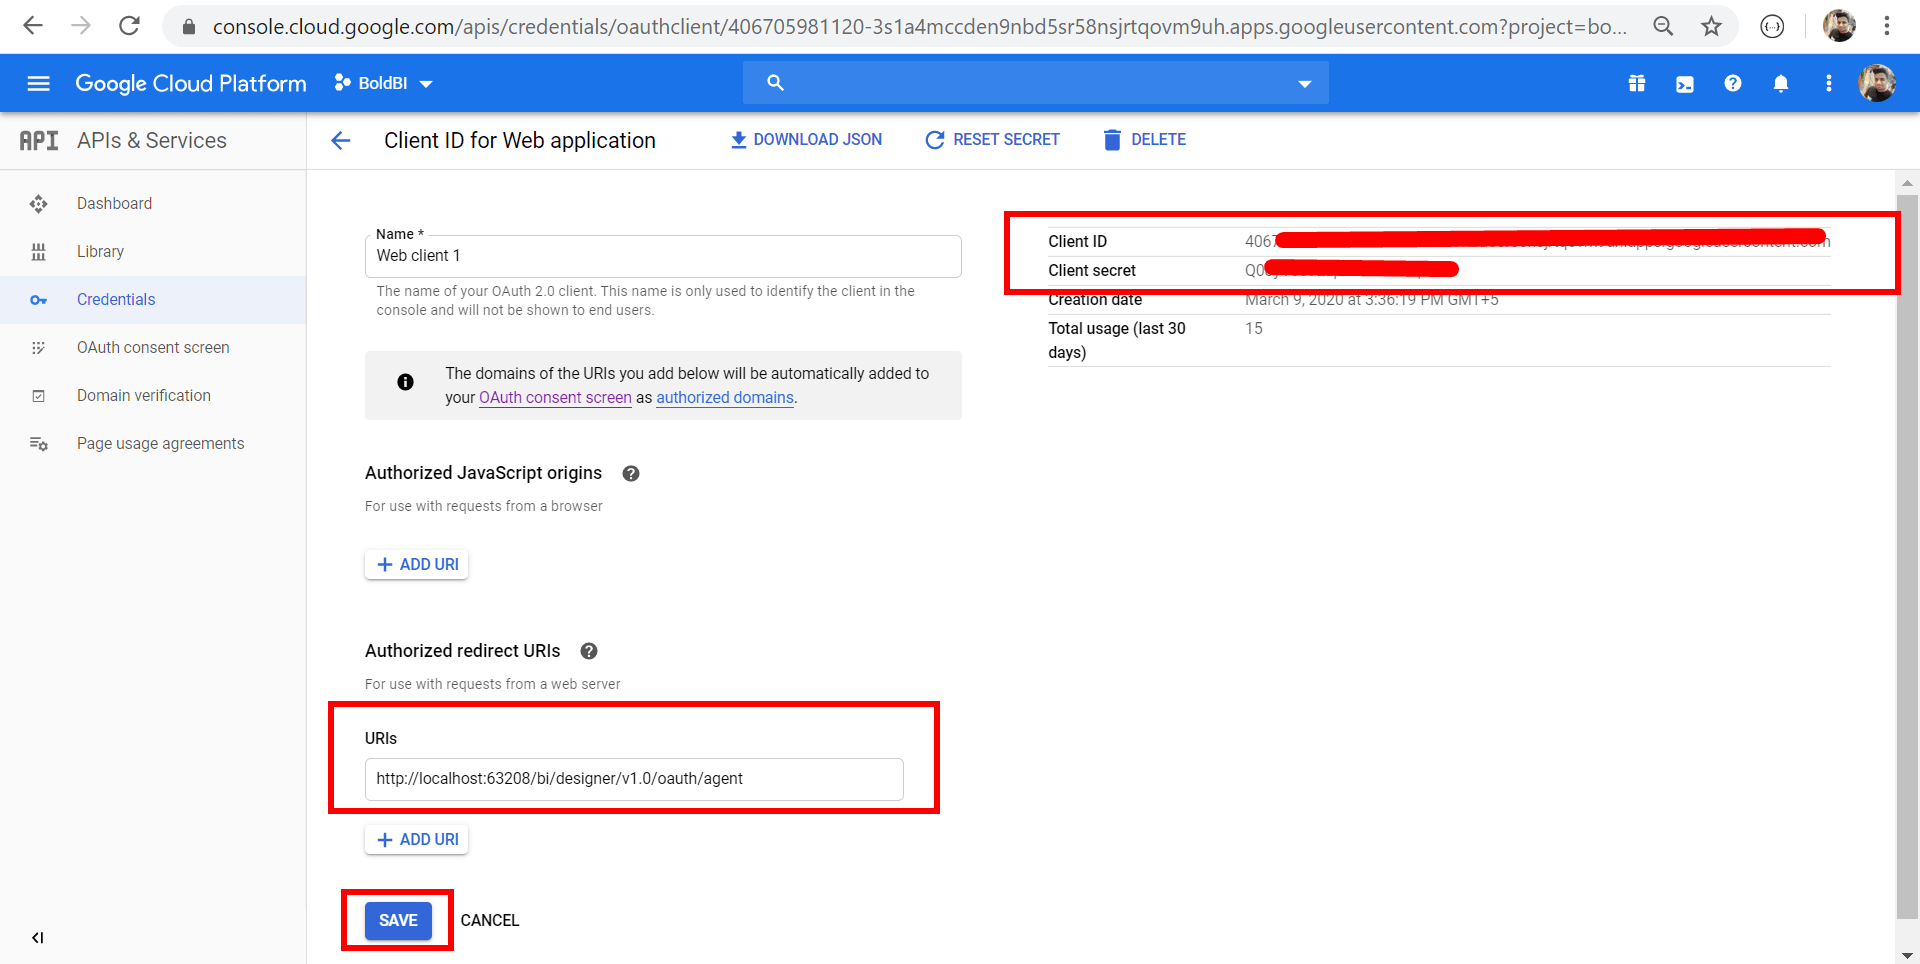
To Create a new Credentials (Client ID, Client Secret), use the following link.
https://console.cloud.google.com/apis/credentials
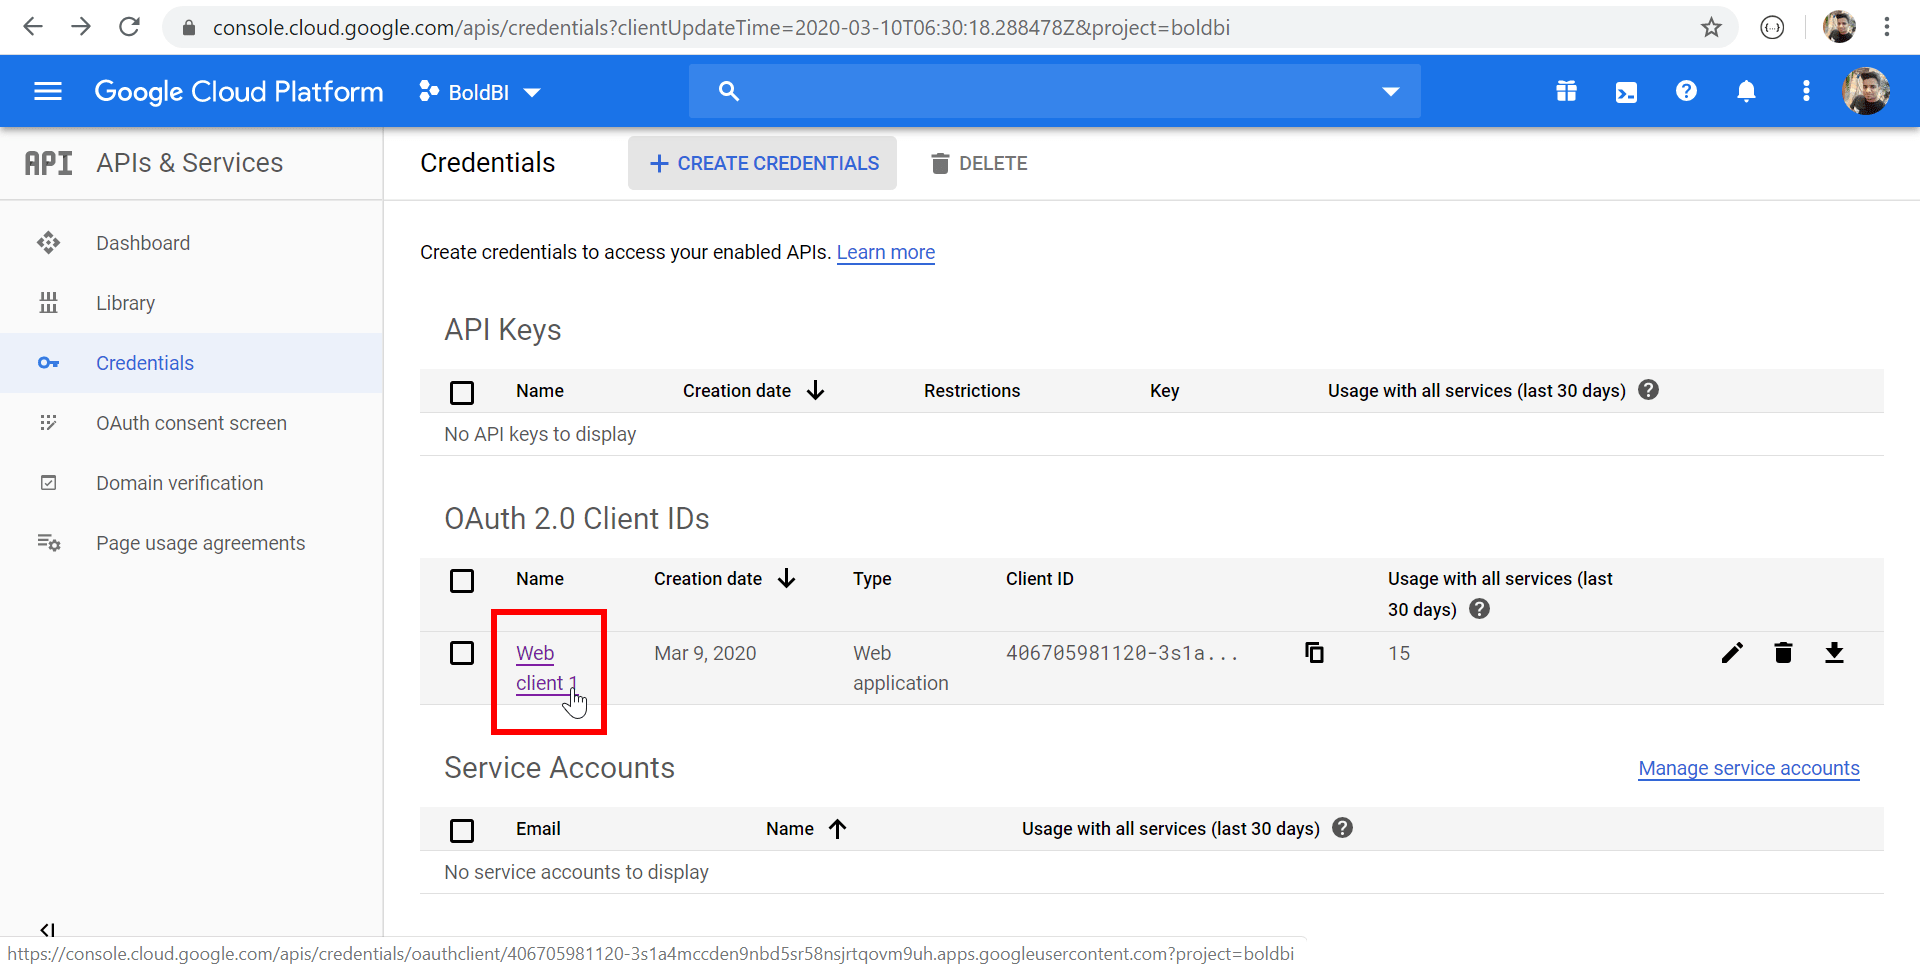
After creating the credentials, open the corresponding credentials and add your Bold BI Server build hosted URL in the following sample URL format.
http://localhost:<boldbi-running port>/bi/designer/v1.0/oauth/agent
3. Go to Bold BI application and navigate to data connectors settings page
If the intermediate DB is not configured, you will receive an error as shown below.
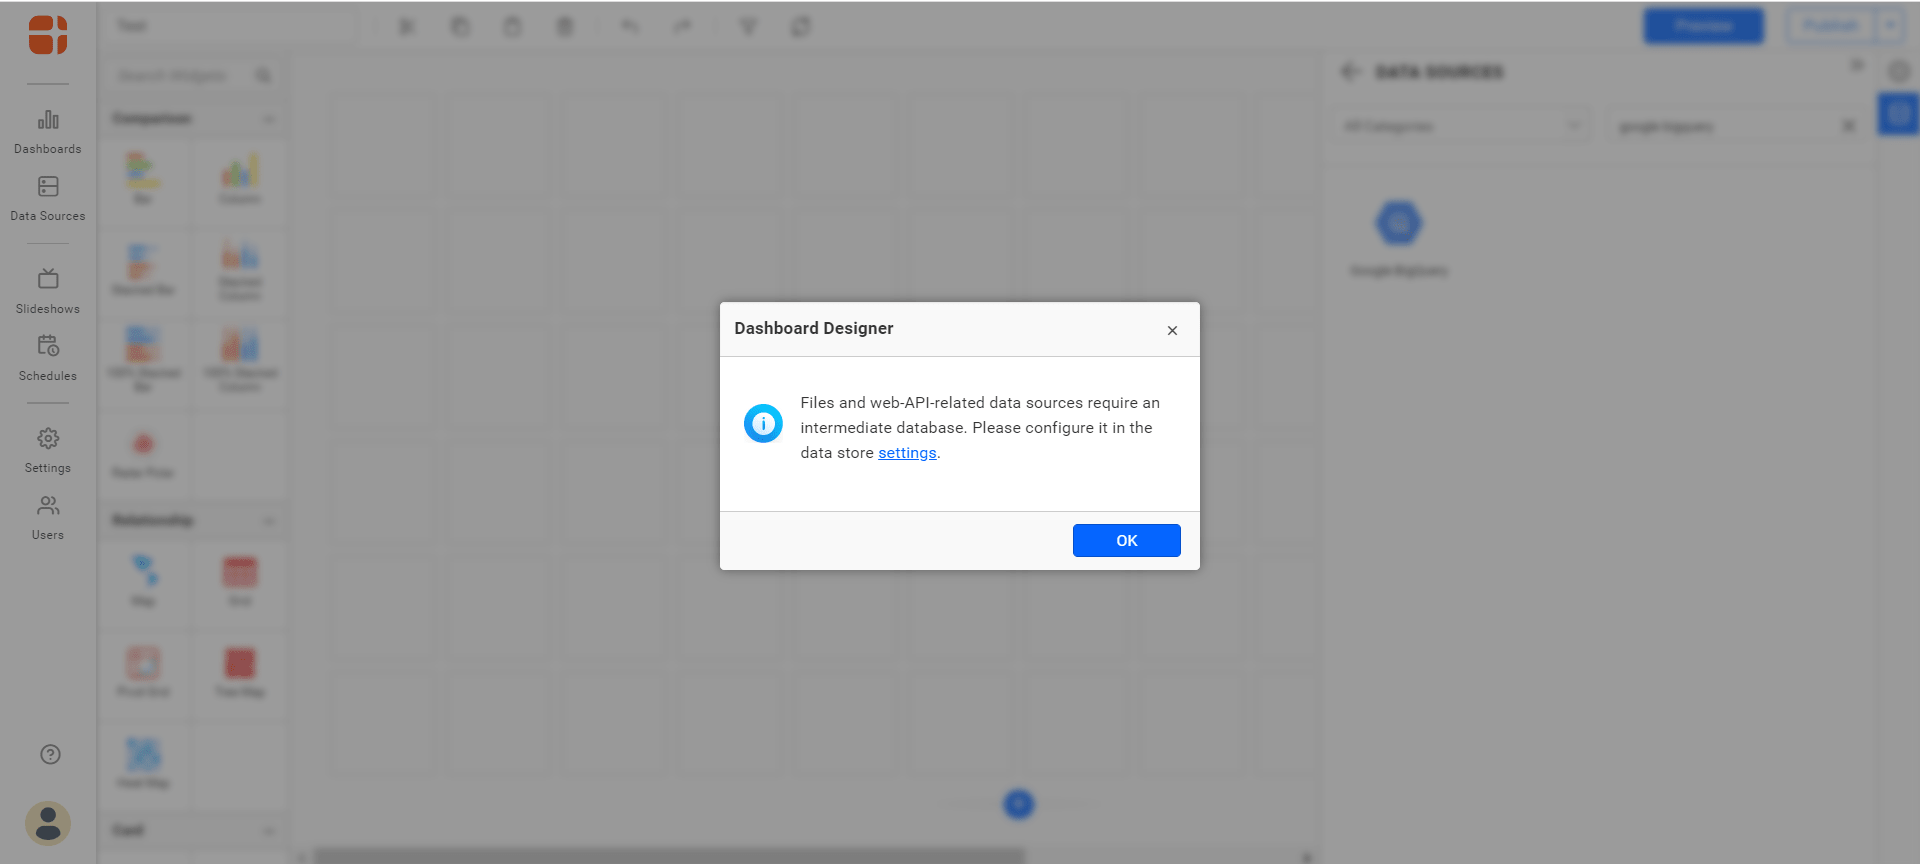
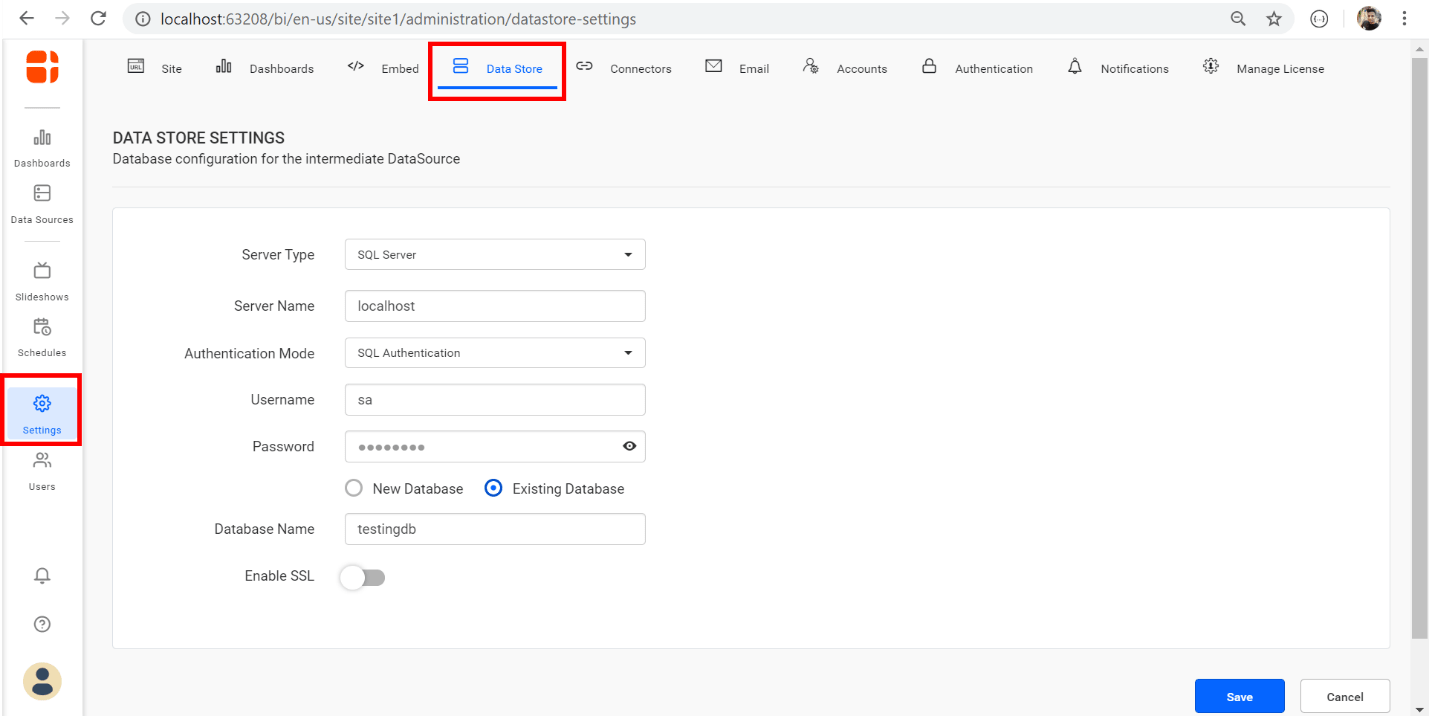
Then, configure the intermediate DB in Data Store section.
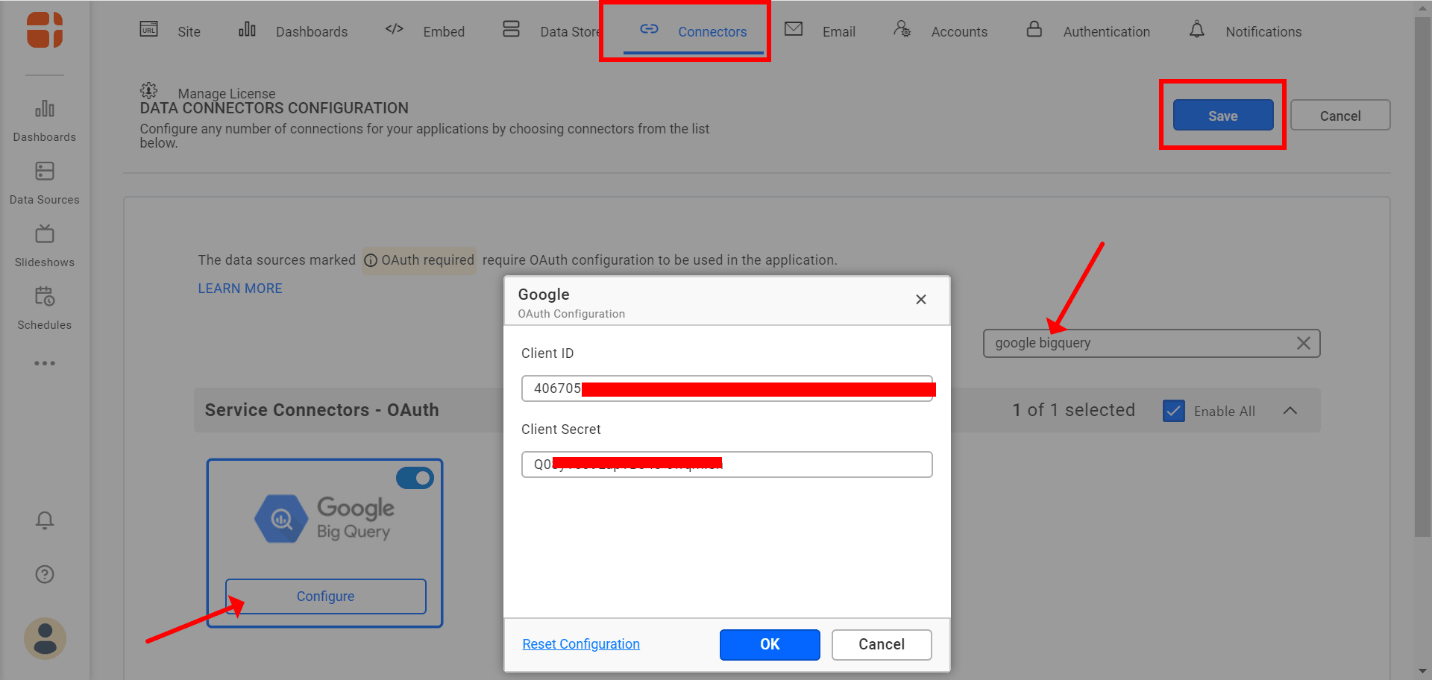
Additionally, configure the client ID and client secret information in the Connectors section, and save the information for Google BigQuery as instructed.
Once the pre-requisites done, you are good to go to work with Google BigQuery.
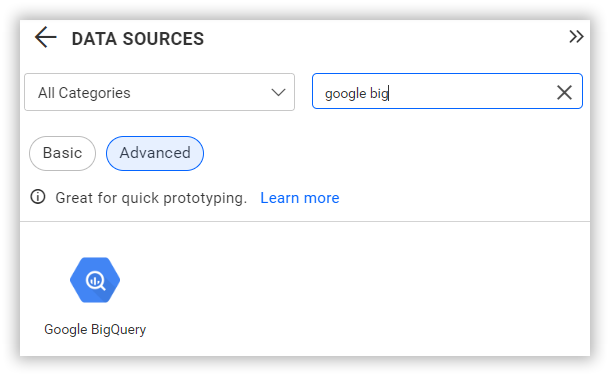
Choose a Google BigQuery data source
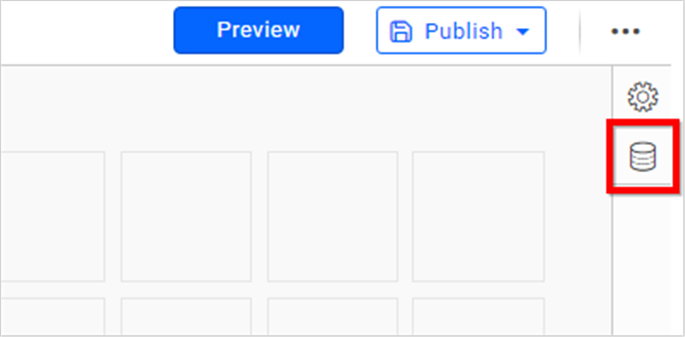
To configure the Google BigQuery data source, follow these steps:
-
Click the Data Sources button in the configuration panel to add a new data connection.
-
Click CREATE NEW to launch a new connection from the connection panel.
-
Select the Google BigQuery connection in the connection panel.
NOTE: You can also create a data source from the home page by clicking on the Data Sources menu on the left menu panel and selecting Create Data Source from the data sources page.

Authentication with Google BigQuery
Use the following steps to authenticate with the Google BigQuery server:
-
Click on the data source, and you will be prompted with a login window. Enter the credentials for your Google BigQuery account to authorize.
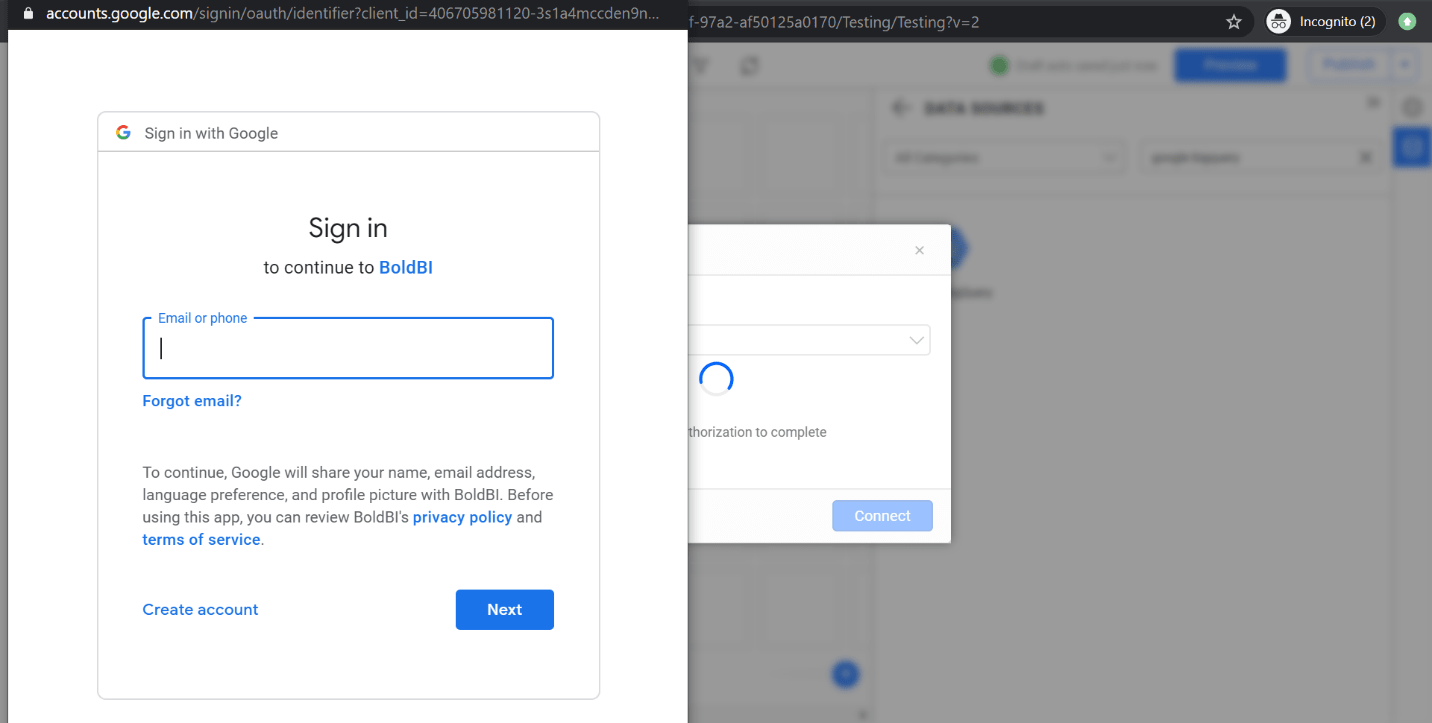
-
Click Allow in the authorization window to accept the scopes requested by Bold BI dashboards.
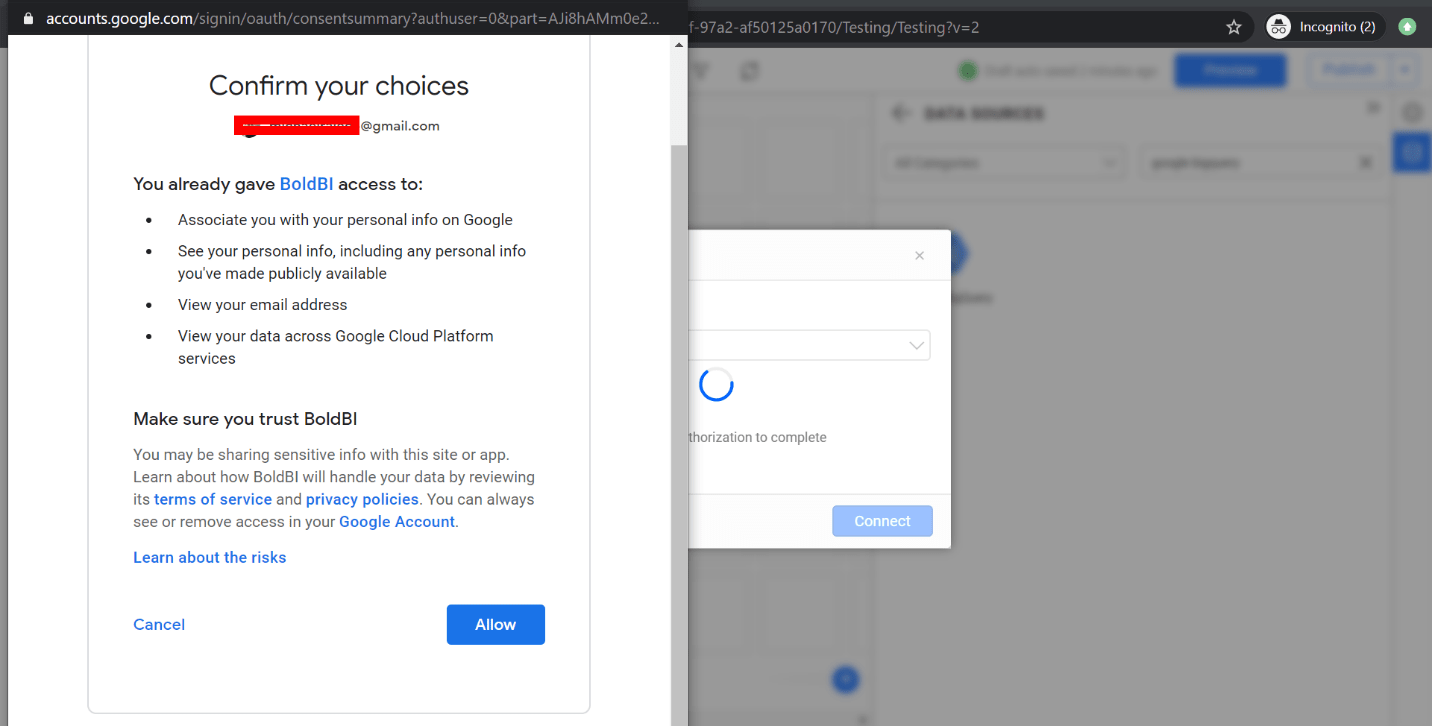
NOTE: If permission is denied, the account will not be accessible from the dashboard.
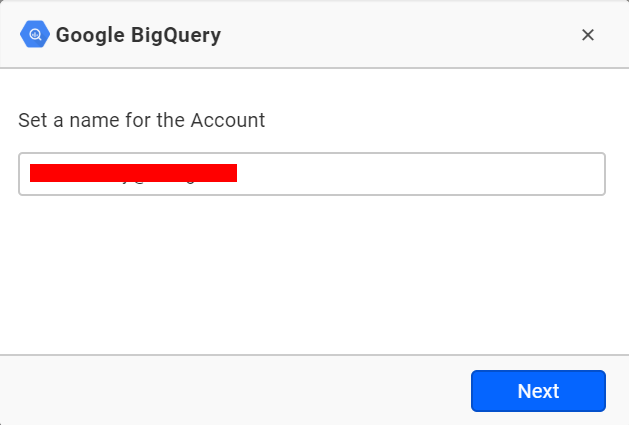
-
Set a name to identify the account and click Next.
-
Now, you have successfully authorized your connection. Click Connect to continue with the data source connection.
-
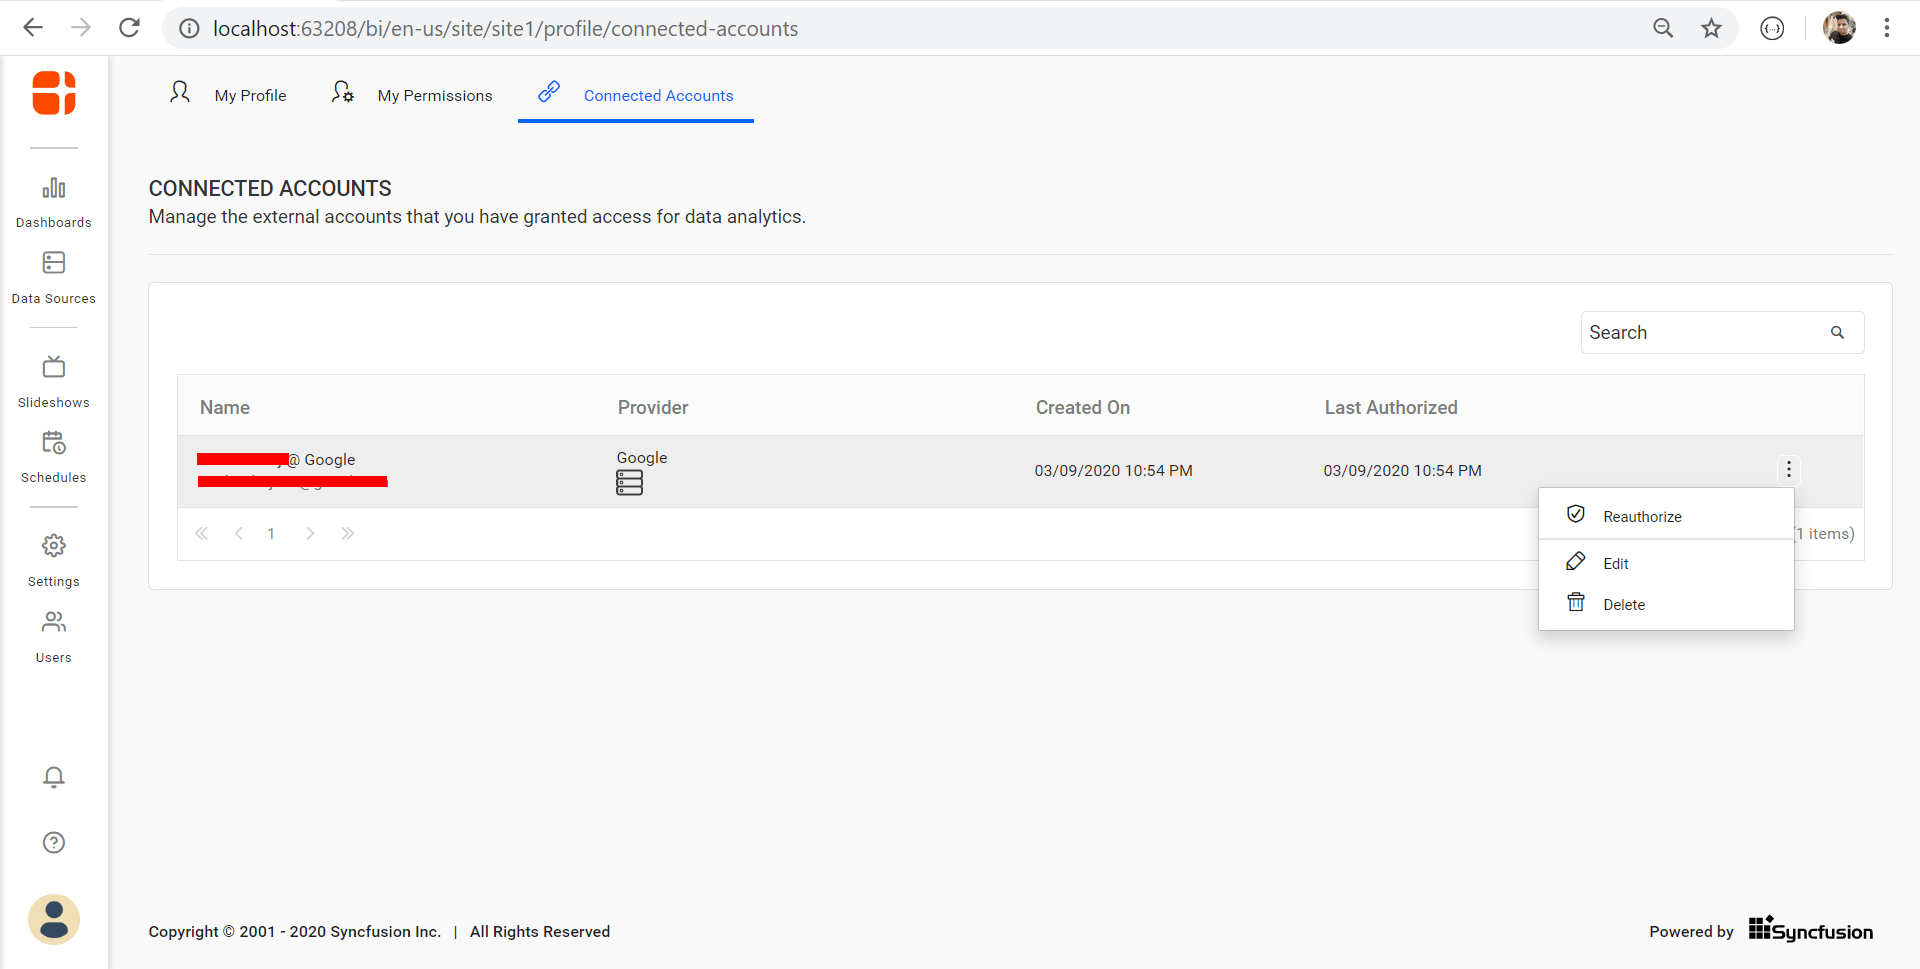
To connect using the already connected account, please refer to Connected Accounts.
NOTE: To connect to another account, click Connect New Account.
Connect to Google BigQuery
Create a Google BigQuery data source
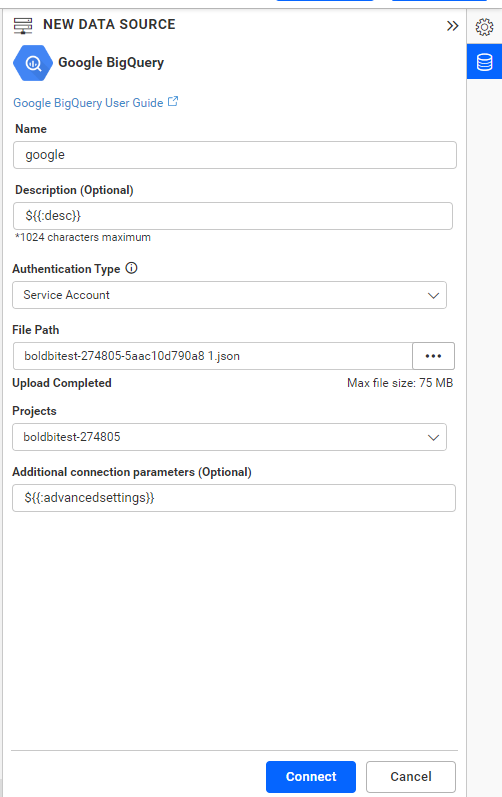
After successful authentication, the NEW DATA SOURCE configuration panel opens.
Follow these steps to create the Google BigQuery data source.
-
Enter a name and description (optional) for the data source.
-
Choose the required projects in Project drop down box.
-
The authentication type will be set to Google BigQuery automatically in the Connected as text box, as OAuth is used for authenticating with the Google BigQuery account.
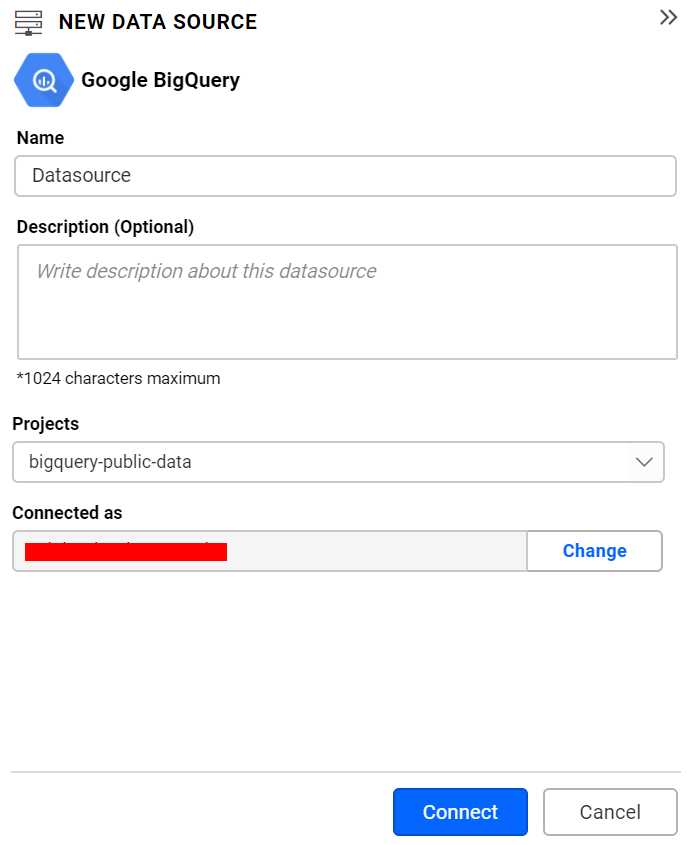
To edit the connection information, use the Edit Connection option
For Service Authentication:
Select the JSON file downloaded from Connecting with Service Authentication

For OAuth:
The authentication type will automatically be sent to the Google BigQuery in the Connected as text box since OAuth is used for authenticating with the Google BigQuery account.
Please choose the required projects in the Project drop-down box.
To connect Google BigQuery with a specific dataset, enter the property currentdataset={datasetname} or specificdataset={datasetname} in the Additional connection parameters text box.

To edit the connection information, use the Edit Connection option.
NOTE We have provided support for using a dynamic connection string for Service account authentication type. please refer to the Dynamic Connection String documentation.
Preview data
- Click Connect to connect to the Google BigQuery server with the configured details.
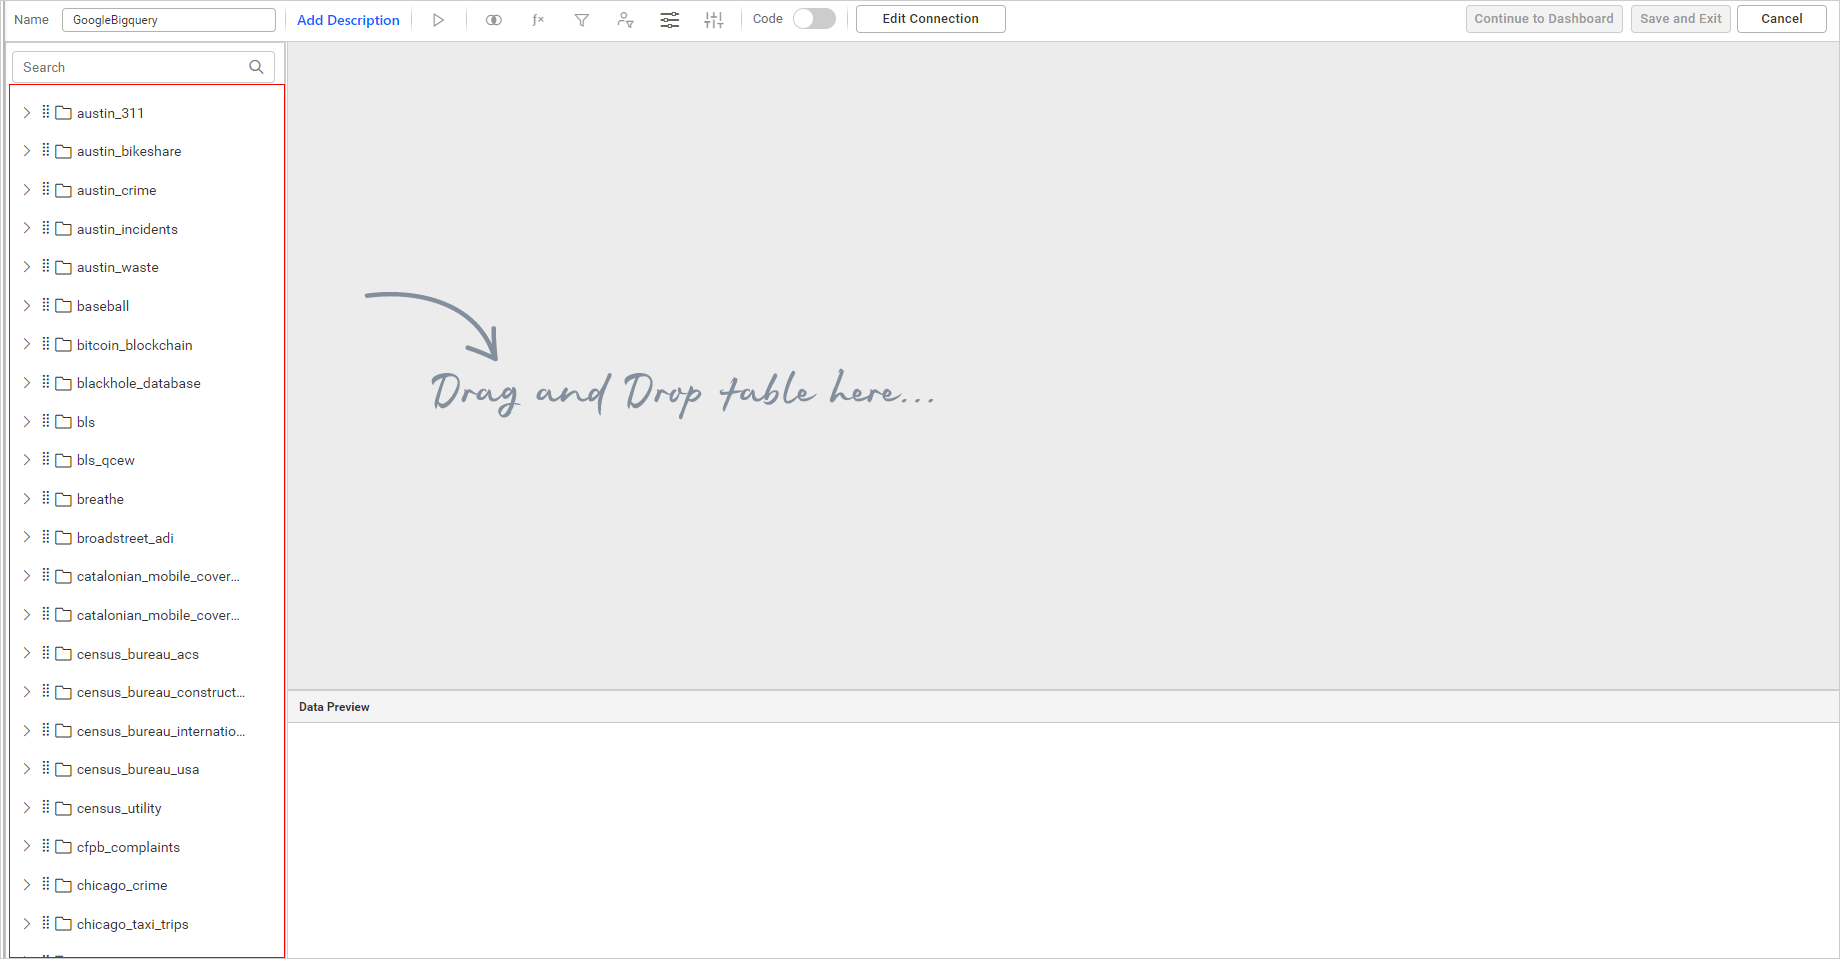
The list of available schemas is displayed in tree view for the selected projects that have been retrieved from the Google BigQuery server.
-
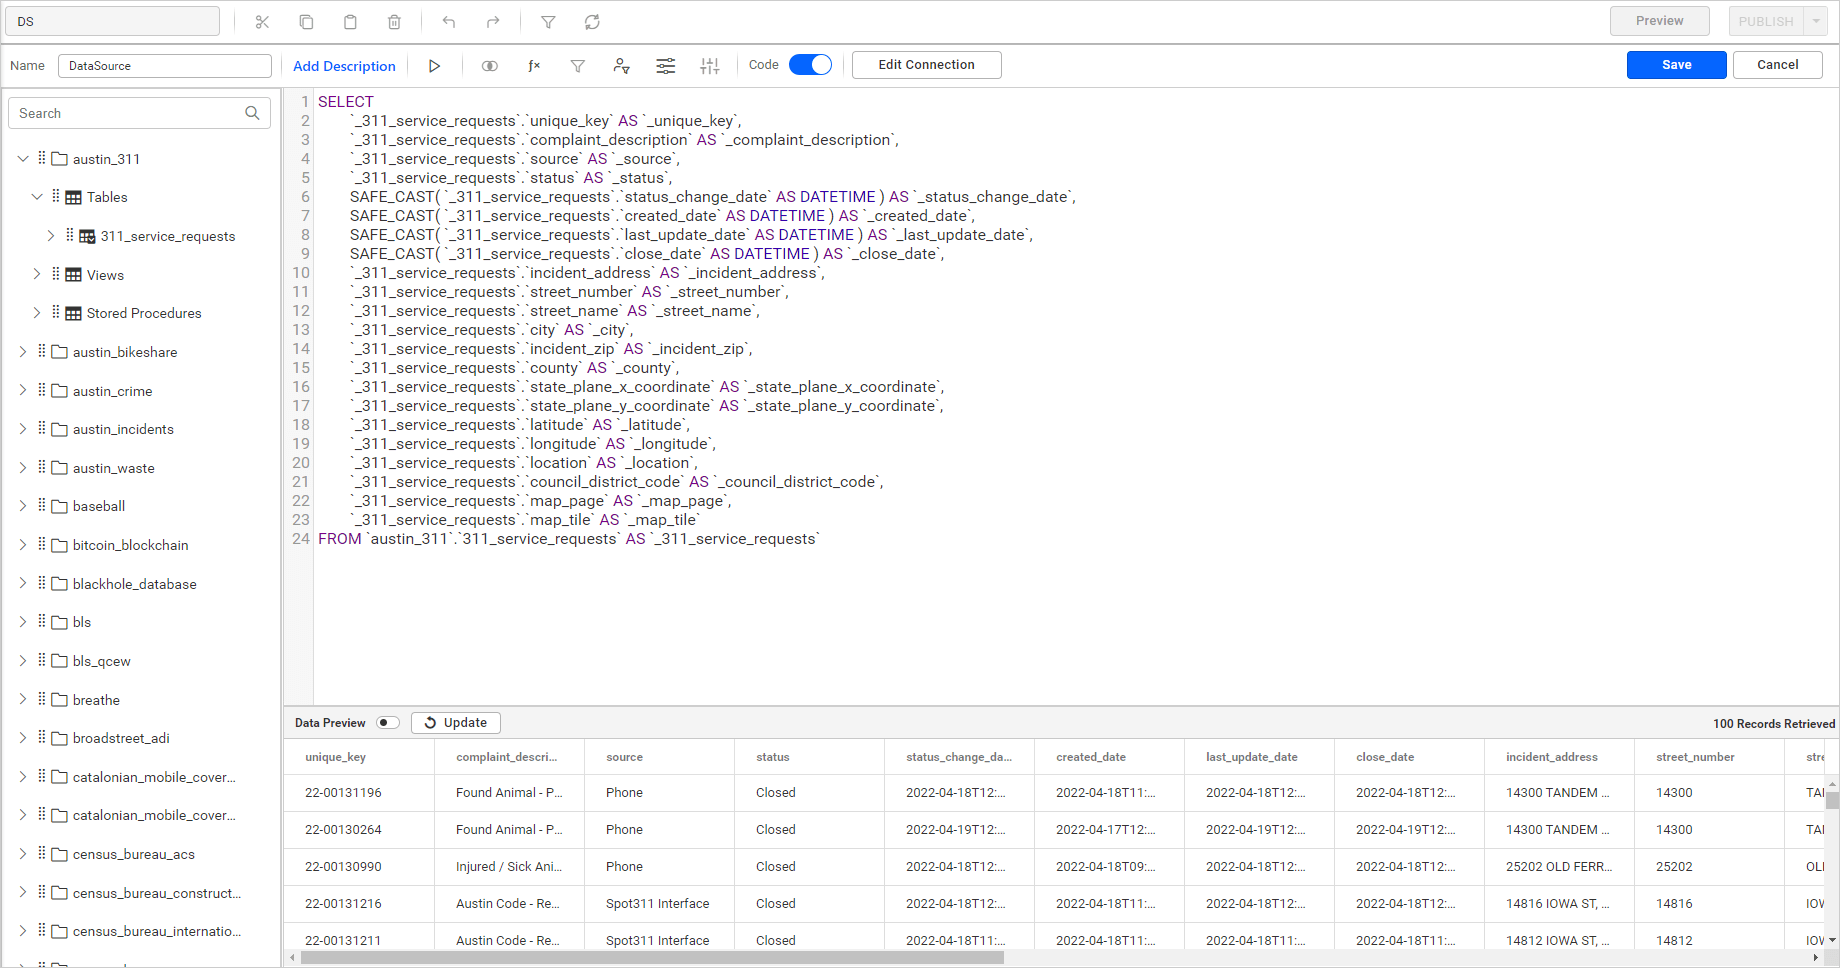
In the data design view page, drag and drop the table.


-
In the data design view page, drag, and drop the table.
You can use Code View options for passing query to display data.
-
Click Save to save the data source with a relevant name.
Connected accounts for OAuth data sources
If you have already logged into the account and authenticated with the data source, the account information will be listed here. You can select one of the accounts or connect to a new account by clicking the Connect New Account button.
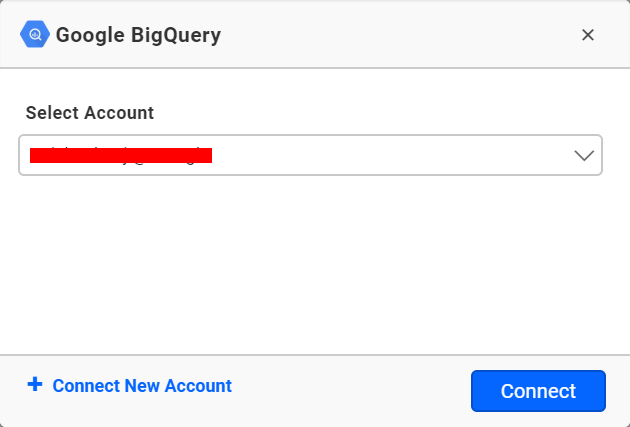
You can edit, delete, and re-authorize this account from the Connected Accounts page.
Link Google BigQuery data source with Google Analytics
Google BigQuery is a data warehouse and that only supports live connection in Bold BI. You can link your Google BigQuery with Google Analytics by following the official documentation steps on how to linking Google BigQuery with Google Analytics.
Connect using custom attribute and dashboard parameter
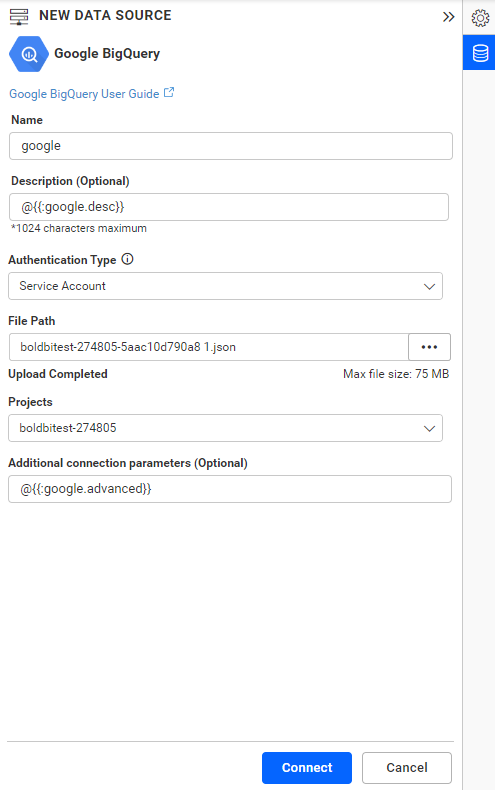
We have added support for custom attributes and dashboard parameters in the data source connection. You can now connect to the data source using custom attributes or dashboard parameters.
Custom Attribute
Dashboard Parameter
Note: Refer to the Dashboard Parameter Documentation and Custom Attributes Documentation for more details.
Related links
Dashboard Designer Walkthrough
Google BigQuery Limitations to build query