Connecting Bold BI to Snowflake data source
The Bold BI dashboard designer supports connecting to Snowflake database through SQL Live query.
Supported Server Editions: Standard, Enterprise and Business Critical
Choose Snowflake data source
To configure the Snowflake data source, follow these steps:
-
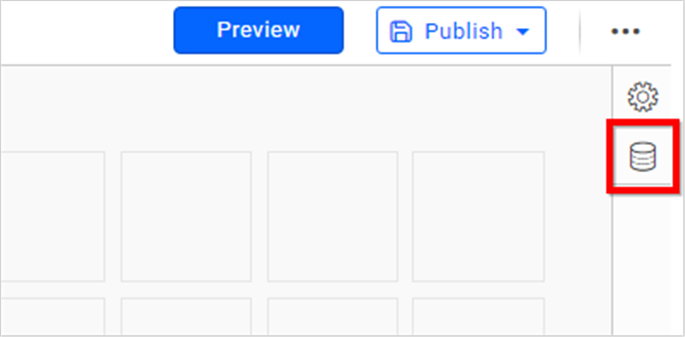
Click on the Data Sources button in the configuration panel to add a new data connection.
-
Click CREATE NEW to launch a new connection from the connection panel.
-
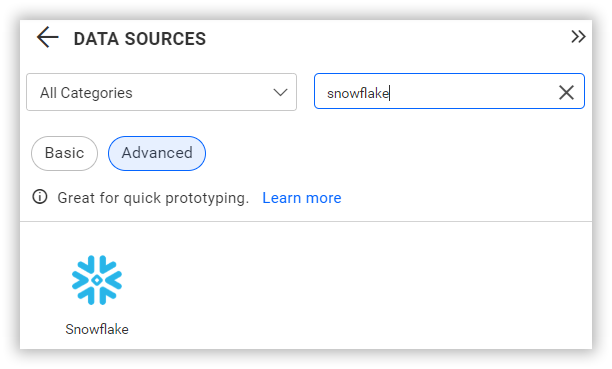
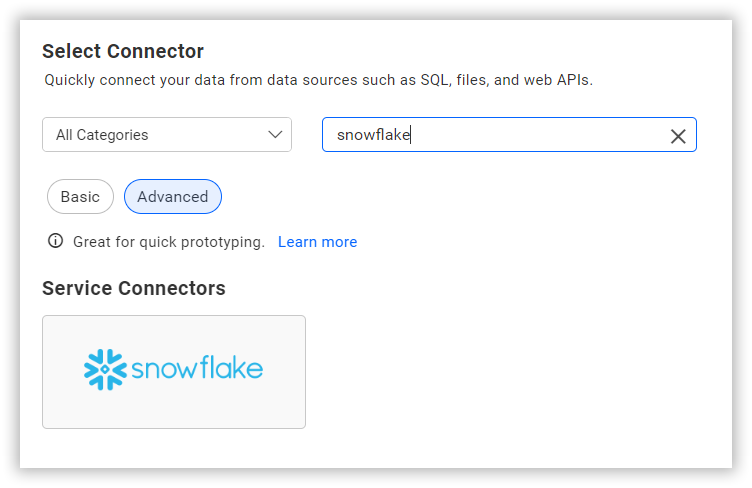
Select the Snowflake connection in the connection panel.
NOTE: You can also create a data source from the home page by clicking on the Data Sources menu on the left menu panel and selecting Create Data Source from the data sources page.
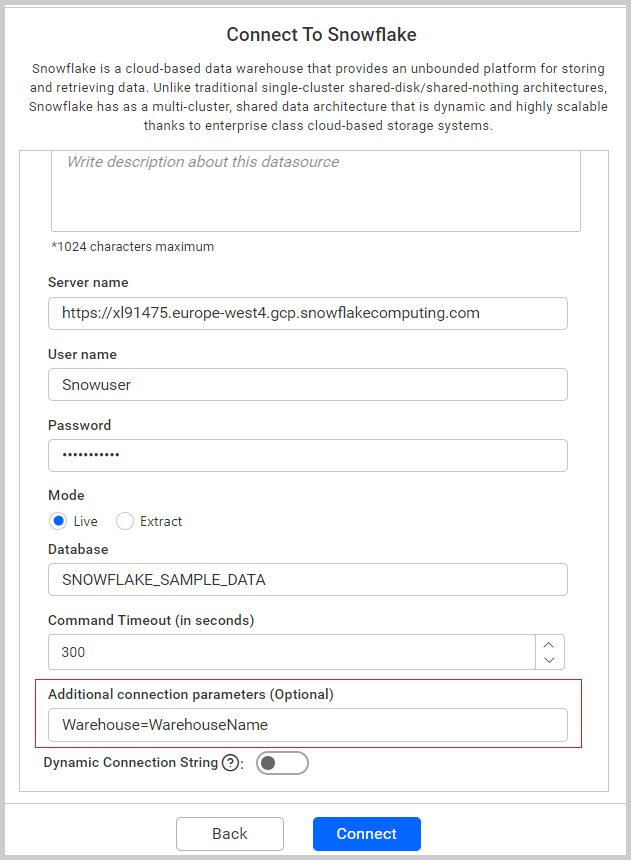
Connect to Snowflake
Create Snowflake data source
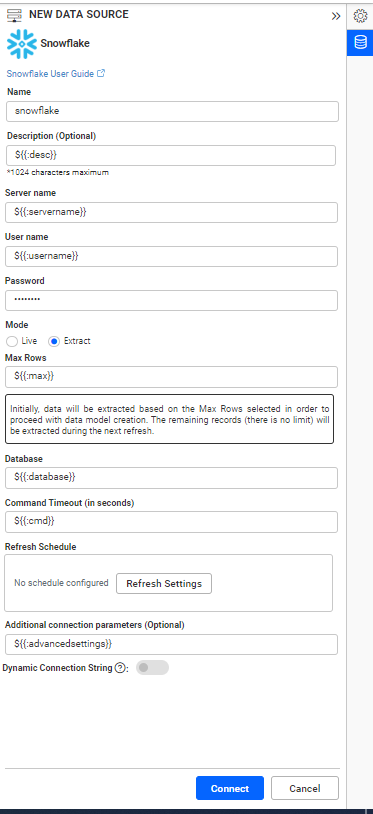
After clicking the data source, the NEW DATA SOURCE configuration panel opens. Follow the given steps to create a Snowflake data source:
- Enter a name and description (optional) for the data source.
- Enter a valid Snowflake server or host name in the Server Name text box.
For example, https://dum421.west-europe.azure.snowflakecomputing.com
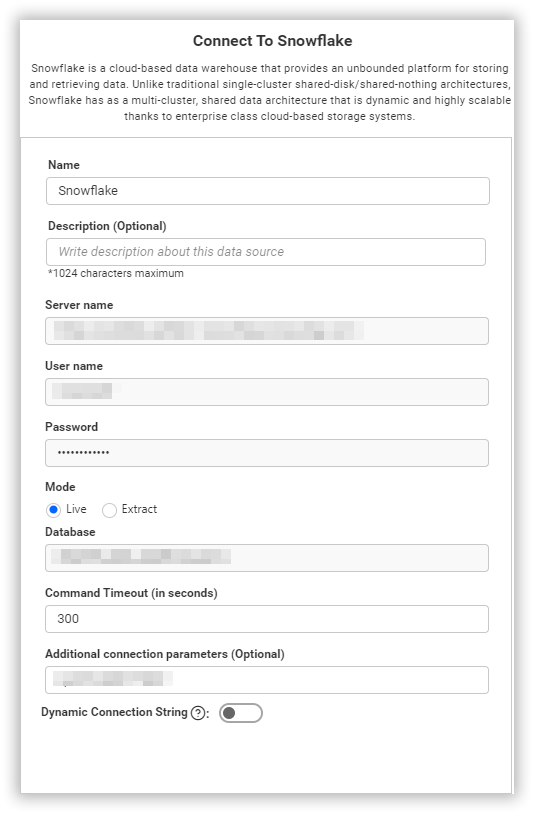
- Select the Authentication type from the authentication mechanism dropdown.
Supported authentication types:
- Basic authentication
- Private key file authentication.
For more details on the available options, see Authentication Mechanisms
- Enter a valid Snowflake database name in the Database text box.
There are two connection types in a data source:
- Live mode
- Extract mode
Authentication Mechanisms
| Environment | Supported Authentication Types |
|---|---|
| Cloud-supported | Basic HTTP Authentication |
| On-premises-supported | Basic HTTP Authentication, Key Pair Authentication & PEM Certificate Authentication |
Basic Authentication
Basic Authentication uses a username and password to connect to Snowflake. It is simple to configure and is recommended for cloud-based environments or manual connections.
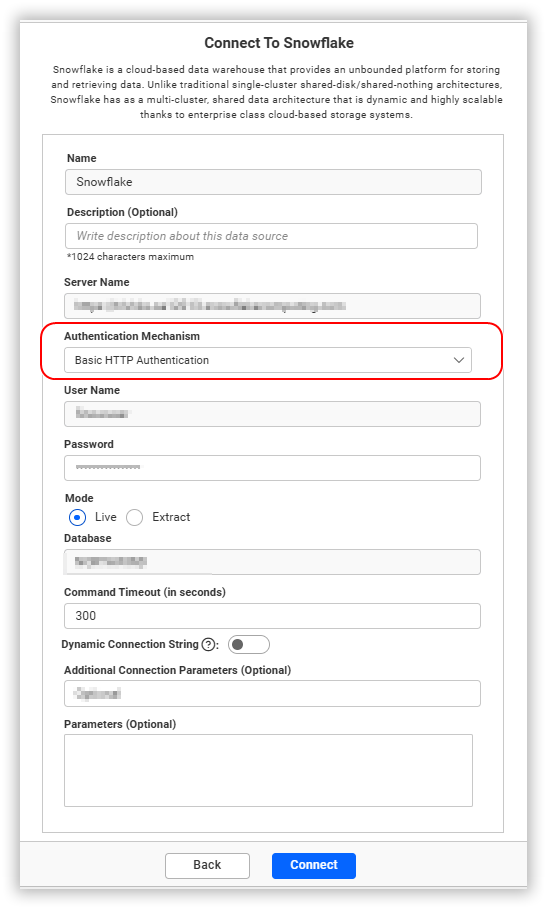
- Enter a valid Snowflake user name in the User Name text box.
- Enter a valid Snowflake password in the Password text box.
You can achieve Key Pair Authentication and PEM Certificate Authentication by using the Additional Parameters option with basic authentication type. You need to pass the following details in the additional parameters section.
Additional connection parameters:
Key Pair Authentication
authenticator=snowflake_jwt;private_key='-----BEGIN PRIVATE KEY----- MIIEvA.... -----END PRIVATE KEY-----';warehouse=warehouse_name;PEM Certificate Authentication
authenticator=snowflake_jwt;private_key='-----BEGIN ENCRYPTED PRIVATE KEY----- MIIEvA.... -----END ENCRYPTED PRIVATE KEY-----';private_key_pwd:pem_password;warehouse=warehouse_name;Key Pair Authentication
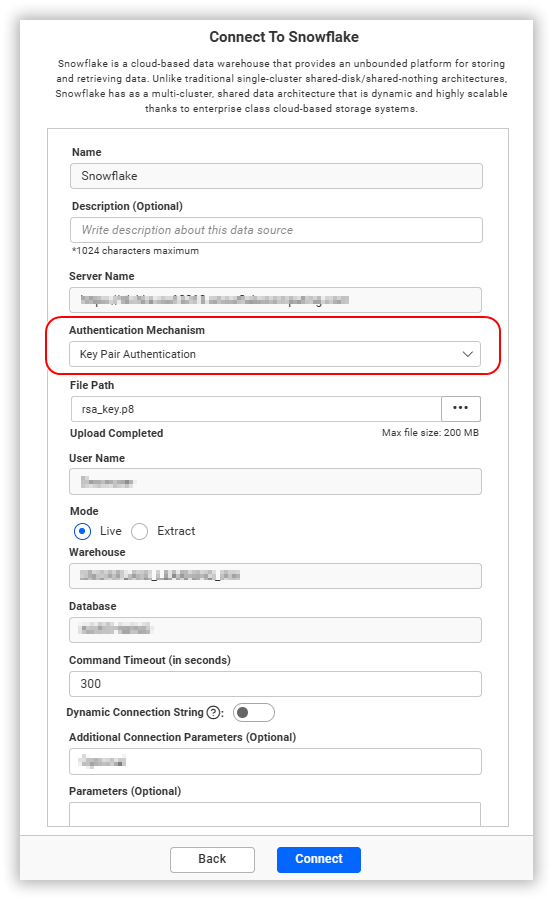
- Choose the
.p8file from local storage by clicking the browse button and then file will be uploaded. - Enter a valid Snowflake user name in the User Name text box.
- Enter a valid Snowflake warehouse name in the warehouse text box.
PEM Certificate Authentication
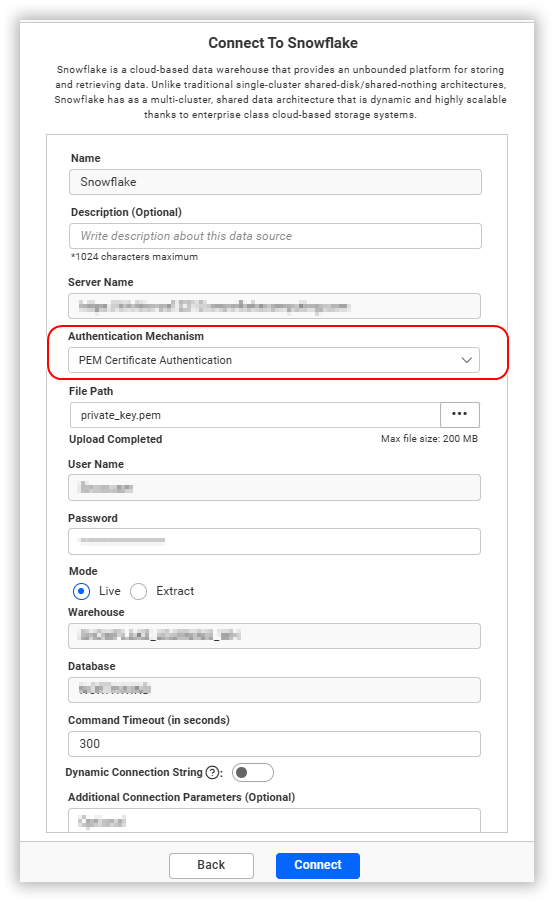
- Choose the
.pemfile from local storage by clicking the browse button and then file will be uploaded. - Enter a valid Snowflake user name in the User Name text box.
- Enter a valid Snowflake password in the Password text box.
- Enter a valid Snowflake warehouse name in the warehouse text box.
Private Key File Authentication
In Bold BI, we support two types of authentication mechanisms for secure key-based access:
- Key Pair Authentication – Uses RSA private/public key pair.
- PEM Certificate Authentication – Uses an encrypted PEM certificate.
Prerequisites
1. Snowflake Setup (Users, Roles, Grants) Run as an admin role (e.g., ACCOUNTADMIN). Replace placeholders:
<username>, <role_name>, <warehouse_name>, <database_name>, <schema_name>Delete the user if it exists (optional)
-- Removes the user if it already exists (to avoid conflicts when recreating)
DROP USER IF EXISTS <username>;
Create a new user
CREATE USER <username>
  PASSWORD = '<ComplexPassword>'
  DEFAULT_ROLE = ACCOUNTADMIN
MUST_CHANGE_PASSWORD = false; -- user does not need to change the password on first login- Creates a new Snowflake user.
- Sets an initial password and default role.
Allow role to modify authentication methods
Grant the ability to modify authentication methods (e.g., add the RSA public key) to a powerful role such as ACCOUNTADMIN, or to a custom admin role.
GRANT MODIFY PROGRAMMATIC AUTHENTICATION METHODS ON USER <username>
TO ROLE ACCOUNTADMIN;
This lets the role update how the user logs in (e.g., key-based auth).
Delete and recreate a role (optional)
-- Clean up if the role exists
DROP ROLE IF EXISTS <role_name>;

-- Create the role
CREATE ROLE <role_name>;
Grant privileges to the role
Adjust database/schema names to your environment.
-- Basic USAGE on account-level objects
GRANT USAGE ON WAREHOUSE <warehouse_name> TO ROLE <role_name>;
GRANT USAGE ON DATABASE <database_name> TO ROLE <role_name>;
GRANT USAGE ON SCHEMA <database_name>.<schema_name> TO ROLE <role_name>;

-- Select/operate within schema
GRANT SELECT ON ALL VIEWS IN SCHEMA <database_name>.<schema_name> TO ROLE <role_name>;
GRANT SELECT ON ALL TABLES IN SCHEMA <database_name>.<schema_name> TO ROLE <role_name>;

-- Optionally, future grants
GRANT SELECT ON FUTURE TABLES IN SCHEMA <database_name>.<schema_name> TO ROLE <role_name>;
GRANT SELECT ON FUTURE VIEWS IN SCHEMA <database_name>.<schema_name> TO ROLE <role_name>;
Assign the role to the user
GRANT ROLE <role_name> TO USER <username>;2. Generate Keys with OpenSSL
Install OpenSSL on your machine. Then open a terminal (Command Prompt/PowerShell on Windows, or shell on macOS/Linux) and run the commands below. Replace paths and file names as needed.
This guide shows how to generate RSA keys and PEM certificates using OpenSSL on Windows.
Prerequisites
- Install OpenSSL(Latest version).
- Choose an output directory.
Example output directory:
D:/Snow/(create it if it doesn’t exist)
Reference
Please refer to the official Snowflake documentation: Key-pair authentication and key-pair rotation
Navigate to OpenSSL binaries
cd "C:\Program Files\OpenSSL-Win64\bin"Key Pair Authentication
You can generate an unencrypted RSA private key and extract its corresponding public key for authentication.
Use the following command to generate a 2048-bit RSA private key in PKCS#8 format without encryption:
openssl genrsa 2048 | openssl pkcs8 -topk8 -inform PEM -out D:/Snow/rsa_key.p8 -nocryptGenerate a public key
From the command line, generate the public key by referencing the private key. The following command assumes the private key is encrypted and contained in the file named rsa_key.p8.
openssl rsa -in D:/Snow/rsa_key.p8 -pubout -out D:/Snow/rsa_key.pubThe command generates the public key in PEM format.
-----BEGIN PUBLIC KEY-----
MIIBIj...
-----END PUBLIC KEY-----
PEM Certificate Authentication
Generate an encrypted PEM private key using AES-256 with a passphrase.
openssl genpkey -algorithm RSA -out D:/Snow/private_key.pem -aes256 -pass pass:admin@123Generate the Corresponding Public Key
openssl rsa -pubout -in D:/Snow/private_key.pem -out D:/Snow/public_key.pubThe command generates the public key in PEM format.
-----BEGIN PUBLIC KEY-----
MIIBIj...
-----END PUBLIC KEY-----
3. Assign the public key to a Snowflake user
Snowflake supports key pair authentication using RSA keys. Depending on the authentication method, the public key to register differs:
-
Key Pair Authentication
(PKCS#8): Use the public key derived from theunencrypted private key (rsa_key.pub). -
PEM Certificate Authentication
(Encrypted private key): Use the public key extracted from the PEM certificate(public_key.pub).
-- Set initial public key
ALTER USER <username> SET RSA_PUBLIC_KEY = 'MIIBIjANBgkqhkiG9w0BAQEFAAOCAQ8A...<snip>...QIDAQAB';
Live mode connection
In this type of connection, data is directly fetched from the source. Select the Live mode option for this connection.
Data Preview
- Click Connect to establish a connection with the Snowflake server using the configured details.
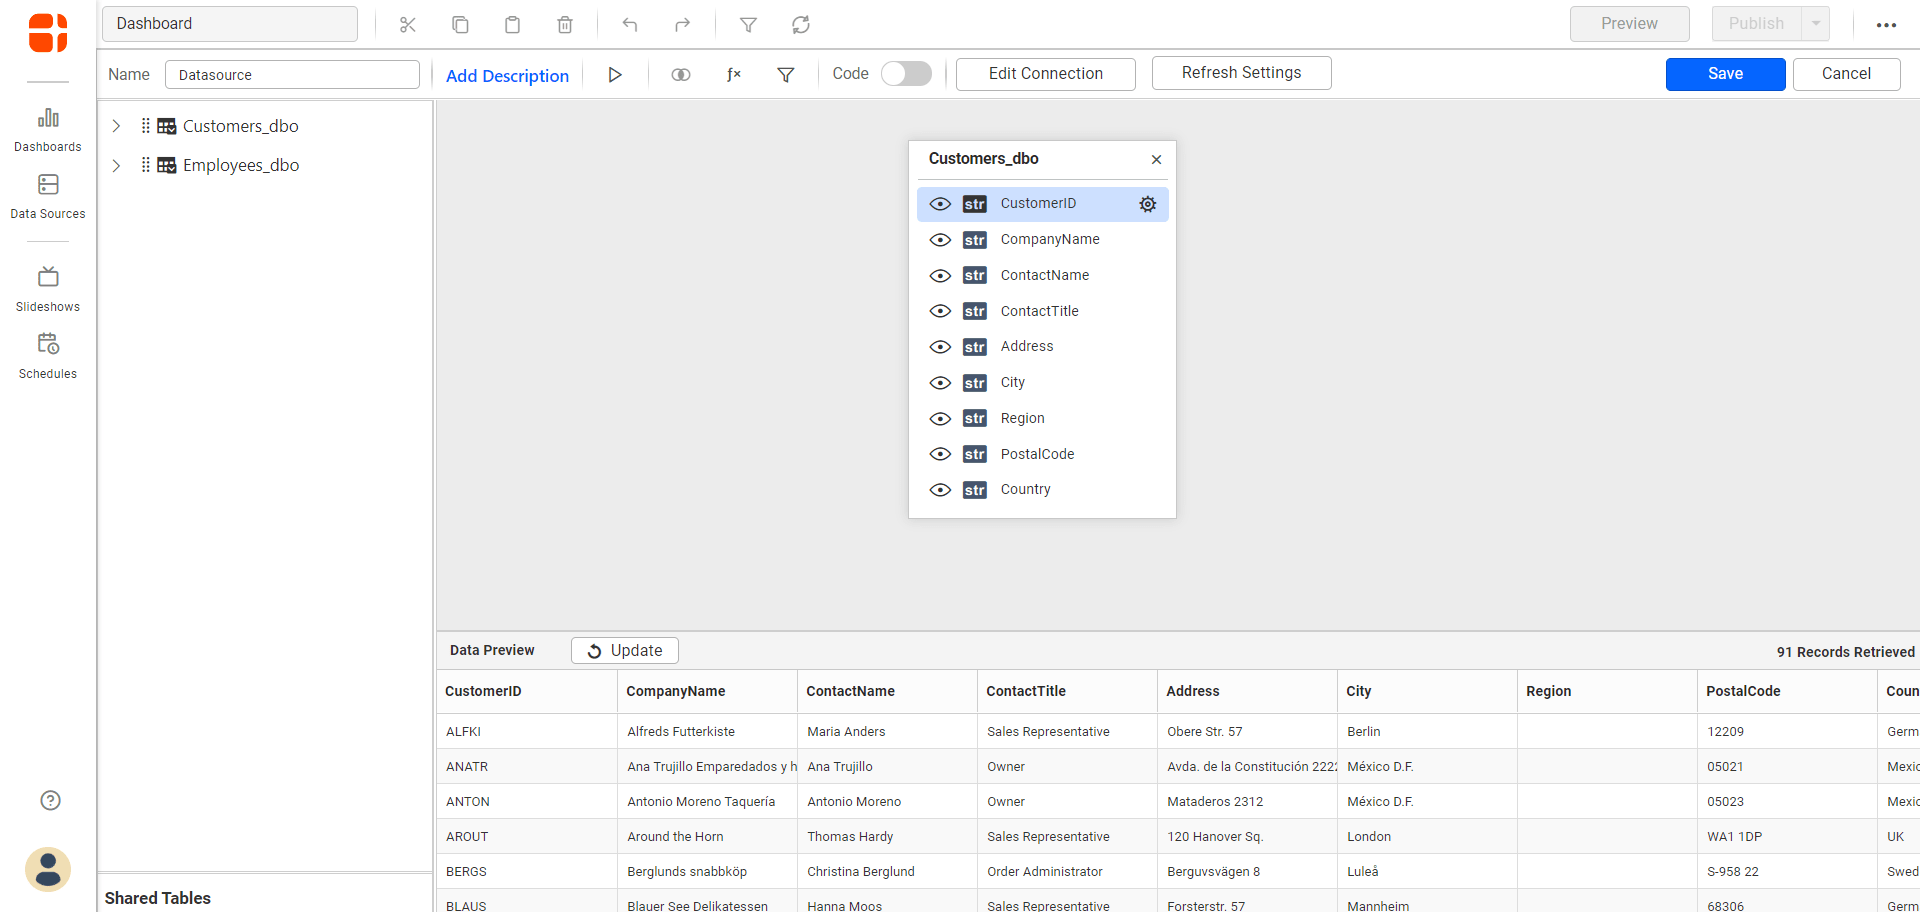
The schema represents the collection of lists retrieved from the Snowflake server. This dialog displays a treeview list of schemas and their corresponding values.
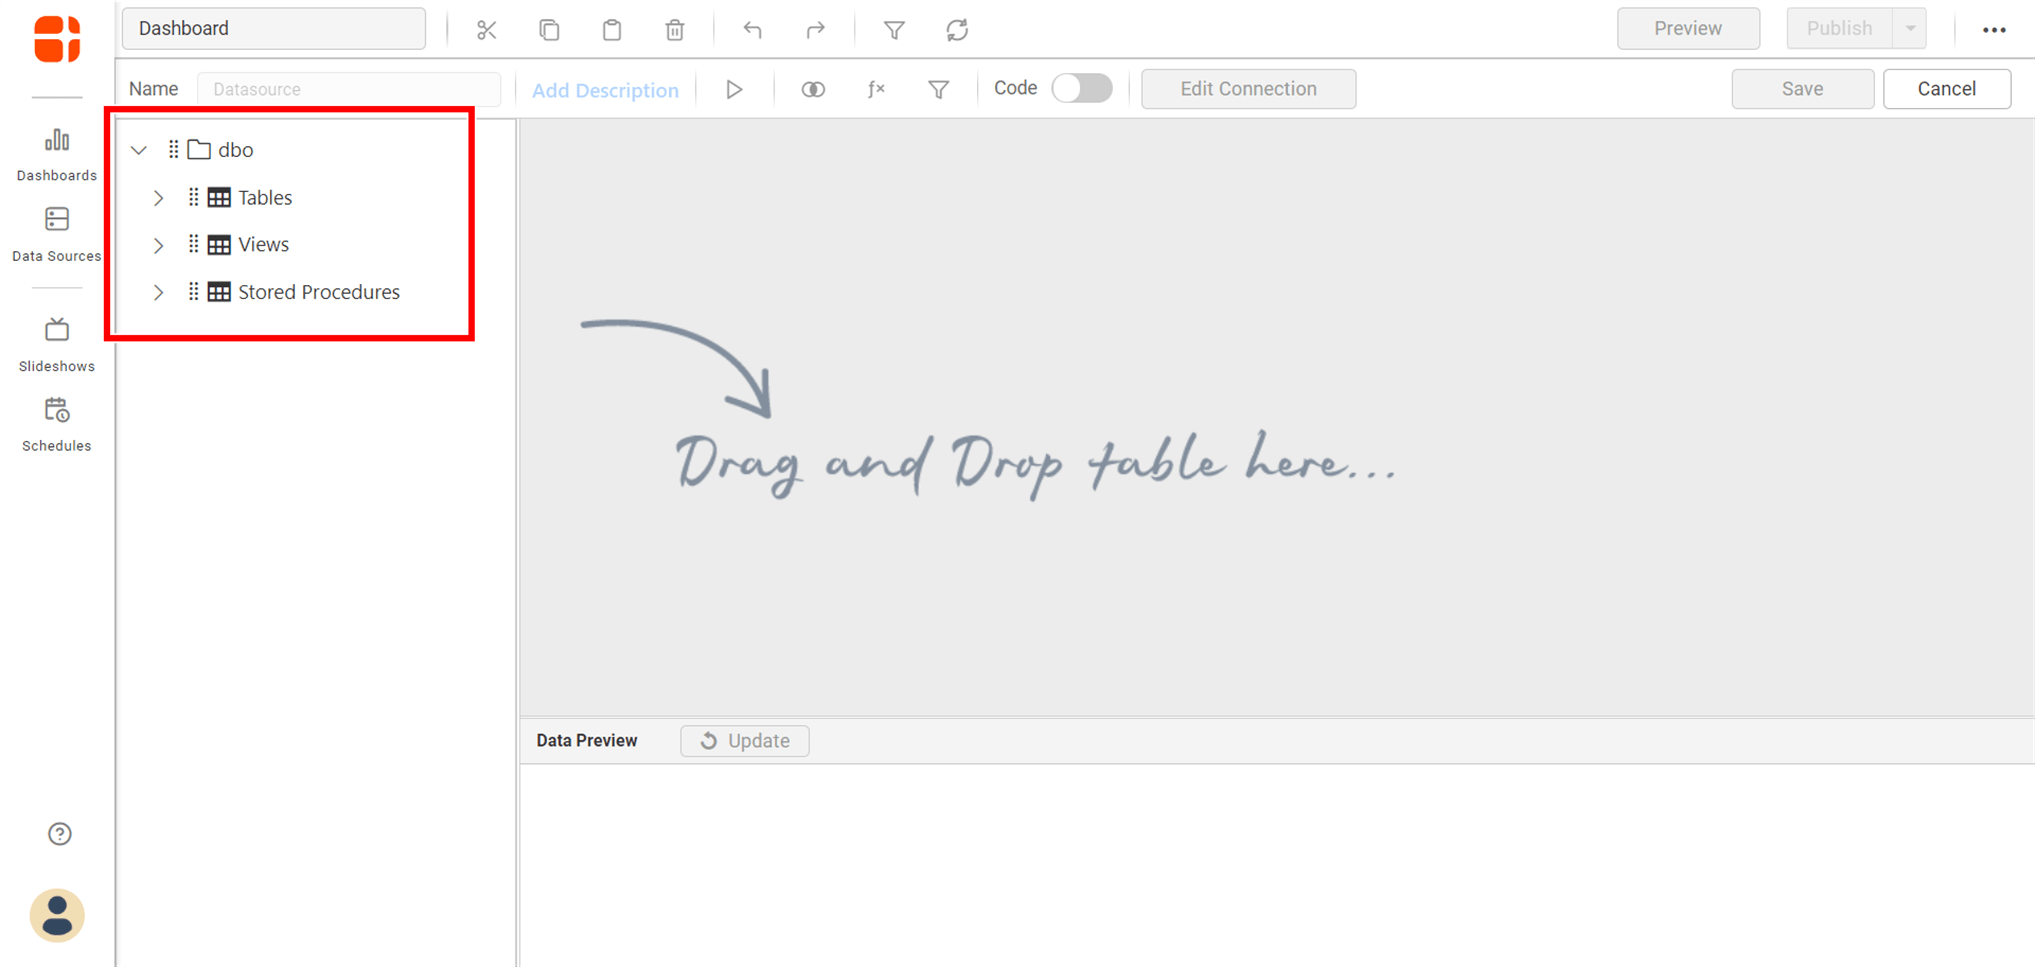
-
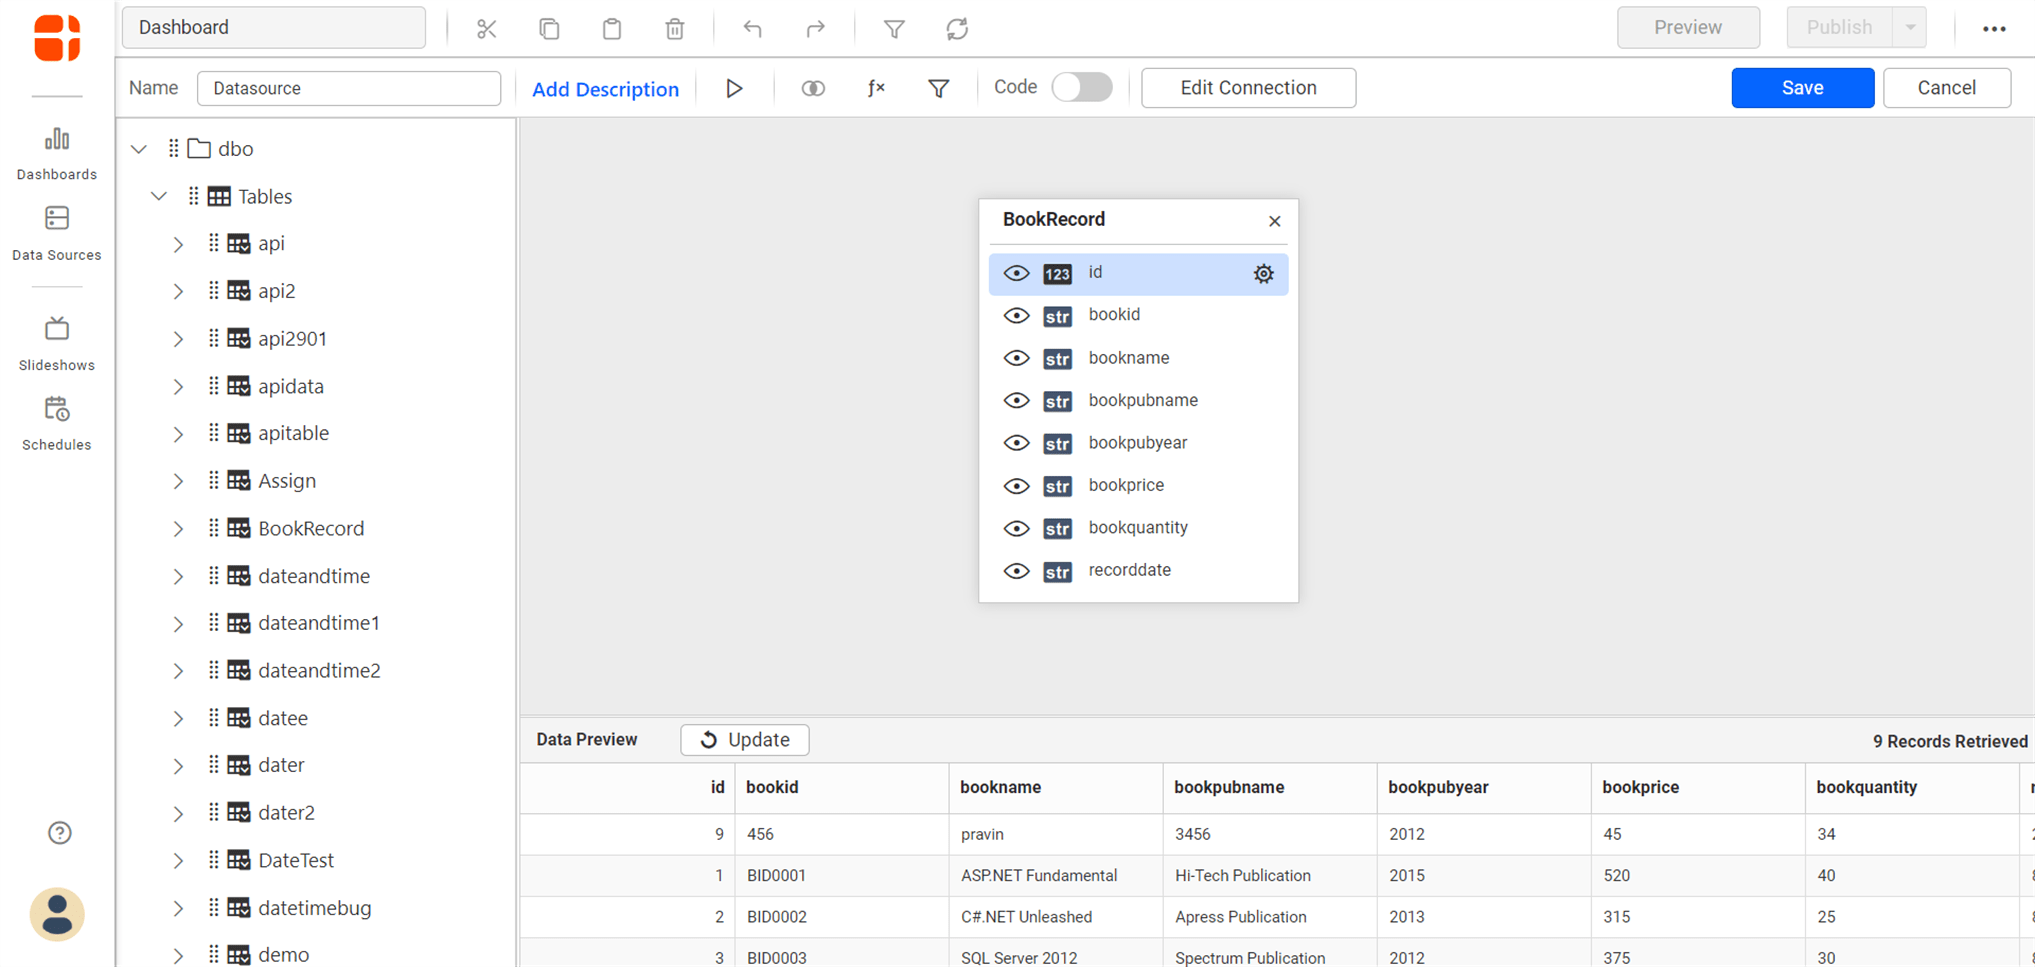
Now, the data design view page with the selected table schema opens. Drag and drop the table.
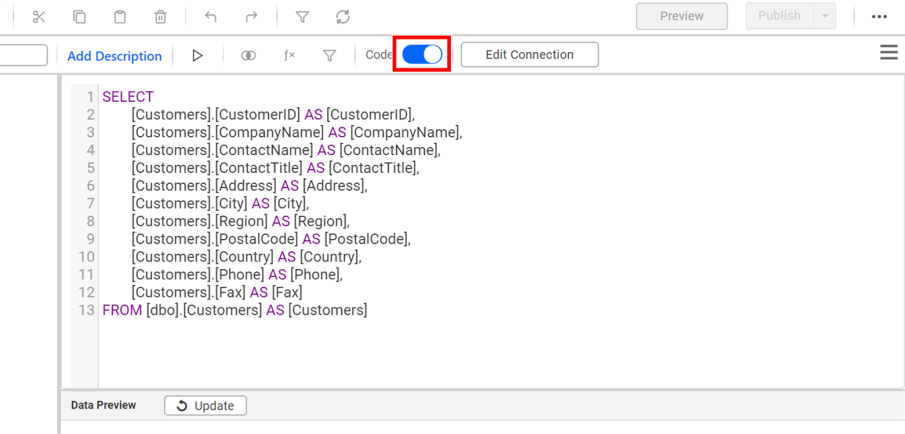
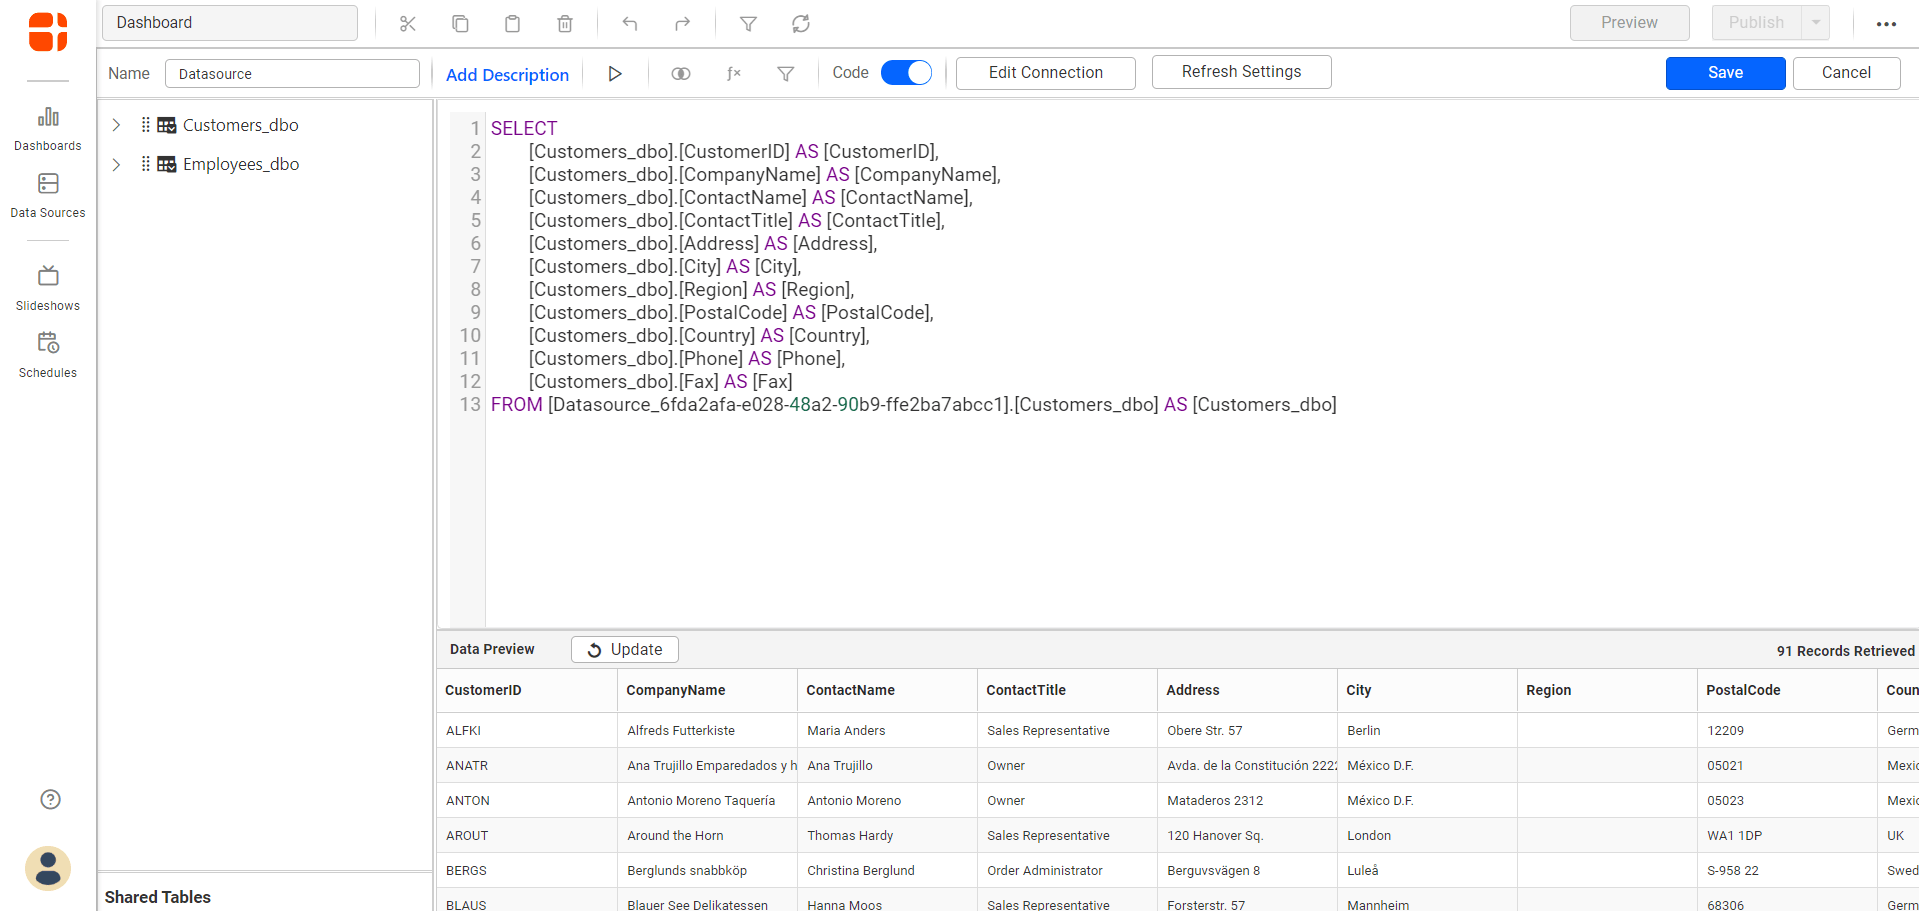
Either you can use the Code View options for passing query to display data.
-
Click Save to save the data source with a relevant name.
Extract mode connection
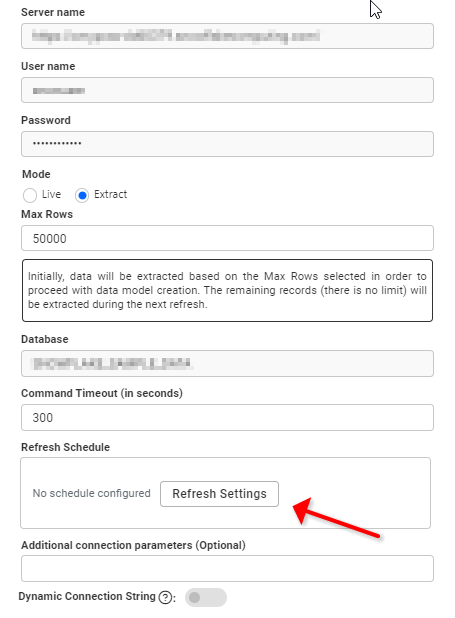
In this connection type, a data source is fetched from the source periodically. Choose the Extract mode option for this connection.
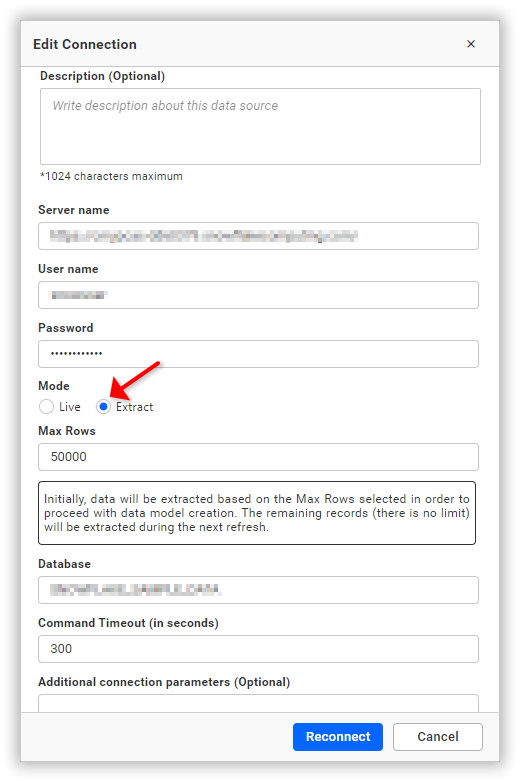
NOTE: Initially, data will be extracted based on the maximum number of rows selected in order to proceed with data model creation. The remaining records (with no limit) will be extracted during the next refresh.

Refresh settings
Steps to configure the data source refresh settings:
-
Click Refresh Settings in the configuration panel.
-
Select the recurrence type, recurrence start date, and end date in the Refresh Setting dialog box.
- Data refresh can be scheduled hourly, daily, weekly, and monthly.
- The Application Time Zone is displayed below the date picker. The start time of the schedule is converted to the client’s Time Zone and shown on the right side for users’ convenience. After selecting, click Schedule.

Preview and data import
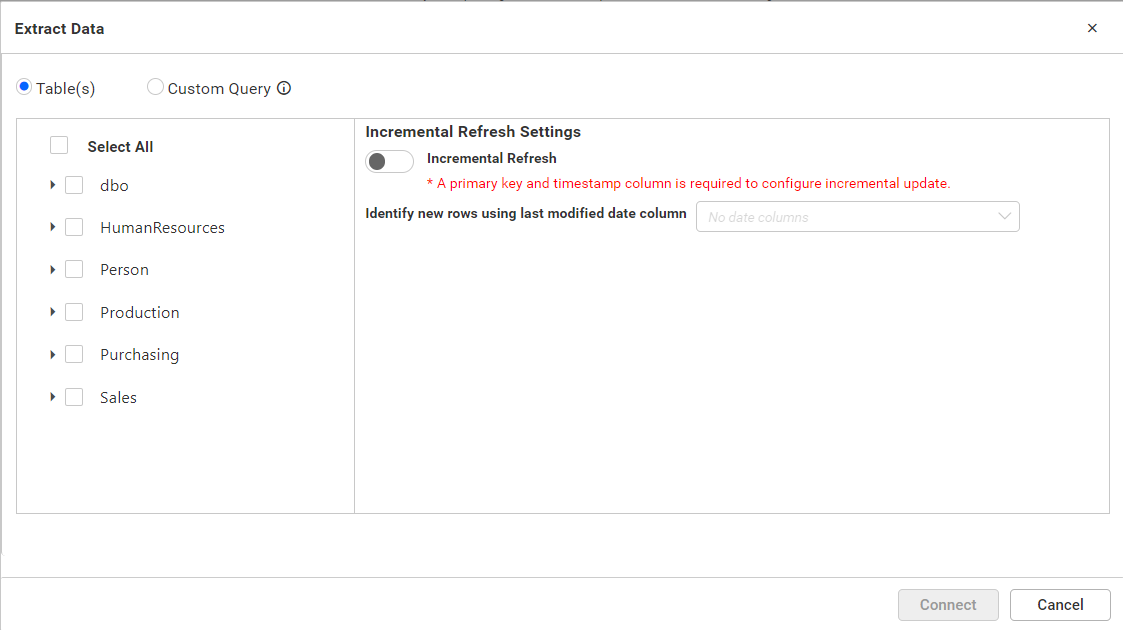
- Click Connect to establish a connection with the Snowflake server using the configured details.
- The Extract Data dialog opens. This dialog has two modes of connection either via Table or Custom query. Under custom query option, write the required query and click Connect.
Under Table option, this dialog displays list of tables and views in treeview. Select the required table(s) or view(s) from treeview to use in the designer. Incremental Update can be performed in both tables and views. The option is available for configuring incremental refresh column for the selected items in the right-side panel. * The table must have a primary key column and date column to configure the incremental refresh option. * Views must have a date column to configure the incremental refresh option, and unique column(s) are optional but can be used to update the modified records.
If you configured it, then the data source will work on Incremental update, otherwise works on Full load concept. And finally click Connect.
-
Now, the data design view page with the selected table schema opens. Drag and drop the table.
You can use the Code View options for passing query to display data.
-
Click Save to save the data source with a relevant name.
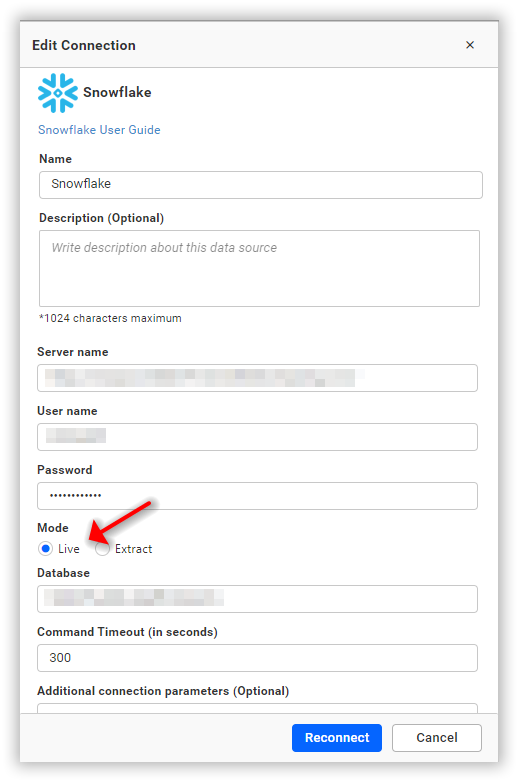
NOTE: In future, you can edit the connection information for both Live and Extract mode connections using the Edit Connection option.
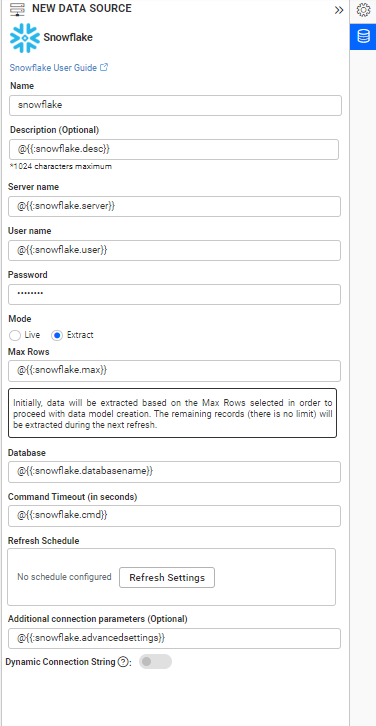
Connect using custom attribute and dashboard parameter
We have added support for custom attributes and dashboard parameters in the data source connection. You can now connect to the data source using custom attributes or dashboard parameters.
Custom Attribute
Dashboard Parameter
Note: Refer to the Dashboard Parameter Documentation and Custom Attributes Documentation for more details.
Connecting Bold BI to Snowflake using Session Variables
In Bold BI, support for Snowflake session variables has been extended to ensure that user-defined values can be set dynamically before query execution. This enhancement allows more flexible and secure parameter usage during runtime.
Steps to Configure Session Variables in Snowflake Data Source:
1. Create Data Source with Custom Attribute
a) When configuring the Snowflake Live connector, include the custom attribute in the Parameters field.
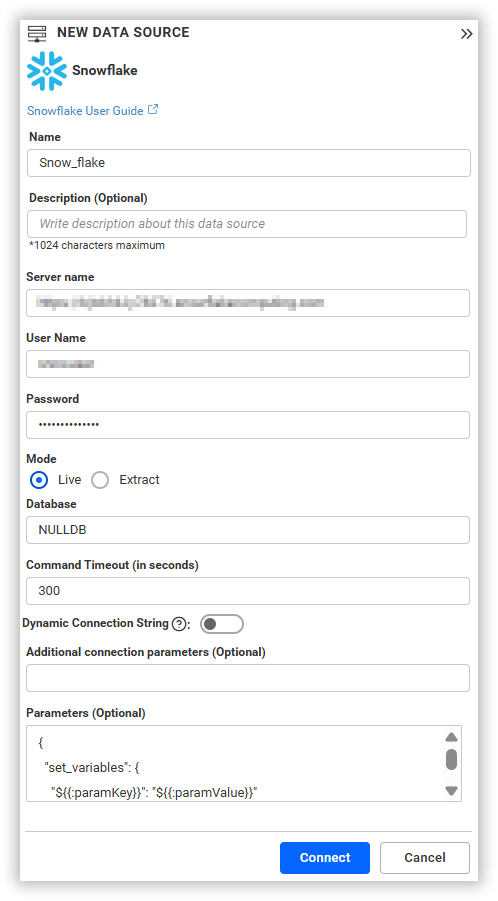
2. Add Custom Attribute
Add a custom attribute in the form of a key-value pair under the data source configuration. This attribute defines session variables that will be passed during query execution.

3. Use JSON Template Syntax
Use the following JSON format with Custom Attribute to define the session variables:
{
"set_variables": {
"${{:paramKey}}": "${{:paramValue}}"
}
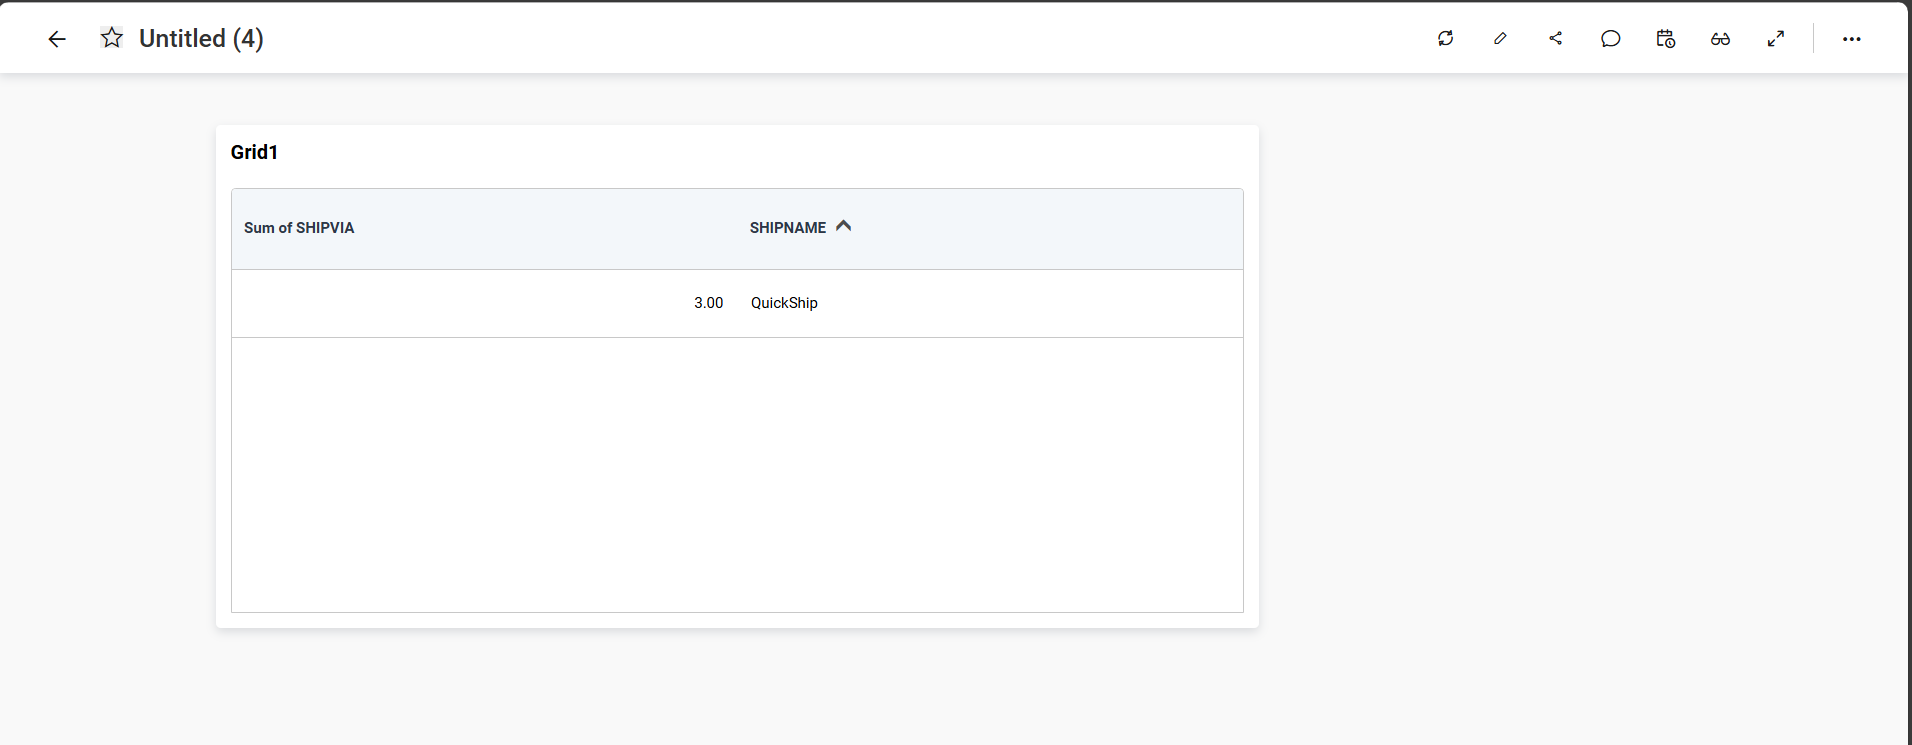
}4. Preview the Data
a) Once configured, Connect and continue to dashboard page to ensure that the variable is correctly passed and the query executes as expected.
For Example - Using Session Variables in Views
You can also create Snowflake views that reference session variables, as shown below:
//Drop View

DROP VIEW orderview;

//SET PARAM

SET SHIPNAMEPARAM = 'Express';

//Check view with SET PARAM

Create or replace View orderview AS SELECT "ORDERS"."ORDERDATE" AS "ORDERDATE", "ORDERS"."SHIPVIA" AS "SHIPVIA", "ORDERS"."FREIGHT" AS "FREIGHT", "ORDERS"."ORDERID" AS "ORDERID", "ORDERS"."SHIPCOUNTRY" AS "SHIPCOUNTRY", "ORDERS"."SHIPNAME" AS "SHIPNAME" FROM "NULLSCHEMA"."ORDERS" AS "ORDERS" WHERE SHIPNAME = $SHIPNAMEPARAM;

//Check query with SET PARAM

SELECT "ORDERS"."ORDERDATE" AS "ORDERDATE", "ORDERS"."SHIPVIA" AS "SHIPVIA", "ORDERS"."FREIGHT" AS "FREIGHT", "ORDERS"."ORDERID" AS "ORDERID", "ORDERS"."SHIPCOUNTRY" AS "SHIPCOUNTRY", "ORDERS"."SHIPNAME" AS "SHIPNAME" FROM "NULLSCHEMA"."ORDERS" AS "ORDERS" WHERE SHIPNAME = $SHIPNAMEPARAM;
Sample JSON response
{

    "set_variables": {

    "SHIPNAME": "SHIPNAMEPARAM"
    }
}
Connecting Bold BI to Snowflake Data Source via REST API
Prerequisites
Supported Server Editions: Standard, Enterprise and Business Critical
Type while creating the data source needs to be snowflake.
Modes
Through the REST API, only the live mode data source can be created and edited.
Parameters for creating Data Source
NOTE: The ability to provide join support is only available during the creation of a new data source. Join in edit connection mode is not supported.
| Parameters | Details |
|---|---|
| Servername required | string
Server name or Host name of the connection |
| Port required | string
Port number used to connect to snowflake
|
| Username required | string
A valid username for the connection |
| Password required | string
A valid Password for the connection |
| Database required | string
database which needs to be connected |
| Schemaname required for table mode | string
Enter a valid Schemaname |
| Tablename required for table mode | string
Enter a valid Tablename |
JoinType Required For Join Info | string
Enter a valid JoinType For Example (Inner,Outer) |
| LeftTable Required For Join Info | string
Enter a valid Left Table name |
| RightTable Required For Join Info | string
Enter a valid Right Table name |
| LeftField Required For Join Info | string
Enter a valid Left Table Column Name |
| RightField Required For Join Info | string
Enter a valid Right Table Column Name |
| Condition Required For Join Info | string
Enter a valid Condition For Example (AND,OR) |
| LeftField Required For Join Info | string
Enter a valid Left Table Column Name |
| Operator Required For Join Info | string
Enter a Valid Operator For Example (=,>=) |
| Value Optional For only Join Info | string
Specifically choose the column values. |
| Query required for code view mode | string
Enter a valid Query |
| AdvancedSettings optional | string
Additional optional connection parameters can be provided. By default, it is empty. |
| CommandTimeout optional | string
Enter a valid Timeout for connection. By default, it is 300 |
| Expressions optional | `Array of Objects` |
Parameters for edit the connection while upload the dashboard via API
| Parameters | Details |
|---|---|
| ServerName required | string
Server name or Host name of the connection |
| Port required | string
Port number used to connect to snowflake
|
| UserName required | string
A valid username for the connection |
| Password required | string
A valid Password for the connection |
| Database required | string
database which needs to be connected |
| Schema required for table mode | string
Enter a valid Schemaname |
| AdvancedSettings optional | string
Additional optional connection parameters can be provided. By default, it is empty. |
| CommandTimeout optional | string
Enter a valid Timeout for connection. By default, it is 300 |
Parameters for adding expressions when creating Data Source
| Parameters | Details |
|---|---|
| Name required | string
Name of the Expression
|
| Expression required | string
Expression
|
Parameters for editing Data Source
NOTE: To edit the data source via API, all parameters are optional. Only provide the parameter that needs to be changed.
Parameters for modifying expressions when editing Data Source
| Parameters | Details |
|---|---|
| Name required | string
Name of the Expression
|
| Expression required | string
Expression
|
| Action optional | string
add/delete/edit
By default, it is add.
|
| NewName optional | string
For renaming the expression. This is applicable only if the Action is edit
|
Connection Sample for Table Mode
For creating connection:
"Connection":
{
"Servername": "string",
"Port": "string",
"Username": "string",
"Password": "string",
"Database": "string",
"Schemaname": "string",
"Tablename": "string",
"AdvancedSettings": "string",
"CommandTimeout": "300",
"Expressions" : [{
"Name": "Expression1",
"Expression" : "SUM(numeric expression)"
    },
    {
"Name": "Expression2",
"Expression" :  "UPPER(string expression)"
}]
}
For creating connection with multiple tables :
"Connection":
{
"Servername": "string",
"Port": "string",
"Username": "string",
"Password": "string",
"Database": "string",
"Tables": [
            {
                "Tablename": "string",
                "Schemaname": "string"
            },
            {
                "Tablename": "string",
                "Schemaname": "string"
            }
        ],
"JoinInfo": [
            {
                "JoinType": "string",
                "LeftTable": "string",
                "RightTable": "string",
                "JoinFieldInfos": [
                    {
                        "Condition": "string",
                        "LeftField": "string",
                        "Operator": "string",
                        "RightField": "string",
                        "Value": "string"
                    },
                    {
                        "Condition": "string",
                        "LeftField": "string",
                        "Operator": "string",
                        "RightField": "string",
                        "Value": "string"
                    }
                ]
            }
        ],
"AdvancedSettings": "string",
"CommandTimeout": "string",
"Expressions" : [{
"Name": "Expression1",
"Expression" : "SUM(numeric expression)"
    },
    {
"Name": "Expression2",
"Expression" :  "UPPER(string expression)"
}]
}
For editing connection:
"Connection":
{
"Servername": "string",
"Port": "string",
"Username": "string",
"Password": "string",
"Database": "string",
"Schemaname": "string",
"Tablename": "string",
"AdvancedSettings": "string",
"CommandTimeout": "300",
"Expressions" : [{
"Name": "Expression1",
"Expression" : "SUM(numeric expression)",
"NewName" : "Sum",
"Action": "edit"
    },
    {
"Name": "Expression2",
"Expression" :  "UPPER(string expression)"
"Action": "delete"
}]
}
NOTE: Through the Rest API, the data source can be created or edited with only one table. If different table is provided in edit data source, the table will be replaced. The widgets will be retained only if the schema is same as the previous table.
Connection Sample for Code View Mode
"Connection":
{
"Servername": "string",
"Port": "string",
"Username": "string",
"Password": "string",
"Database": "string",
"Query": "string",
"AdvancedSettings": "string",
"CommandTimeout": "300",
"Expressions" : [{
"Name": "Expression1",
"Expression" : "SUM(numeric expression)"
    },
    {
"Name": "Expression2",
"Expression" :  "UPPER(string expression)"
}]
}
Sample connection for editing the connection while uploading the dashboard via API.
"Connection":  {
       "ServerName": "string",
       "Database": "string",
       "UserName": "string",
       "Password": "string",
       "AdvancedSettings": "string",
       "CommandTimeout": "string",
       "Schema": "string"
  }
How to filter active warehouse through connection parameters for Snowflake data source
The Bold BI application allows you to filter the warehouse through connection parameters in the Snowflake data source by following these steps.
Steps to connect the snowflake with the active warehouse
-
Refer to the Connecting Bold BI to Snowflake data source for successfully connecting to it.
-
For connecting the Snowflake with warehouse connection, you need to add the connection string Warehouse=WarehouseName in the Additional connection parameters textbox along with the existing server details and click Connect.
In this way, you can filter the warehouse connection by passing parameters in the connection string.
-
Drag and drop the table from the table schema in the data design view page.

-
Click Save to save the data source with a relevant name in order to proceed with designing a dashboard.

Related links
- Choose Snowflake data source
- Connect to Snowflake
- Authentication Mechanisms
- Live mode connection
- Extract mode connection
- Connecting Bold BI to Snowflake using Session Variables
- Connecting Bold BI to Snowflake Data Source via REST API
- How to filter active warehouse through connection parameters for Snowflake data source
- Related links
Having trouble getting help?
Contact Support- Choose Snowflake data source
- Connect to Snowflake
- Authentication Mechanisms
- Live mode connection
- Extract mode connection
- Connecting Bold BI to Snowflake using Session Variables
- Connecting Bold BI to Snowflake Data Source via REST API
- How to filter active warehouse through connection parameters for Snowflake data source
- Related links
Having trouble getting help?
Contact Support